Basics and Datatypes
Welcome to Week 1!
Week 1 Goal
In this week, you'll get up and running with Python. You'll learn what a program is and how to write and run programs that use Python's basic data types and operators.
Topics Covered
Here are some of the specific topics you'll learn in these lessons:
- Comments let us put text in a program that will be ignored by the program but are useful for humans reading the program. Comments in Python start with the
#sign. - Variables are a way to store data with a name, so you can use it later. Creating a variable looks like
name = "Mo"orage = 22 - Strings are the Python data type for text, and they look like
"hello world" - Ints and Floats are the Python data types for numbers, and they look like
9or0.7 - Python can use operators like
+to add numbers or concatenate strings printshows output to the user, andinputasks the user to type in text- Strings can be concatenated (added together) using the
+and usingf-strings - You can format strings a variety of ways using f-strings
What is a program?
Everything you do on the computer has a computer program — “software” — behind the scenes.
We write computer programs to help us solve problems or perform tasks, like editing documents, browsing web pages, sharing images, or chatting with friends.
Everything on a computer is a program behind the scenes.
This very moment, you are reading on a computer, with a web browser. The browser is a program, built by a large team. But, how do they actually do it? What does a program look like when they are writing it? How does it work?
This is the question we'll focus on first: What are computer programs?
- Programming languages let us write instructions for computers using words
- Programming languages get translated into 1s and 0s the machine understands
- Python is a beginner-friendly language that has tons of real-world use
- You can make basic programs in Python using
print,input,+, and=
Programs are...
Programs are text that a computer can execute as instructions.
That means you can read them and write them with the keyboard.
Programs use special symbols and keywords. The symbols and the order they have to go in is called the syntax.
If a program has valid syntax, then the computer can run it. If the program has the right logic, it will do what the programmer wanted. The syntax, grammar, and vocabulary make up a Programming Language.
We're learning Python, so we're going to learn what words and symbols are allowed in Python, and how to structure them to make the computer do what we want.
Translating for machines
Underneath the screens and keyboards, computers are mechanical. They only understand 1s and 0s. But, people don’t think in 1s and 0s! When you want something, you use words.
So, how do we tell computers what we want them to do, like “send a message” or “show this webpage”?
We need a translator.
Programming languages let us write instructions for computers using words. Those words translate into instructions that the machine understands (1s and 0s). Then, we can type something like “send a message”, and it’ll get translated into something like 00011101001010001 001010010001001 101000010010100 10001010001010100000 01001010010, which will make the computer send the message.
A Very Picky Translator
Programming languages are very picky about what you type in. You can’t actually type in send a message — the programming language wouldn’t understand! Instead, it would be more like send_message("Hello!") . The program has to be crafted precisely, with lots of attention to detail, so that the programming language knows exactly what you mean.
Programming languages only understand a few specific words and symbols, in a few specific combinations. Those words, symbols, and combinations are the vocabulary, grammar and syntax of a programming language — and that’s what you’ll learn in this course!
What is Python?
Python is a programming language. You can write Python code, and then it will turn into instructions the computer understands and runs.
Here’s a small program that prints out 10 copies of the word “Programming”.
message = "Programming"
number_of_copies = 10

print(message * number_of_copies) # ProgrammingProgrammingProgrammingProgrammingProgrammingProgrammingProgrammingProgrammingProgrammingProgramming
As you can see:
- It uses words, like
messageandprintand numbers like10 - It uses symbols like
=,*, and() - The words and symbols are arranged in a particular order
What is python used for?
- Python is a general purpose programming language, which means it’s a good fit for a wide variety of problems.
- Python is popular for data science, mathematics, web development, and more. It’s commonly used for “scripting” - small programs to do specific tasks.
- Python is a widely recommended language for beginners. The syntax is not as hard to get started with as some other languages, and you can build cool, real-world projects with it.
How do you write programs?
We need two things to start writing programs of our own:
- A Text Editor: A tool to write text
- An Interpreter or a Compiler: A tool to translate your code to computer-executable programs.
In this course, we recommend using VSCode as your text editor, and the built-in terminal for VSCode to run the Python interpreter.
We'll also use Replit for other helpful features: multiplayer mode and sharing.
Further Exploration: Plain text vs. Rich text
Why not use something like Google Docs to write code?
Google docs is awesome for writing formatted text. It's got highlighting, different fonts, sizes, alignment, tables, and lots of different options for formatting.
But... Python doesn't understand any of that formatting. Python only understands the text. That's true of most programming languages: they only consist of text.
Google docs is known as a "Rich Text Editor". It's the text, plus the formatting.
For programming, we use something called a "Plain Text Editor", or just "Text Editor". That means we can't use bold, center, or other formatting options. We only type the characters and symbols.
But... in the examples above, the code has colors!?
Text Editors for programming have features like Syntax Highlighting that display your code in color to help you. The colors aren't saved with the code, and you can't change them word-by-word. Replit has built-in features like Syntax Highlighting, so you don't have to worry about it as long as you're using Replit.
A Brief Tour of Python
Over the next few weeks, you’ll learn about Python in more detail.
First, we'll quickly illustrate some of the basics, to get you started.
Comments: Explaining your code
Programs are written and read by people.
That means that when writing code, we prioritize both making the computer do what we want and making sure someone else can understand what the code means.
We can help others make sense of our code through its structure, and with comments.
In the example below, the first two lines are code comments.
# Prints "Programming" ten times
# string * number copies the string that many times
message = "Programming"
number_of_copies = 10
print(message * number_of_copies)
Comments communicate with the other people that read our code. While code can sometimes make sense on its own, comments fill gaps in explanation.
In Python, comments start with the # character (called ‘hash’ or ‘octothorp’). Anything after the # gets ignored by Python - it won’t try to run it as code.
In Kibo, we’ll often use comments to explain code and to illustrate what code does. When you see a snippet like:
# prints message lots of times
print(message * number_of_copies)
# => ProgrammingProgrammingProgrammingProgrammingProgrammingProgrammingProgrammingProgrammingProgramming
The comments explain the result of running the code.
Print: Showing output from your program
The easiest way to make your program display some result is to use print.
Here’s an example:
print("This is the output")
The program would output:
This is the output
- You use the keyword
print - Then parentheses
- Inside the
( )you put the value you want to show - Text has to go in inside quote marks
" "
To run code in line with the lessons, we'll use Trinket,
Click the ▶️ button to run the program and see the output.
Variables: Storing values to reuse
You can give a value a name, and use it later, using a variable.
message = "I love programming"
print(message)
print(message)
print(message)
message is a variable. It stores the value "I love programming".
The equals sign = assigns the value to the variable.
The program would output:
I love programming
I love programming
I love programming
Click the ▶️ button to run the program and see the output.
Adding things together with +
In Python, you can add things together with the + operator.
print(10 + 10) # 20
print(10 + 154) # 164
print(12345 + 23456) # 35801
Computers are good at arithmetic — they are very fancy calculators.
Python can also add text together with +:
message = " loves programming"
print("Adesola" + message)
print("Chidi" + message)
print("Ebbe" + message)
The program would output:
Adesola loves programming
Chidi loves programming
Ebbe loves programming
Click the ▶️ button to run the program and see the output.
Input: get some data from the user
Python can ask the user to type in a message using input.
favorite = input("What is your favorite thing? ")
print("I like " + favorite + " too!")
When the program sees input, it prints the message and waits for the user to enter their response. Then, it continues from there.
The variable favorite stores the value that the user typed in.
If the user typed in playing soccer, then the output would look like:
What is your favorite thing? playing soccer
I like playing soccer too!
When you run this program, be sure to click in the “Result” box to type a response, and press Enter.
In summary
- Programming languages get translated into 1s and 0s the machine understands
- Python is a beginner-friendly language that has tons of real-world use
- You can make basic programs in Python using
print,input,+, and=
Data types
What you need to know about data types
- Python can store different types of data
- The basic types of data you’ll learn about first are:
- Strings
- Integers
- Floats
- Booleans
- Python can do different operations based the data type
- like
+to add numbers together
- like
Basic Data Types
Your name, age, date of birth, and photo are different pieces of data. Data, and the variables that refer to them, are represented by different types.
Every programming language has data types, but the built-in types are different from one programming language to another. In Python, we have more than 10 built-in data types. Here are the 3 types we need in this lesson:
- int (for integer)
- Represents integer numbers, like
1,4, or10
- Represents integer numbers, like
- float (a floating-point number)
- Represents floating-point numbers, like
1.0,4.32, or10.189 - You might know these as ‘decimal’ numbers or fractions - numbers that have a dot separating the integer part from the fractional part.
- Represents floating-point numbers, like
- str (for string)
- Stores text as character-based data like words, e.g.,
Hello World
- Stores text as character-based data like words, e.g.,
These are called primitive types. Python can represent more complicated data using compound types like List and Dictionary, which are made out of the primitive types. We’ll learn about some of those in later lessons.
Python figures out the type automatically based on some rules:
- numbers without a decimal point are treated as ints (like
10) - numbers with a decimal point are treated as floats (like
1.0) - text between quote marks is treated as strings (like
"Hello"or'100.5')
There are more rules for other types, but we're skipping them for now.
Video: Data Types
Data Types
Every value in Python has a type, for example, string, float, and integer. You can find out what type a value is by using the type() function.
Strings
Strings are for representing text.
They look like this: "Kibo School", starting and ending with ", the double quote.
When you add them together with +, Python concatenates the strings. It sticks them together end to end, like this:
school_name = "Kibo"
print("I love " + school_name) # "I love Kibo"
They are called strings because they are a series (a ‘string’) of characters. The string "Kibo" is made of the characters 'K', 'i', 'b', 'o'.
Integers
Integers are for representing positive and negative whole numbers.
They look like numbers: 10, 9019, or -5
Python works like a calculator. It can do math with +, -, *, / and more.
10 + 5 # 15

value = 100
value + 10 # 110
value - 10 # 90
value * 10 # 1000
value / 10 # 10
Floats
Floats are for representing fractional numbers
They look like numbers with a decimal point: 10.5, 90.19, or -0.781
Python stores them differently from integers, so they show something different when you call type on them
TypeErrors
TypeError is a common error you get when the types don’t match, like if you tried to add a string and a number.
"Hello" + "5" # "Hello5"
"Hello" + 5 # TypeError
There are lots more Python types that we didn’t cover. You can look them up by using Google to find the Python documentation.
Question: What do you happens when you add a float and an integer? Try to guess the answer first, then try it out in the Python interpreter.
Operators
Operators are symbols or characters that perform specific operations on operands, such as variables or values.They allow us to manipulate data and perform various calculations or comparisons.
There are different types of operators in Python. In this week, we will learn about arithmetic operators and assignment operators. Next week, we will learn about comparison operators and logical operators. We will learn about more operators in future lessons.
Arithmetic Operators
+performs addition-performs subtraction*performs multiplication/performs division**performs exponentiation%performs modulo operation (the remainder after integer division)
What would happen?
Try to guess what each snippet would print out. Then, click the arrow to see an explanation.
print(5 + 10)
print(5 + 10)
It would print 15.
First, python adds 5 and 10, then it does the print.
print(4 + 3 * 2)
print(4 + 3 * 2)
It would print 10.
First, python multiplies 3 and 2 and gets 6. Then it adds 6 to 4, then it prints the final result.
There are other operators, like comparison, assignment, and logical operators. We will cover assignment operators in this lesson, and the rest in future lessons.
Using the Repl to explore
The best way to learn how the Python operators behave is to try out different operators and see what they do.
- Open a Python repl on your computer by entering
pythonin a terminal - Set a timer for 5 minutes and try to find out as much as you can about the operators.
- Ask yourself questions, then try entering the code in the REPL to answer your question.
Variables and assignment
What you need to know about variables
- A variable is a name you give to data, so you can use it later in the program
- You assign a value to a variable with
= - There are lots names you can use for variables, but there are some rules
- Using meaningful variable names makes your program better
Video: What are variables?
Assignment Operators
We learned about the = operator which is also called the assignment operator. It assigns the value on the right to the variable on the left.
There are other assignment operators in Python, which are shortcuts for doing math and assigning the result to a variable.
For example, the += operator adds the value on the right to the variable on the left, and assigns the result to the variable on the left.
x = 10
x += 5 # x is now 15
There are other similar assignment operators, like -=, *=, /=, and %= that works the same way.
Variable Names
Good and Bad Variable Names
Variable names should be descriptive and help a reader understand the code.
For example, take a look at the code below:
x1q3z9ocd = 35.0
x1q3z9afd = 12.50
x1q3p9afd = x1q3z9ocd * x1q3z9afd
print(x1q3p9afd) # 437.5
The variable names above are allowed in Python, but they are not helpful.
Contrast with:
hours = 35.0
pay_rate = 12.50
pay = hours * pay_rate
print(pay) # 437.5
These variable names are descriptive and helpful!
Practice: Assigning and printing variables
Solution (try for 5 minutes before looking!)
books_read = 13
print(books_read)

meals_eaten = 4
meals_eaten = meals_eaten + 1
# you can use the += operator to do the same thing:
# meals_eaten += 1

print(meals_eaten)
Input and output
Key ideas
- Show output with
print() - Get data from the user with
input()
Printing Output
Websites and apps you have used in the past have a whole screen full of text and buttons. Eventually, you’ll learn to build those kinds of programs, but we’re starting with the basics: programs that work with text.
print shows some output to the Console:
print("Hello, world")
You’ve written code like this from your first “Hello, World” program. When you run it, the output shows up.
On early computers, there was only a text console. On the earliest computers, there wasn’t a screen at all. Instead, the output was printed out on paper. The output now shows up in the Console in our web browser, but we still call the function print.
print("We can print any string we want")
x = ("If the string is in a variable, we can print the variable")
print(x) # If the string is in a variable, we can print the variable
Getting Input from the User
You've already used the input() function in earlier challenges to get the name from the user.
When Python sees input:
- It prints out the arguments to
input, similar toprint. - It pauses to wait for the user to type something in
- It waits for the user to press Enter
- When the user presses Enter,
inputgives the program the text that the user typed in
We can design lots of text-based interactions using input. A calculator, a search engine, a quiz, a chatbot - all of these and more can be designed to use text input and output.
Converting Inputs
The input() function returns a string. If you want a number, need to convert the data type using int or float.
response = input("How old are you?")
age = int(response)
It’s common to see the input and the conversion all at once, like this:
age = int(input("How old are you?"))
Converting to a float is similar:
soda_price = float(input("How much does a soda cost?"))
What does python do if you try to convert a string like "3.5" to an integer using int?
int("3.5") # ValueError: invalid literal for int() with base 10: '3.5'
⚠️ Python doesn’t want to accidentally lose information. Instead of guessing whether you want to round up or down, it raises a ValueError and halts the program.
Practice: Assigning and printing user input
Experimenting With Print
print()
print
print("Hello", "world")
What happens when there’s nothing between the parentheses? Or if you leave off the parentheses? Or if you put more than one thing between the parentheses?
Sometimes, the best way to find things out about how Python works is to try it out.
Experiment with
Print with multiple arguments
The print() function can take more than one argument. It can have more than one thing inside the parentheses (...)
However, you must separate arguments by commas.
name = "Emmy"
print("Hello" name) # SyntaxError: invalid syntax (because there's no comma)
print("Hello", name) # Hello Emmy
Example: Input and Output
Here's the code for the exercise:
1. first_num = int(input("enter first number: "))
2. second_num = int(input("enter second number: "))
3.
4. total = first_num + second_num
5.
6. print("the sum is: ", total)
In plain English, here is what the code does:
- line 1: Ask the user for an input. Convert the input to an integer, and store it in a variable named
first_num - line 2: Ask the user for another input. Convert the input to an integer, and store it in a variable named
second_num - line 4: Add
first_numandsecond_numand put the result in a third variable namedtotal - line 6: Print out the string
"the sum is"and the value of the variable namedtotal
Practice: Add three numbers
Solution: Add Three Numbers
first_num = int(input("enter first number: "))
second_num = int(input("enter second number: "))
third_num = int(input("enter third number: "))

total = first_num + second_num + third_num

print("the sum of the three numbers is: ", total)
String concatenation and f strings
Key ideas
- Using formatted strings
- Concatenating strings
String Concatenation and f-strings
When there’s a variable we want to combine with a string to print out a message, so far we’ve added the strings with +.
name = "Mercy"
print("Hello, " + name) # Hello, Mercy
When the message is longer, this becomes more confusing and harder to type.
name = "Mercy"
print("The alarm went off at exactly 6:00 AM as it had every morning for the past five years. " + name + " began her morning and was ready to eat breakfast by 7:00 AM. The day appeared to be as normal as any other, and " + name + " was not expecting anything to change.")
There’s another way to format long text that uses variables, called f-strings.
name = "Mercy"
print(f"Hello, {name}") # Hello, Mercy
print(f"The alarm went off at exactly 6:00 AM as it had every morning for the past five years. {name} began her morning and was ready to eat breakfast by 7:00 AM. The day appeared to be as normal as any other, and {name} was not expecting anything to change.")
Instead of using + to combine the variable and the string, we start the string with f and we use {} to insert the variable right inside the string. That way, there’s less confusion about quote marks and spaces.
Check the following video on how to check some commands using python console.
Other f-string uses
We can also use f-strings for rounding.
one_third = 1/3
print(one_third)# 0.3333333333333333
print(f"{one_third:.2}") # 0.33
f-strings have other formatting powers, but we’ll leave it at rounding floats for now.
Practice: f-strings
Open a new file in VSCode to practice with f-strings.
- Try printing some messages using f-strings and variables
- Try rounding a float to a specific number of digit
Looking at the f-strings documentation, what other tricks do you want to try? If you find something you think is particularly useful or interesting, share it with your classmates in Discord.
Solution: F-strings practice
first_num = float(input("enter first number: "))
second_num = float(input("enter second number: "))

result = first_num / second_num

print(f"the result is {result:.3} ")
Practice: Basics and Datatypes
💡 This is your chance to put what you’ve learned into action.
Try solving these practice challenges to check that you understand the concepts.
Why practice?
Practice coding helps you become a great coder. These practice problems aren't graded, but that doesn't mean they aren't important.
You should aim to practice a lot, especially with unfamiliar concepts. Spread practice over multiple days to take advantage of the spacing effect, which helps you retain new knowledge.
More about practice
Practice helps you understand what you know, and what you don't know. It can be easy to trick yourself into thinking you understand something when you do not -- or that you don't understand when you do. Practicing by writing code or debugging code will help you find out what you really understand, and where you are still confused.
Practice helps build confidence in your coding. The more programs you write, and the more problems you solve, the more you learn that you are a capable coder and problem-solver.
Practice doesn't always feel good - sometimes you'll be stumped! But, practice shouldn't feel super frustrating either. If you find yourself getting angry at yourself or the code, it's a good time to take a break and ask for help.
On the flip side, if practice feels too easy, it means you aren't challenging yourself enough. If the practice problems early in the course are not challenging for you, take a look at the Additional Practice page. You should still complete these exercises, so that you can confirm that you can apply these concepts
The solutions to some challenges are available, and you can view a video of the solution below each challenge.
- Try to go through the whole challenge without using the solution.
- If you can’t do the challenge without looking the solution, it means you don’t understand the material well enough yet.
- Try the next practice challenges without looking at the solution. If you need more practice challenges, reach out on Discord.
Submission
Reminder: This practice is not graded. You should submit your work on Github Classroom so that your instructor can check your code, but you will not normally get feedback on the practice assignments.
This video shows how to get assignment code onto your computer, and how to submit it to Github Classroom. You can ignore the parts about submitting in Gradescope and Woolf for the practice exercises.
Video
Body Mass Index
This is 1 of the assignment problems for this week. You can check your solution against the solution provided here. The video also walks you through the process of arriving at your solution. Your code doesn't have to look exactly like what is shown here for it to be correct. There are many other correct solutions.
💪🏿 Create a program that calculates body mass index, which is used to determine if a person's weight is a healthy proportion for their height.
Follow the link below to attempt this exercise (that attempt can be submitted as part of your required assignment)

Watch the video below to see the full solution.
Make sure you give yourself enough time to solve the practice without watching the video. It is really important for your learning.
Body Mass Index Solution
Decryption
Encryption and decryption play an important role in information security and computer science. It’s used everywhere to secure the transmitted data between two entities. In this exercise, we have a sample program that decrypts secret messages. In this task, you will follow some steps to decrypt a secret message.

Watch the video to see the full solution.
Assignment
🧑💻 This is an individual exercise. It is based on this week's content so you should review that to set you up for the assignment. You are expected to work independently.
If you get stuck, confused, or have trouble with the project, you should use the #help-prog1 channel in Discord or message an instructor. Try not to spoil the project for others - use Discord spoiler tags if you are going to include a screenshot or code sample.
This week's assignment comprises 3 independent exercises which will test your
understanding of basic python datatypes and operations. You are required to complete
all of them in order to get full marks. Specific instructions for each exercise are
in the README.md file within each exercise's folder. The exercises are:
- USD-to-Naira conversion - Convert a user-provided USD value to NGN
- AC-load estimator - Calculate the AC requirements of a building given its physical dimensions and the number of occupants
- Body mass index calculator - Given an individual's height and weight, calculate their BMI

Submission
In order to get credit for your project, you must:
- push your code to Github Classroom
- submit your work in Gradescope
- submit your project in Woolf
It is possible to get partial credit for partial submission
This video walks through the process of submitting your project:
Late Policy
This assignment is due on Sunday evening (please check Gradescope for the precise time and convert to your time zone). You have a 24 hour grace period to submit the assignment after the deadline with no penalty. However, no late assignments will be accepted beyond that time without special permission from the instructor (only for extenuating circumstances) and will received a 25% penalty. Please start your assignments early, and allow appropriate buffer for potential issues (e.g., internet connectivity, electrical outages, etc.).
Collaboration Policy
Students are encouraged to study and learn together. Another student is often the best resource for working out a complex computation or understanding a difficult concept. However, all work turned in to fulfill course requirements must be the exclusive work of the person submitting them, unless otherwise stated in the assignment. In order to allow students to work together, yet submit assignments that represent their own understanding, the Gilligan’s Island Rule (which has been attributed to Larry Ruzzo of the University of Washington) is adopted.
The Gilligan’s Island Rule: You are free to meet with fellow students and discuss an assignment with them. Writing on a board or shared space during the meeting is acceptable; however, you should not take any written (electronic or otherwise) record away from the meeting. If you get help from a book or the Web, you must put the source aside after you have obtained help and put away any notes you took. Everything that you derive from the collaboration should be in your head. After the meeting, engage in at least a half-hour of mind-numbing activity (like watching an episode of Gilligan’s Island), before starting to work on the assignment. This will ensure that you are able to reconstruct what you learned from the meeting by yourself. (Gilligan’s Island was a 1960s US sitcom that set the standard for dim-witted TV.)
Remember...
- Read the instructions in the exercise's
README.mdfile - Plan before you code
- Debug if you aren't getting the desired output
- Attend office hours if you need additional support
- Ask for help in Discord
Conditional Statements
So far, the Python programs you’ve written have all run step by step, from top to bottom, executing each line exactly once. This week, and the next week, you’ll learn to write programs where the flow of control is more complex.
Programs need to be able to do different things, depending on the circumstances. Conditional Statements will be your tool for writing code that can make decisions.
The kinds of decisions will vary, from "is this number even?" to "did the user input the correct password?", but they all boil down to a set of yes-or-no questions.
In Python, the data type for representing yes-or-no answers is the Boolean: True or False.
Topica Covered
This week, you'll learn:
ifstatements let you write code that makes decisions- You can use comparison operators like
==,<,>to compare values and getTrueorFalse elifandelseblocks let you handle more complicated branching situations- You can combine booleans expressions with
and,or, andnot

Simple decisions
Life is full of decisions.
- Do I stay at the party, or is it too awkward?
- Is the price too high?
- Should I study more for the exam?
Programs also need to make decisions. Depending on the circumstances, programs should behave differently.
- Is the entered password correct?
- Is the number even?
- Is the user's input valid?
- Is the dark mode enabled?
- Is the user logged in?
In this lesson, you’ll learn how to write programs that can make simple decisions using if statements. if (and related keywords else and elif) will let you write code that can handle different situations appropriately.

In the example above, you are going to stay at the party if you do not feel awkward. You can write that decision in a general if statement:
if I don't feel awkward:
  stay at the party
This example isn’t quite something Python could execute, but it’s surprisingly close!
If statement
The if statement is the simplest tool for controlling the flow of the program in Python.
if x > 0 :
    print('x is positive')
Up until now, Python has run every line of code in our programs, in order. With the if statement, that’s no longer the case. The print here only runs if x really is more than 0. Otherwise, the print will never run at all.
A one-branch if statement is the simplest conditional statement. Below is a flow control diagram for the code snippet.

The boolean expression after if, in this case x > 0, is called the condition. If it is true, then the indented statement gets executed. If not, nothing happens.
In the rest of this lesson, you’ll learn more about:
- boolean values and boolean expressions
- conditional statements
if,elif, andelsekeywords

Boolean Expressions
Boolean is another Python data type. The only two Boolean possible values are True and False. These values are useful for writing code that makes decisions, like deciding whether or not to stay at the party.
Boolean Expressions
The simplest boolean expressions are the keywords True and False. Just like
we can do arithmetic with numbers, we can also build more complicated statements
that turn into True or False.
One kind of operation that results in boolean values is comparisons.
Comparisons
You can compare values in Python using comparison operators. These operators produce True or False based on the values on either side.
# '<' is the 'less than' operator
5 < 10 # True
15 < 10 # False
Here are the other comparison operators:
- == means Equal to
- < means Less than
- <= means Less than or Equal to
- >= means Greater than or Equal to
- > means Greater than
- != means Not Equal to
Here’s some examples:
x = 10  # Set x to 10. Note that the usage of "=" is not a boolean expression.

x == 10 # True (check if x equals 10)
x == 6  # False
x < 8   # False
x > 8   # True
x > 10  # False
x >= 10 # True
x <= 90 # True
Comparisons work on strings too:
y = "Hello"    # set y to "Hello"

y == "Goodbye" # False
y == "Hello"   # True
y == "hello"   # False (!!! equality is case-sensitive)
y != "Goodbye" # True
y != "Hello"   # False
y == 5         # False
y > 5          # TypeError
If/Else
Conditional statements
A conditional statement runs code based on a specific condition.
In Python, the syntax uses the keyword if, a condition followed by a colon :, and then an indented block of code to run.
if response == "yes":
	print("Proceeding...")
The print only runs if the value of the variable response is equal to "yes"
In this example, the condition is response == "yes" and the code block is print("Proceeding...").
The code block ends when you stop indenting.
In the following example, "Goodbye" is always printed, no matter what the response is. It’s outside of the code block, because it’s no longer indented.
response = input("Type 'yes' to proceed")
if response == "yes":
	print("Proceeding...") # only runs if response is equal to "yes"

print("Goodbye")         # runs no matter what
Practice
If-Else
Sometimes we want to do one thing if a boolean expression is true, and something else if it is false. In those cases, we can write an if-else statement.
Take a look at the example below. It prints a different message based on whether x is even or odd.
if x % 2 == 0:
    print('x is even')
else:
    print('x is odd')
We want to check if a given number x is even or odd. The % operator is called ‘modulo’ and it returns the remainder after division. If the remainder is 0 when x is divided by 2, then x is even. The flow control diagram looks like this:

The boolean expression x % 2 == 0 checks to see if the remainder of x divided by 2 is equal to 0. If this is true, then the first indented statement (called a branch) gets executed and the program prints "x is even". If the boolean expression is false, then the branch after theelse gets executed instead and the program prints "x is odd".
When writing conditional statements, you must pay attention to indentation. You must indent after an if statement, maintain the indent as long as you want to be in the if block, then reduce the indent when done with the if block. Also, don't forget to add the : after the condition, and another : after the else if you have one.
Practice

A sample run of the code should look like this:
Hello! What's your name? Opeyemi
Hello Opeyemi! Let's see if it's time to leave this party.
Is it awkward? I'm not sure
Stay and par-tay!
Multi Way decisions
In this section, you will learn how to make decisions in your code based on multiple conditions or choices. We will introduce the elif keyword to assist with this.
An example of a multi-way decision could involve checking a student's grade, which could fall into different ranges: greater than 90, between 70 and 90, between 50 and 70, or less than 50.
Another example could be determining the current season based on the month. If it is December, January, or February, we are in winter. If it is March, April, or May, we are in spring, and so on.
Using just if or if/else statements cannot accommodate more than two choices, so we will introduce a new keyword, elif, to address this.
If-elif statements
if and else let us express conditions with two possible outcomes. But what if there are more than two possibilities we want to express in our program? elif stands for "else if". It lets us check more conditions, so we can cover as many conditions as we want.
Below is the flow control diagram for a multi-branch program:

Here is the corresponding Python code:
if x < y:
    print('x is less than y')
elif x > y:
    print('x is greater than y')
else:
    print('x and y are equal')
The code runs line by line. So, the conditions are checked in the order the code is written. The code does not look ahead. So, in the example above, assuming x = 3 and y = 3, the code will do 2 comparisons:
- Check if x is less than y. Since x = 3 and y = 3 this statement is false, and it keeps going
- Check if x is greater than y. Since x = 3 and y = 3, this statement is false
- Execute the else statement and print 'x and y are equal'
But with x = 4 and y = 6, the code will run the first comparison, print 'x is less than y' and finish. It will never even run the second check!
There is no limit on the number of elif statements that can be added, but the code will evaluate them from top to bottom. Having an else statement is optional, but if you have one, it has to be at the end.
Practice

The sample run of the code should now look like this:

If/elif/Else Exampels
Here is a video to review and practice if/elif/else statements with different examples:
And, Or, Not
In Python, you can combine conditions using the logical operators and, or,
and not. They let you express more complex conditions, like "even numbers
greater than 100" or "the password must be between 8 and 26 characters long, and include
a number, a symbol, and a capital and lowercase letter".
Combining Conditions with and and or
To check more than one thing, you can combine conditions with and or or.
if x > 10 and x < 100:
	print("x is a medium sized number")
elif x < 10 or x > 100:
	print("x is either small or large")
else:
	print("x is exactly 10 or 100")
They work basically like they do when you use them in English:
andisTrueif both the left and the right side are true,Falseif either is falseorisTrueif either the left or the right side are true,Falseif both are false
| left side | right side | and |
|---|---|---|
| True | True | True |
| True | False | False |
| False | True | False |
| False | False | False |
| left side | right side | or |
|---|---|---|
| True | True | True |
| True | False | True |
| False | True | True |
| False | False | False |
Note: Python’s or results in True if either the left, the right, or both are True. This is somewhat different from how we speak. Sometimes in English, “or” means one or the other, but not both. That’s sometimes called the “exclusive or” or ‘xor’, but it doesn’t have a Python keyword.
Not
Python can turn a boolean into its opposite with not.
not True # False
not False # True
not 100 > 10 # False
not 100 < 10 # True

if not response == "It's awkward":
	print("Stay and par-tay!")
Sometimes it’s useful to be able to express the opposite of a condition.
response = int(input("Enter a big number: "))
if not response > 100:
	print("That's not a big enough number!")
If the input is not greater than 100, it will print output to tell the user that their number isn’t big enough.
🤔 How else could you write this snippet?
You could express the same thing with <=.
response <= 100 is equivalent to not response > 100
not can be combined with other conditions, like and and or. It’s often useful to group expressions with parentheses when making combinations.
if not (x < 10 or x > 100):
	print("x is a medium sized number")
Nested Conditionals
One of the coolest things about Python is that you can use pieces of syntax in lots of situations.
The code in an if statement's body can have any valid Python.
if 5 < 15:
  print("We can do anything in here")

  possible = 10
  print("possibilities:", possible)
  possible = possible * 100
  print("possibilities:", possible)
  possible = possible * 100
  print("possibilities:", possible)
  possible = possible * 100
  print("possibilities:", possible)
  possible = possible * 100
  print("possibilities:", possible)
  print("TOO MANY POSSIBILITIES")
We can even put another if statement in the body of an if statement.
if x > 10:
  print("x is greater than 10")
  if y > 10:
    print("and, y is greater than 10")
What will be printed if x = 5 and y = 15?
Nothing!
If x = 5 and y = 15, x is less than 10. That means the whole body below that
if statement won't run -- including the second if statement.
When there's one conditional statement inside another, it's called a nested conditional. The inner conditional is nested in the outer one.
The trick to reading nested conditionals in Python is to keep careful track of
the indentation. Each block keeps going until the code is no longer indented.
You sometimes have to look very carefully to match up each else with the
corresponding if, especially when there's lots of nesting and conditions.
Here's an example with lots of nesting:
password = input("password: ")

if len(password) > 8:
  if any(number in password for number in "0123456789"):
    if password != password.lower():
      if password != password.upper():
        print("Password valid. Account created.")
      else:
        print("password must contain a lowercase letter")
    else:
      print("password must contain an uppercase letter")
  else:
    print("password must contain a number")
else:
  print("password too short, must be more than 8 characters.")
With this many levels of nesting, it's a little hard to tell which statement goes with which, but you can still match them up.
Copy this code and try it out! You may have to practice using the tab key on your keyboard 😉.
Practice: Conditionals
💡 This is your chance to put what you’ve learned into action.
Try solving these practice challenges to check that you understand the concepts.
The solutions to each challenge are available, and you can view a video of the solution below each challenge.
- Try to go through the whole challenge without using the solution.
- If you can’t do the challenge without looking the solution, it means you don’t understand the material well enough yet.
- Try the next practice challenges without looking at the solution. If you need more practice challenges, reach out on Discord.
Money for Books
This is 1 of the assignment problems for this week. You can check your solution against the solution provided here. The video also walks you through the process of arriving at your solution. Your code doesn't have to look exactly like what is shown here for it to be correct. There are many other correct solutions.
📚 You'll write a program to help someone figure out if they have enough money for all the books they want to buy using if/else statements.
Follow the link below to attempt this exercise (that attempt can be submitted as part of your required assignment)

Watch the video to see the full solution

Quick Draw
In this exercise, you will implement a quick draw game to see how fast the user's reactions are.

Watch the video to see the full solution

Assignment
🧑💻 This is an individual exercise. It is based on this week's content so you should review that to set you up for the assignment. You are expected to work independently.
If you get stuck, confused, or have trouble with the project, you should use the #help-prog1 channel in Discord or message an instructor. Try not to spoil the project for others - use Discord spoiler tags if you are going to include a screenshot or code sample.
This week's assignment comprises 3 independent exercises which will test your
understanding of conditional branching in python. You are required to complete
all of them in order to get full marks. Specific instructions for each exercise are
in the README.md file within each exercise's folder. The exercises are:
- exam-results: Write a program that lets a user enter their exam score, then tells the user if they have passed the exam.
- money-for-books: Write a program that tells users if they have enough money to buy their desired number of books.
- bill-calculator: Build a program to help calculate Electricity and Water bills, turning the utility bill rules into conditions and boolean logic

Late Policy
This assignment is due on Sunday evening (please check Gradescope for the precise time and convert to your time zone). You have a 24 hour grace period to submit the assignment after the deadline with no penalty. However, no late assignments will be accepted beyond that time without special permission from the instructor (only for extenuating circumstances) and will received a 25% penalty. Please start your assignments early, and allow appropriate buffer for potential issues (e.g., internet connectivity, electrical outages, etc.).
Collaboration Policy
Students are encouraged to study and learn together. Another student is often the best resource for working out a complex computation or understanding a difficult concept. However, all work turned in to fulfill course requirements must be the exclusive work of the person submitting them, unless otherwise stated in the assignment. In order to allow students to work together, yet submit assignments that represent their own understanding, the Gilligan’s Island Rule (which has been attributed to Larry Ruzzo of the University of Washington) is adopted.
The Gilligan's Island Rule: You are free to meet with fellow students and discuss an assignment with them. Writing on a board or shared space during the meeting is acceptable; however, you should not take any written (electronic or otherwise) record away from the meeting. If you get help from a book or the Web, you must put the source aside after you have obtained help and put away any notes you took. Everything that you derive from the collaboration should be in your head. After the meeting, engage in at least a half-hour of mind-numbing activity (like watching an episode of Gilligan’s Island), before starting to work on the assignment. This will ensure that you are able to reconstruct what you learned from the meeting by yourself. (Gilligan’s Island was a 1960s US sitcom that set the standard for dim-witted TV.)
Remember...
- Read the instructions tab in Replit
- Plan before you code
- Debug if you aren't getting the desired output
- Attend office hours if you need additional support
- Ask for help in Discord
Loops
We often want code to run again and again, until it’s time to stop. For example, we might want to read through a file until we find a certain word or until we reach the end of the file. We might also need to run part of the program for a certain number of time. For example, we might want to ask the users to enter their password three times before we give up. Loops is your tool to do that.
Loops reduce the amount of code you need to write. Instead of having to type out the same thing again and again, or run your program many times, you can use a loop to repeat your code instead.
Loops empower you to automate repetitive tasks, solve complex problems with elegance, and build powerful applications that can handle vast amounts of data.
In this weeks’s lessons, we will learn how to do that using loops.
Topics Covered
By the end of these lessons, you'll have learned:
- loops let you repeat code, either a specific number of times, or until a condition is met
whilerepeats code for as long as a condition is Trueforrepeats code for a specific number of iterationsrangelets us control the start, end, and step size of aforloop- You can debug loops using
print, or by stepping through the code with a debugger like pythontutor
Assignment
🧑💻 This is an individual exercise. It is based on this week's content so you should review that to set you up for the assignment. You are expected to work independently.
If you get stuck, confused, or have trouble with the project, you should use the #help-prog1 channel in Discord or message an instructor. Try not to spoil the project for others - use Discord spoiler tags if you are going to include a screenshot or code sample.
This week's assignment comprises 2 independent exercises which will test your
understanding of loops in python. You are required to complete
all of them in order to get full marks. Specific instructions for each exercise are
in the README.md file within each exercise's folder. The exercises are:
- rock-paper-scissors - Recreate the classic game of rock, paper, scissors.
- password-validator - Implement a program that validates a password entered by a user.

Remember...
- Read the instructions tab in Replit
- Plan before you code
- Debug if you aren't getting the desired output
- Attend office hours if you need additional support
- Ask for help in Discord
While loops
Often, we want code to keep going. For example, a password prompt might ask a user to enter a new, yet complex, password until they enter a valid value. The program doesn’t know ahead of time how many tries the user will need. Instead, it knows when to stop asking — when the user enters a valid password. This type of situation is perfect for a while loop.
In this section, we'll learn about while loops. while loops repeat a block of code until a condition is met.
while loops
The syntax looks like this:
while condition:
	block of code to execute
It’s a lot like an if statement. It checks the condition, then runs the block of code if the condition is True. But, unlike an if statement, after executing the block, a while loop checks the condition again and again. It only stops when the condition becomes False.
Here’s a flow chart depicting a while loop:

The flow of a while statement is:
-
Evaluate the condition, the result will be True or False.
-
If the condition is False, exit the
whilestatement and continue execution at the next statement (after the while loop block). -
If the condition is True, execute the body of the while statement and go back to Step 1
Examples
Watch the following video for an introduction to while loops with examples.
Here's another example asking the user for password:
# Set up the password
password = "super secret"
user_entry = ""

# While loop
while user_entry != password:
	user_entry = input("What's the password?")
In the example above, the program will keep prompting the user for a password while the user's input is not the expected value.

Below is another example that prints the values from 5 to 1:
n = 5
while n > 0:
    print(n)
    n = n - 1
print('Blastoff!')
You can read the code in English as:
- The initial value of
nis 5 - While
nis greater than 0, display the value ofn, and then reduce the value ofnby 1 - When
nis no longer greater than 0, display the string Blastoff!
The code will output:
5
4
3
2
1
Blastoff!
The condition we are checking before every loop is: "Is n greater than zero?" This is a boolean expression that will yield either True for 5, 4, 3, 2, and 1, or False when the value of n is 0.
Check Your Understanding
Unfold to see the answers
Before watching the video, please try to answer the questions above by yourself first.What does a loop look like?
a = 1
while a < 10:
	print(a)
	a += 2
Let’s visualize how this code runs:

In the animation, you can see the variable a change over time, and the loop condition checked before each execution of the loop body.
👉🏿 Step through this code interactively on pythontutor.com
Loop Vocabulary
A while loop has a condition and a body. The condition is what gets checked each time. The body is the code that runs again and again. Just like an if statement, the body code has to be indented.
Every execution of the body of a while loop is called an iteration. In the blastoff example, the body of the loop was executed five times, so the loop has five iterations.
Whether or not the loop body will be executed depends on whether or not the condition evaluates to True or False.
In the ‘blastoff’ example above, the loop is controlled by an iteration variable n which tells the loop whether or not to proceed. The body of the loop changes the value of n each time the loop runs, so that the loop eventually finishes running.
If n did not change, the loop would repeat forever, creating an infinite loop.
Infinite loop
An infinite loop is a loop that runs forever. For example:
x = 4
while x > 0:
	print("Run on!")
print ("Done!")
4 is always greater than 0, and x never changes, so the loop runs forever.
If you accidentally write an infinite loop, you will have to figure out how to stop it. Sometimes you’ll need to force-close the program. If you accidentally run an infinite loop in a repl or terminal, you can press Control + C in the console to end the program.
Infinite Loop Demo
♾️ Try running this demo of an infinite loop.
Press the Stop button to end the program. Otherwise, it will run on forever! Or, at least until you leave the page.
Practice: Loop Prediction
🤔 Look at the following code snippet. What will the output be? Why?
Think about it, write down what you think the result will be, then expand the solution.
i = 10
while i > 13:
  print ('This is a while loop')
  i = i + 1
Unfold to see the solution
The body of the loop will never get executed!
The condition i > 13 will be False because 10 is not greater than 13. So, the body of the while loop will be skipped.
Practice
For loops
We learned that a while loop is a great tool when you know the stopping condition.
In this section we will explore a second tool for repeating code: the for loop. A for loop is a good fit when we want to run a block of code a definite number of times, or when we want to iterate over list of things.
for Loops
for loops step through a list of items in order. Each iteration will assign the next item to the loop variable, then execute the loop body.
The syntax of a for loop starts with the for keyword, and has an indented loop body. A for loop has a variable name, the in keyword, and a list of things to loop through.
for variable in items:
	loop body to execute


image credit: https://www.dataquest.io/blog/python-list-tutorial
The items you iterate through can be any sequence of values. For example, you can loop through a list of numbers, or a string of characters. The sequence of values can be written explicitly, or generated with a function like range().
Example of iterating through a list of numbers:
for i in [2,4,5,6] :
	print(i)
output:
2
4
5
6
Example of iterating through a string:
for letter in "Hello" :
	print(letter)
output:
H
e
l
l
o
Example of iterating through a range of numbers:
for i in range(1,11):
	print(i)
output:
1
2
3
4
5
6
7
8
9
10
Watch the following video for an introduction to for loops with examples:
Comparing For and While loops
Let's take a look at an example of a for loop:
for i in [5, 4, 3, 2, 1] :
	print(i)
print('Blastoff!')
This for loop will have the same output as the while loop we saw in the previous section:
5
4
3
2
1
Blastoff!
Let’s compare the for loop with the while loop :
for i in [5, 4, 3, 2, 1] :
	print(i)
print('Blastoff!')
n = 5
while n > 0:
    print(n)
    n = n - 1
print('Blastoff!')
🤔 Compare the two code examples above (the for loop and the while loop).
What do you notice about them?
while vs. for
Similarities:
- loop keyword, then something, then
: - loop body is indented
Differences:
- variable
ncreated before the while loop, variableicreated as part of theforloop whileloop changes the variable withn = n - 1,forloop variable changes automaticallyforloop has to write out exactly what numbers to loop through
for loop iteration variable
The initial statement in the for loop is:
for i in [5,4,3,2,1]:
In this code, the loop creates a new variable i. The value of i will change in each iteration of the loop, to take on the value of each item in the list. In this example, i will take on successive values of 5, 4, 3, 2, and 1.
As you can see, for loops offer a more direct syntax than while loops, because you can explicitly declare the values of the iteration variable.
We’ll cover the list syntax [5, 4, 3, 2, 1] in more detail later in the course. For now, you can use it to write for loops, without knowing exactly what it means. You can put any values inside the [], and the loop variable will be assigned to each value in turn.
Practice
Range function
Range function
range() is a function that generates a series of numbers within a certain range.
# Same loop as before, using range()
for i in range(5,0,-1):
	print(i)
print("Blastoff!")
5
4
3
2
1
Blastoff!
For longer lists of numbers, range is easier than typing the whole thing out.
The syntax for the range function is below.
range(start, stop, step)
- start specifies the first value of the range.
- stop specifies the stopping point.
- The stop value is not included in the range, so
range(1,10)will only go up to9.
- The stop value is not included in the range, so
- step specifies how much to count by each time.
range(2,10, 2)produces2,4,6,8.- The default value is 1, which means that if you leave step out,
rangewill count by 1.
- The default value is 1, which means that if you leave step out,
Here’s some examples using range:
# Print the numbers 1-10
for n in range(1,11): # 11 is not included!
	print(n)

# Print the numbers 5, 10, 15, 20... 100, counting by 5s
for number in range(5, 101, 5):
	print(number)

# Print the numbers counting down from 5 to 1
for i in range(5,0,-1):
	print(i)
print("Blastoff!")
Range Practice
Debugging loops
Usually it takes more than one try to write the code to solve a problem with loops. When the code isn’t working correctly, you need a strategy for figuring out what is happening, and to fix it.
Loop debugging: Printing each step
Printing values at each step is a strategy for debugging what’s happening in your loop. Let’s see what it looks like.
Here’s some broken code for solving a loop problem:
# Find the total of the even numbers from 2 to 12
total = 0
for i in range(1,12,2):
	total + i
print(total) # 0  <- Wrong, should not be 0!
You might be able to spot the bug in this code, but let’s try printing out the values to debug it.
total = 0
print("before the loop total is", total)
for i in range(1,12,2):
	print("i is", i, "total is", total)
	total + i
print("after the loop total is", total)
print(total)
Here’s the output:
before the loop total is 0
i is 1 total is 0
i is 3 total is 0
i is 5 total is 0
i is 7 total is 0
i is 9 total is 0
i is 11 total is 0
after the loop total is 0
0
Wow! It looks like there are actually 3 bugs!
- instead of the even numbers,
iis getting set to the odd numbers - instead of including
12, it’s stopping at11 totalisn’t changing at all in the loop
Fixing the code
Since we can see the values, it’s much easier to tell what we need to fix.
rangeneeds to start at2(instead of1)rangeneeds to stop at13(instead of12)- it needs to be
total += iinstead oftotal + i
When we fix the code, we can leave the prints in to make sure our changes work.
total = 0
print("before the loop total is", total)
for i in range(2,13,2):
	print("i is", i, "total is", total)
	total += i
print("after the loop total is", total)
print(total)
Now the output is:
before the loop total is 0
i is 2 total is 0
i is 4 total is 2
i is 6 total is 6
i is 8 total is 12
i is 10 total is 20
i is 12 total is 30
after the loop total is 42
42
Now that we can see that the code is working, we can remove the extra print statements. Here’s the final code:
total = 0
for i in range(2,13,2):
	total += i
print(total)
Practice
Solution (try for 10-20 minutes before looking)
total = 0
print("total before is", total)
for i in range(10,25,2):
  print("i is", i, "total is", total)
  total + i
print("total after is", total)
print(total)

# BUGS
# - supposed to be the odd numbers (range should start at 11)
# - supposed to include 25 (range should end at 26)
# - should be total += i
Loop debugging: Visual Tracing
When debugging more complicated code, it’s helpful to be able to see how the code executes step by step. You can use pythontutor.com to run your code step by step, and see the values of all your variables as the program runs.
🎥 Watch this video to see how to step through the code using PythonTutor
Similar to printing out the values at each step, PythonTutor helps you see what’s happening when your code runs. That makes it easier to spot bugs.
Here’s the example from before in pythontutor. Try it out!
Practice: Loops
💡 This is your chance to put what you’ve learned into action.
Try solving these practice challenges to check that you understand the concepts.
The solutions to some challenges are available. You can view a video of the solution below each challenge. Try to go through the whole challenge without using the solution.
- Try to go through the whole challenge without using the solution.
- If you can’t do the challenge without looking the solution, it means you don’t understand the material well enough yet.
- Try the next practice challenges without looking at the solution. If you need more practice challenges, reach out on Discord.
Print multiples
Write a program that prints the numbers from 1 to 100, noting the multiples of 3 and 5.
Before checking the solution, make sure you spend enough time thinking and trying. This is really how you learn and build experience.
Watch the video to see the full solution.
Guess My Number
In this exercise, practice writing a number guessing game.

Watch the video to see the full solution.
Scrabble Word Score
In this example, you'll practice using loops to calculate the Scrabble score of different words.

Lists
At the end of the last lesson, you saw how the for loop gave you the power to loop through a list of items. In this lesson, you’ll learn more about working with lists, and see how lists and loops together make for powerful programming patterns.
You’ll also focus on problem-solving using loops, and practice breaking problems down into pieces so that you can find solutions step by step.
Topics covered
Here's a preview of what you'll learn this week:
- Lists store multiple pieces of data, like
[1, "hello", [ "another list" ], False] - You access list elements by their index, which starts at 0, like
my_list[0] - You can change list contents by assigning at an index, appending, or removing elements
- assigning:
my_list[0] = 5 - appending
my_list.append(10) - removing
my_list.pop(2)
- assigning:
- You can solve many problems (like the ones below) by updating a variable at each step in a loop
- total and average
- maximum and minimum
- finding and filtering
Assignment
🧑💻 This is an individual exercise. It is based on this week's content so you should review that to set you up for the assignment. You are expected to work independently.
If you get stuck, confused, or have trouble with the project, you should use the #help-prog1 channel in Discord or message an instructor. Try not to spoil the project for others - use Discord spoiler tags if you are going to include a screenshot or code sample.
This week's assignment comprises 3 independent exercises which will test your
understanding of the use of lists in python. You are required to complete
all of them in order to get full marks. Specific instructions for each exercise are
in the README.md file within each exercise's folder. The exercises are:
- list-average - Use a loop to find the average of a list of numbers.
- longest-word - Ask the user for five words, then display the longest of these.
- safari-animals - Print out the description of an animal, based on user input.

Remember...
- Read the instructions tab in Replit
- Plan before you code
- Debug if you aren't getting the desired output
- Attend office hours if you need additional support
- Ask for help in Discord
List basics
What is a list?
In your life, you’ve come across all kinds of lists - grocery lists, to-do lists, the attendance roll at school, the roster of your football team. Lists in Python are a way to represent many pieces of data, like you do on those lists. Instead of just one number, string, or boolean, a list can hold many pieces of data at once.
When working with lists in your life, there are a few core actions you perform:
- Create a list
- Add something to the list
- Remove something from the list
- Change an item on the list
- Take some action for all of the items on the list
In this lesson, we’ll cover the syntax for creating lists and updating lists, and performing these core actions.
Watch this video for an overview of lists in Python:
List Syntax
A list is a sequence of values. It’s written like this:
[1,2,3]
The list is surrounded by square brackets, with elements separated by commas. The values inside a list are called ‘elements’ or ‘items’. You can assign lists to variables, just like you can with numbers and strings:
my_list = [1,2,3]
Lists can be empty. An empty list looks like this:
empty_list = []
Lists can contain any type of element, even other lists.
Below are some examples of valid lists:
countries = ["Kenya", "Ghana", "Ethiopia", "Zimbabwe"]
primes = [2, 3, 5, 7, 11]
empty_list = []
foods = [["apples", "kiwis", "bananas"], ["chorizo", "steak", "chicken nuggets"], ["ice cream", "popcorn", "chocolate bars"]]
different_types = [False, 1, "string", []]
The list data type
Earlier, you learned the basic Python data types: String, Int, Float, Boolean. A List is another core data type in Python, but it’s different from the others you’ve learned so far.
my_list = [1,2,3]
type(my_list) # <class 'list'>
A list is a type of data structure.
Different data structures are useful for solving different kinds of problems in Python. The other most common built-in Python data structures are dictionaries, sets, and tuples. We’re going to focus on Lists, but as you grow in your Python skills, you’ll learn the uses of these other types.
List indices
Each element of the list has a position, called an index. We can get an element from a list using the name of the list and its index in brackets. For example, given the list below:
countries = ['Kenya', 'Ghana', 'Ethiopia', 'Zimbabwe']
We can access the first list item using countries[0], the second list item using countries[1], and so on.
countries[0] # "Kenya"
countries[1] # "Ghana"
Remember that lists are indexed starting at 0. So the first item has position 0, the second item has position 1, and so on. This start-from-zero numbering is common to almost all programming languages.
Why do list indices start at 0?
You can think of a list index as an offset. Indexes answer the question: "How many spaces from the start do I go to find the item?"

In this list, you have to move 0 spaces to get to "Kenya", so it is at index 0. You have to move 2 spaces to get to Ethiopia, so it is at index 2.
countries[0] # "Kenya"
countries[2] # "Ethiopia"
After you access an element from a list, you can use it anywhere you’d use another value or variable.
print(countries[0]) # Kenya
print(countries[1] + " is a nice place to visit") # Ghana is a nice place to visit
Practice: Access List Items
Solution Code (try for 5 minutes before peeking)
tallest_buildings = ["Burj Khalifa", "Merdeka 118", "Shanghai Tower", "Abraj Al-Bait Clock Tower", "Ping An International Finance Centre", "Lotte World Tower"]

print(tallest_buildings[0])
print(tallest_buildings[2])
print(tallest_buildings[1], "is taller than", tallest_buildings[5])
More about lists
IndexError
If you try to access a value past the end of the list, Python will raise an error:
print(countries) # ['Kenya', 'Ghana', 'Ethiopia', 'Zimbabwe']
countries[3] # "Zimbabwe"
countries[4] # IndexError: list index out of range
len
To keep from going out of bounds, you can get the length of the list with the function len:
len(countries) # 4
Last item
If there are 4 elements, then the last index is 3.
Since we start counting at 0, the last element is always at index one less than the length of the list.
countries = ['Kenya', 'Ghana', 'Ethiopia', 'Zimbabwe']
last_index = len(countries) - 1 # 3
countries[last_index] # "Zimbabwe"
countries[len(countries) - 1] # "Zimbabwe"
Negative indexes
Python has a shorthand for accessing elements from the end of the list:
countries[-1] # "Zimbabwe"
countries[-2] # "Ethiopia"
Negative indices start counting from the end of the list, so -1 is the last index, and -2 is the second-to-last, and so on.
Mutating Lists
Lists are mutable.
In programming, 'mutate' means ‘change’. Mutable means we can change the lists.
We can:
- assign a new value to a list index
- add and remove items from a list
- change the order of items
Assigning new values
We can change any element of a list by assigning at an index.
For example, to change the second item in the list above to the "Nigeria", we can assign to index 1, like this:
# The old list
countries = ["Kenya", "Ghana", "Ethiopia", "Zimbabwe"]
# Change the second item
countries[1] = 'Nigeria'
# The new list
print(countries) # ['Kenya', 'Nigeria', 'Ethiopia', 'Zimbabwe']
Adding an item to the end of a list
To add a new element to the end of the list, you use .append()
countries.append("Cameroon")
print(countries) # ['Kenya', 'Nigeria', 'Ethiopia', 'Zimbabwe', 'Cameroon']
Removing an item
To remove an item from a list, you use pop(). With no arguments, pop removes the last element.
countries = ['Kenya', 'Nigeria', 'Ethiopia', 'Zimbabwe', 'Cameroon']
print(countries) # ['Kenya', 'Nigeria', 'Ethiopia', 'Zimbabwe', 'Cameroon']
countries.pop() # removes the last element, "Cameroon"
print(countries) # ['Kenya','Nigeria', 'Ethiopia', 'Zimbabwe']
Or, you can specify an index to remove, and pop() will remove the element at that index.
print(countries) # ['Kenya','Nigeria', 'Ethiopia', 'Zimbabwe']
countries.pop(1) # Removes the element at index 1, "Nigeria"
print(countries) # ['Kenya', 'Ethiopia', 'Zimbabwe']
You can also remove an item by value, using .remove(). This will remove the first item in the list that matches the value you pass in.
countries = ['Kenya', 'Ethiopia', 'Zimbabwe']
print(countries) # ['Kenya', 'Ethiopia', 'Zimbabwe']
countries.remove("Kenya")
print(countries) # ['Ethiopia', 'Zimbabwe']
Check your understanding
Try this quiz to check how well you understand what list operations will do.
Practice
Solution Code (try for 5 minutes before peeking)
my_list = [10, 20, 30, 40, 50]
print(my_list)

# Assign the first list item the value 5
my_list[0] = 5
print(my_list)

# Assign the last list item the value 'dog'
my_list[4] = 'dog'
print(my_list)

# Remove the second item in the list
my_list.pop(1)
print(my_list)

# Add another item to the end of the list with value False
my_list.append(False)
print(my_list)

print("The number of items in the list is", len(my_list))
Loop patterns
You’ve learned and practiced some of the core actions of working with lists. You can create a list, add and remove items, and perform actions for all of the items. Now it’s time to learn to write code that uses lists and loops to solve problems.
Using lists and loops together, you can answer questions about data.
- What’s the smallest (or largest) item in this list?
- What’s the sum of all the items in the list? What’s the average?
- What are the items in the list that fit this condition?
When solving more complicated problems with lists, it’s also helpful to have more powerful debugging techniques. In this lesson, you’ll learn problem solving with loops, including common patterns and strategies for figuring things out.
Video: Lists and Loops
Looping through a list with for
When you first saw the for loop, you learned that it could loop through a list, or through a range. You’ve been using this the whole time, but as a quick refresher, here’s a loop that will print the numbers from 5 down to 1:
for number in [5,4,3,2,1]:
	print(number)
And here’s another version, using range:
for number in range(5,0,-1): # start at 5, go down to (but not including) 0, by -1 each time
	print(number)
We’ll be using for loops for almost all of the loop and list problems here. A while loop can work in some circumstances, but it’s usually a little more work.
Sum of numbers in a list
Here’s a python program to add up all the numbers between 1 and 10:
total = 0
for number in [1,2,3,4,5,6,7,8,9,10]:
	total += number

print(total) # 55
Here’s what this program does:
- Step 1: Creates a variable called
total, which starts at0 - Step 2: Loop through the numbers 1 through 10. Increase
totalby thenumbereach time. - Step 3: After the loop, print out the total
Solving problems using loops
Many loop problems can be solved using the pattern in this example: update the variable every time you go through the loop. In this lesson, you’ll see lots of different problems you can solve with this pattern.
🔑 Common pattern
Step 1: Create a variable before the loop starts and set the initial value.
Step 2: Perform some computation on each item in the loop body, which may change the value of the variable.
Step 3: Use the value of the variable when the loop completes.
Let’s try it out.
Practice
Solution (try for 10-20 minutes before peeking)
total = 0
# We want to include 100, so we stop at 101
# We want even numbers, so step by 2
for i in range(10,101,2):
  total+=i
print(total)
Note: there's a built-in Python function called sum that can do this for us.
But, that's not a great way to practice using loops!
Loops, Conditions, and Lists
Check if an item is in the list
Sometimes you want to find out if some item is in the list. You can use the same pattern as before, but with a different change to the variable in the loop body.
Here’s an example:
# Does the list have string "Python" in it?
languages = ["Ruby", "JavaScript", "C", "Rust", "Smalltalk", "Clojure", "Python"]

has_match = False
for language in languages:
	if language == "Python":
		has_match = True

print(has_match)
It’s the same pattern as before, but with an if statement in Step 2.
- 🔑 Step 1: Create a variable called
has_match, which starts asFalse - 🔑 Step 2: Loop through the strings in the list. If the string matches, set
has_matchtoTrue - 🔑 Step 3: Print out the
has_matchvariable
Filter a list
Sometimes, you want to find only the values in your list that meet a certain condition.
Again, we can use the three step pattern. The variable we are updating will be a new list, with just the filtered values.
numbers = [62, 60, 53, 53, 33, 3, 25, 61, 36, 1, 69, 55, 56, 39, 32, 76, 20, 62, 47]
# Write a program to find all the even numbers in the list
evens = []
for element in numbers:
  if element % 2 == 0:
		evens.append(element)

print(evens) # [62, 60, 36, 56, 32, 76, 20, 62]
We use an if statement and the modulo operator to find the even values, and add them to the list.
Practice: Sum of Odds
Solution (try for at least 10-20 minutes before looking)
numbers = [62, 60, 53, 53, 33, 3, 25, 61, 36, 1, 69, 55, 56, 39, 32, 76, 20, 62, 47]

total = 0
for n in numbers:
  if n % 2 == 1:
    total += n

print(total)
Smallest Item
Finding the minimum value in a list uses the same pattern. Step through the elements of the list, and update a variable that is tracking the current minimum value.
Each time through the loop, check if the number is smaller than the current minimum value. If it is, then it’s the new minimum value.
We can use the first value in the list as the initial value of the minimum.
numbers =  [62, 60, -53, 53, 33, -3, 25, 81, 36, 1, 69, 55, 56, 39, -32, -76, 20, 62, 47]
minimum = numbers[0]
for number in numbers:
	if number < minimum:
		minimum = number

print(minimum) # -76
With one small change, this same code works to find the largest value instead.
Practice: Interactive Minimum
Solution (try for at least 10-20 minutes before looking)
numbers = int(input("How many numbers will you enter? "))
i = 0
minimum = float('inf')

for i in range(numbers):
  x = int(input("Enter a number: "))
  # check whether x is smaller than minimum, and reassign minimum to it if so
  if x < minimum:
    minimum = x

print("The smallest number is:", minimum)
Split strings
You've learned how to do some useful operations with strings, like concatenating and combining. There’s one more operation — splitting — that will help you work more powerfully with strings.
Key ideas
- Using split() method to convert string into a list
Video: Splitting strings
String Split Example
As you saw in the video, the string split function divides a string into a
list of parts of that string, based on a separator.
groceries = "rice,beans,oil,peppers,meat,greens"
groceries_list = groceries.split(",")
print(groceries_list) #=> ['rice', 'beans', 'oil', 'peppers', 'meat', 'greens']
Exploration
Python has another string function to go the other direction: from a list of strings to a single string, with a separator.
Have you seen that function before? Can you find it by searching the web or the Python docs?
Practice: Lists
💡 This is your chance to put what you’ve learned into action.
Try solving these practice challenges to check that you understand the concepts.
The solutions to each challenge are available, and you can view a video of the solution below each challenge. Try to go through the whole challenge without using the solution.
If you can’t do the challenge without looking the solution, it means you don’t understand the material well enough yet.
Try the next practice challenges without looking at the solution. If you need more practice challenges, reach out on Discord.
Squad Mates
👥 Write a program that creates a list with the names of your squad mates and prints them out

Watch the video to see the full solution
Roster Change
⚽ There have been some changes to the roster. Write a program that makes the changes to the list and shows the old and new rosters.

Items Matching Rule
Count how many items match a rule, specified as a list

Functions
Functions are one of the most beautiful things in programming. They let you take some piece of code and give it a name. Functions make it possible to split big problems down into little pieces, and then let you reuse the parts of your solution to solve other problems.
Thinking in functions will be different from the programs you've written so far. Instead of thinking about input and output of your program (with input and print), you'll think about the input and output of your functions: arguments and return values. Instead of planning all the steps your whole program needs, you'll think about which functions it needs, and how those functions work together.
Topics covered
Here's a summary of what you'll learn in these lessons:
- Functions allow us to write some code once in our program, then run it as many times as needed.
- Functions are used (i.e. called or invoked) by writing the name followed by parentheses, with the function's arguments in the parentheses.
- Python has many built-in functions, like
print(),str(), andrandom.randint() - You can find available functions and modules by looking at the Python docs or searching Google
- Python lets you define your own functions using the keyword
def returnsends back a value from a function
Assignment
🧑💻 This is an individual exercise. It is based on this week's content so you should review that to set you up for the assignment. You are expected to work independently.
If you get stuck, confused, or have trouble with the project, you should use the #help-prog1 channel in Discord or message an instructor. Try not to spoil the project for others - use Discord spoiler tags if you are going to include a screenshot or code sample.
This week's assignment comprises 4 independent exercises which will test your
understanding of the use of user defined functions in python. You are required to complete
all of them in order to get full marks. Specific instructions for each exercise are
in the README.md file within each exercise's folder. The exercises are:
- add-list-numbers - Write a function that calculates the sum of all numbers in a list.
- double-list-elements - Write a function that doubles all the elements in a list.
- smallest-item-in-a-list - Write a function that returns the smallest item in a list of numbers.
- unit-conversion-functions - Write four functions. Each function takes in a value in one unit (e.g. kg), and converts it to another unit (e.g. lbs).

Remember...
- Read the instructions tab in Replit
- Plan before you code
- Debug if you aren't getting the desired output
- Attend office hours if you need additional support
- Ask for help in Discord
Function basics
You’ve used functions like print, random.randint, and append in your programs already, to output values, get random numbers, and add items to lists. Under the hood, those functions are just more code -- code that someone else wrote, and you can use. As you’ll see, a function is like a recipe. Python follows the steps in the recipe when you tell it to.
We’ll see two sources of functions in this lesson. The authors of Python built many useful functions into the language. They’re called built-in functions. You can see the full list here (fair warning - it's really long!). We can also build our own functions, as you will see in the next section. Functions we write ourselves are called user-defined functions.
Both kinds of functions work the same way. They execute the code for that function. The only difference is who wrote them.
Built-in functions
Built-in functions are functions that are pre-defined in Python, and always available for us to use in our programs. We've seen many built-in functions already, like print(), str(), input(), and more.
One group of built-in functions are type conversion functions. They convert values from one type to another. For example, the function int() takes a value and tries to convert it to an integer.
>>> int('32')
32
>>> int('Hello')
ValueError: invalid literal for int(): Hello
>>> int(3.99999)
3
>>> int(-2.3)
-2
Function call syntax
As you’ve seen already, you call a function by it’s name and parentheses. For some functions, you also need to put some data in between the parentheses for the function to use.
some_function(data1, data2, data3) # a function called 'some_function' that takes in three pieces of data
If you just use the function’s name, it doesn’t run the function:
input # doesn't run the function
print # doesn't run the function
int # doesn't run the function
You need parentheses, and whatever data is needed to run the function.
input()
print("Hello, world!")
int("32")
Vocabulary
You’ve already learned the word function. Let’s cover the other words for associated concepts:
- Run a function, also called executing, invoking or calling a function. Run, execute, invoke, and call all mean the same thing: tell Python to follow the instructions — do the action for the function. For
print, actually print something. The syntax for running (calling, executing) a function is the name, plus the parentheses, soprint(). - The data that goes in between the parentheses are called arguments. So, for a function call
print("Hello", 12345), you’d say that"Hello"and12345are the arguments to the function. As you’ll see, functions take in arguments, and use the arguments in their operation. - Functions like
int("32")return a value. After running the function, the code “gets back” a value that it can store in a variable, or use in some other expression. - Sometimes, you’ll see functions called methods. Method is a name for a function that’s associated with some type of data. In
"Hello".upper(), we would say the functionupperis a method. It’s available to use with strings like"Hello", and it uses the.syntax, instead of a freestanding call likeupper("Hello").
Investigate: Built-in Functions
Building our own functions
Video: Functions in Python
Defining a function
We use the keyword def (short for ‘define’) to create a new function. When you define a function, you specify a name for the function as well as a sequence of statements in an indented block. The function is stored in the program’s memory, but the code does not run right away. After the definition, we can call the function to run the code.
Here’s what it looks like:
# Define a function.
def function_name(parameter_1, parameter_2):
	# Follow these steps (the indented function body)
	# print each parameter
	print(parameter_1)
	print(parameter_2)

# Use function_name to call the function.
function_name(argument_1, argument_2)
When defining a function:
- Use the keyword
def - Give the function a name, ideally one that tells what the function does
- Give names for each of the function's parameters
- Use an indented block for the code for the function
Below is an example of a Python function that calculates the sum of two numbers:
def add(a, b):
  return a + b
Later, when we want to run the statements in the function, we call the function, which runs the code from the function definition.
add(3, 5) # 8
add(10, 30) # 40
Parameters and Arguments
def add(a, b):
  return a + b
In the example above, a and b are parameters. Parameters are names that stand in for the values passed to the function. You use them in the function body like variables.
We can call the add function like this:
>>> add(3,5)
8
The values passed to the function are called arguments. In this example, 3 and 5 are arguments. The parameters a and b get assigned the values 3 and 5 in the function body.
Practice
A sample run of your code with argument Keno, i.e., greet("Keno") should look like this:
Welcome to Kibo, Keno
We're glad you're here Keno.
Keno, how did you hear about us?
Explanation
If you put the function definition at the end of the program, you will get an error.
A function must be defined before you use it in your program. If you try to call
greet("Keno") before the function greet is defined, Python doesn't know how
to run the function, and will raise a NameError.
Functions can have any code inside them
Any code can go inside a function. Variables, loops, conditions, other function calls — it all works. Anything that you’ve written in a program so far can go inside a function.
# A function with an if/else statement
def check_password(attempt):
	password = "sEcRetPaSsWoRd"
	if attempt == password:
		return "You're in!"
	else:
		return "Access denied"

print(check_password("open sesame")) # Access denied
print(check_password("sEcRetPaSsWoRd")) # You're in!

# A function with a loop inside
def add_up_to(number):
	total = 0
	for i in range(1,number):
		total += number
	return total

print(add_up_to(5))   # 20
print(add_up_to(10))  # 90
print(add_up_to(100)) # 9900
Return Values
def add(a, b):
  return a + b
Often, a function will take its arguments, do some computation, then return a value to be used where the function was called. The return keyword is used for this. In our example, the statement return a + b is called the return statement. It ends the function execution and 'sends back' the result of the function.
It is common to say that a function “takes” arguments and “returns” a result.
Note that some functions do not necessarily return a result.
You can visualize a function as a machine that takes in arguments, and spits out the return value:

Concretely, for the add function that we defined and called like this:
def add(a,b):
	return a + b

add(3,5)
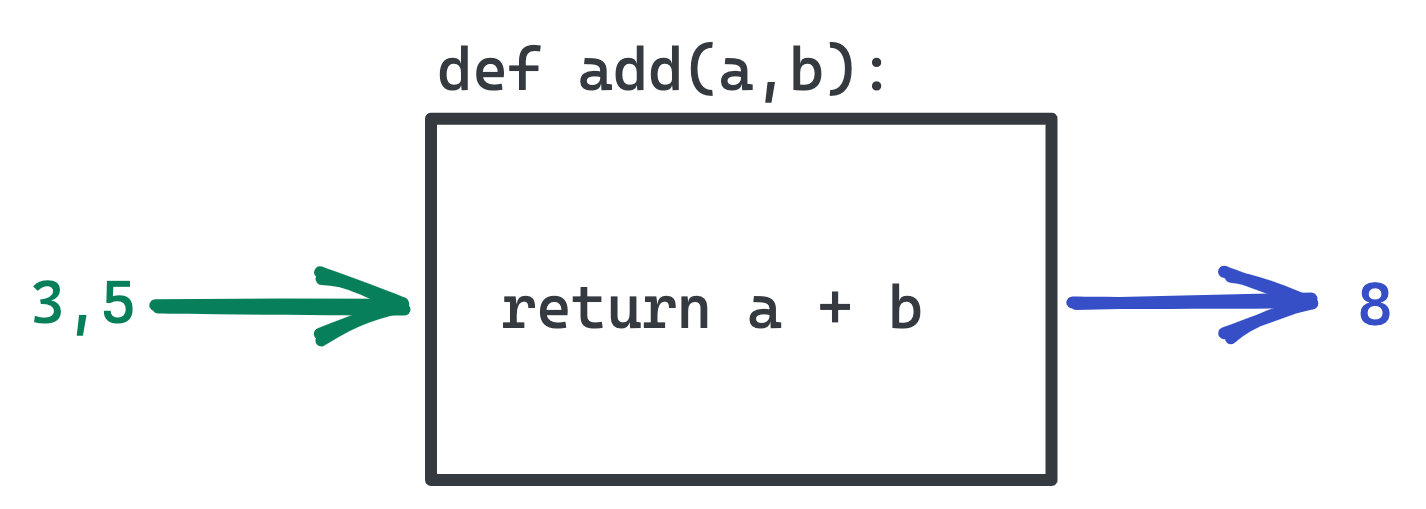
Programs can use the return value for further operations:
result = add(3,5)
print("the result was", result) # the result was 8
bigger_result = add(result, 10)
print("the bigger result was", bigger_result) # the bigger result was 18
If you feel a bit confused, don’t worry. This is a new concept, and it takes a while to get used to. Watch the video below for a more detailed explanation.
Return vs. Print
print is different from returning a value. If you use print, a message shows up in the console, but the rest of the program cannot access this message.
def add_and_print(a,b):
	print(a + b)

result = add_and_print(3,5) # 8
print("the result was", result) # the result was None
The print in the function will print out the value, but it will not return it. None is the value that functions return by default. If they don’t explicitly return something else, they return None.
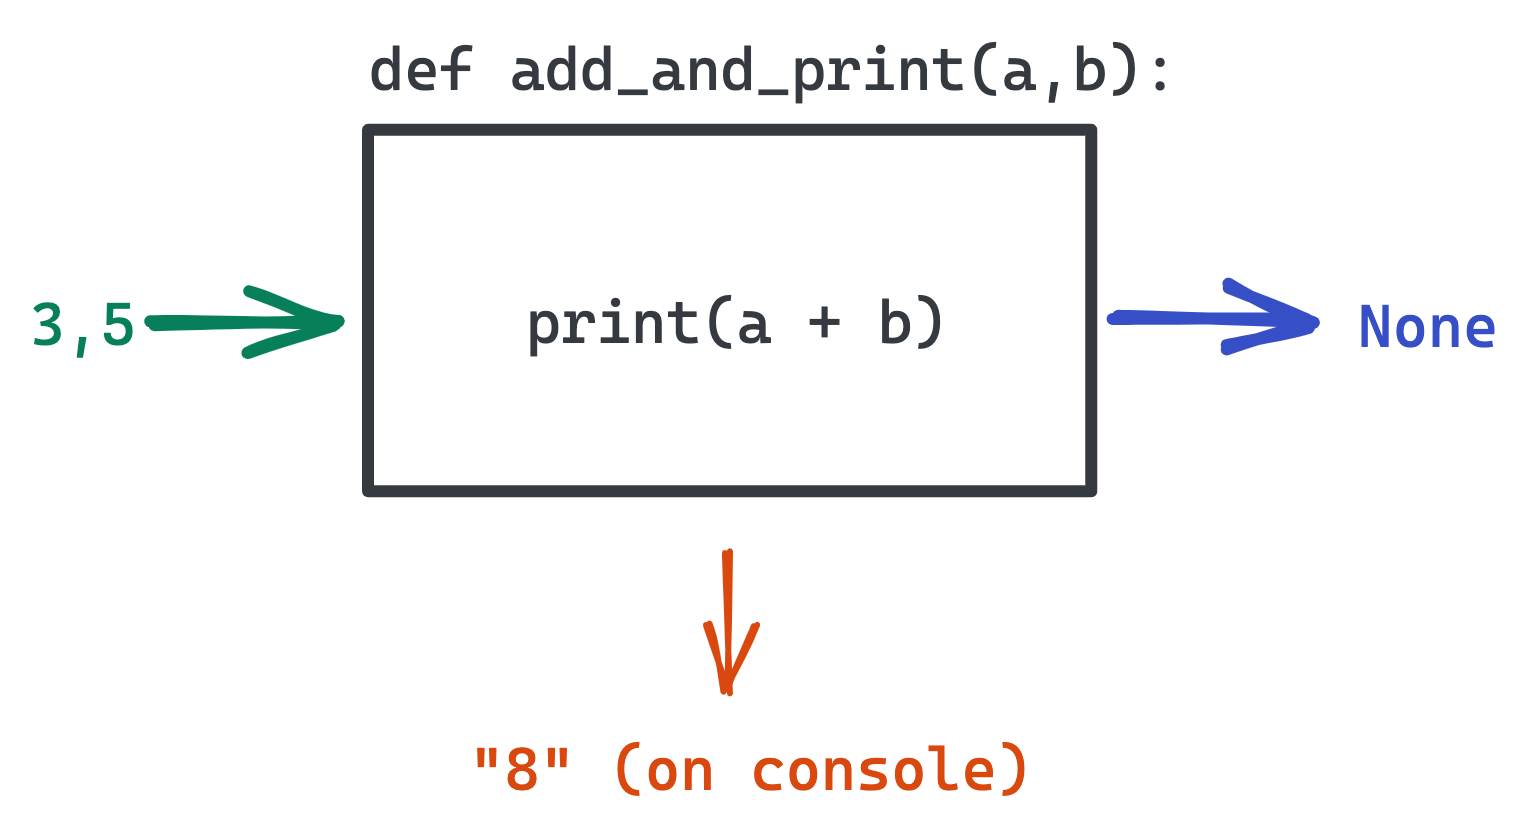
Practice
Types of return values
Functions return different types of values. Here is an example of a function that checks if a given username is valid or not. It returns a boolean:
def is_valid(username):
  if len(username) > 5:  #checks to see if username has more than 6 characters
    return True
  else:
    return False

print(is_valid('user'))    # will print False
print(is_valid('mhassan')) # will print True
You can return any of the types you’ve learned so far from a function - numbers, strings, booleans, or lists.
Practice: Functions
💡 This is your chance to put what you’ve learned into action.
Try solving these practice challenges to check that you understand the concepts.
The solutions to each challenge are available, and you can view a video of the solution below each challenge. Try to go through the whole challenge without using the solution.
If you can’t do the challenge without looking the solution, it means you don’t understand the material well enough yet.
Try the next practice challenges without looking at the solution. If you need more practice challenges, reach out on Discord.
Greeting Function
You will write a function to greet the user.

Area of a circle
You will write a function to calculate the area of a circle.

Area of Circle: Solution
BMI with functions
⚖️ Remember your BMI assignment? In this practice exercise, you'll rewrite using functions instead.

BMI with functions: Solution
Organizing Code
With data types, variables, lists, loops, and functions, you have the tools to build more complicated programs. As you've seen by now, there are lots of ways to solve any given programming problem. So... what makes a good solution?
The next few lessons will cover more function syntax. They'll also focus on how to use functions to organize your code, and how to use documentation and naming to make your program easier to understand -- both for others and for yourself.
Learning Objectives
After this week, you will be able to:
- Use helper functions to split problems into smaller pieces
- Use default arguments, keyword arguments, and
*argsto make your functions more flexible - Document your functions so that other programmers (or you at another time) can better understand how your code works
Project
🧑💻 This is an individual project. It will require a bit more work than the weekly exercises you have done so far. However, the course material has covered everything you need to attempt this successfully.
If you get stuck, confused, or have trouble with the project, you should use the #help-prog1 channel in Discord or message an instructor. Try not to spoil the project for others - use Discord spoiler tags if you are going to include a screenshot or code sample.
Microprocessor Simulation
The microprocessor is the chip at the heart of every computer. Inside the microprocessor is an Arithmetic Logic Unit (ALU) that performs very simple operations on numbers.
In this project, you will write a program that simulates a bit of what a microprocessor does. You'll use lots of helper functions. Since your program will be larger than the programs you've written before, you'll have to think carefully about how you organize your code, and how it works together.

Remember...
- Read the instructions
- Plan before you code
- Debug if you aren't getting the desired output
- Attend office hours if you need additional support
- Ask for help in Discord
Program Design
Take a look at these two programs.
Explore them: run the code, read the code, and see what you can understand.
These programs have the same behavior! They are both different versions of the Tic Tac Toe game. But, one program is better than the other.
What differences do you notice these programs? What makes one better than the other?
Good Programs and Bad Programs
Writing good programs involves significant judgement. As you've seen, there are tons of different ways to solve the same problem with code. Different programmers have different opinions about what makes one solution better than another. Still, there are some rules that are universal.
Here's one attempt at explaining what makes a good program:
The Zen of Python, by Tim Peters

Beautiful is better than ugly.
Explicit is better than implicit.
Simple is better than complex.
Complex is better than complicated.
Flat is better than nested.
Sparse is better than dense.
Readability counts.
Special cases aren't special enough to break the rules.
Although practicality beats purity.
Errors should never pass silently.
Unless explicitly silenced.
In the face of ambiguity, refuse the temptation to guess.
There should be one -- and preferably only one -- obvious way to do it.
Although that way may not be obvious at first unless you're Dutch.
Now is better than never.
Although never is often better than *right* now.
If the implementation is hard to explain, it's a bad idea.
If the implementation is easy to explain, it may be a good idea.
Namespaces are one honking great idea -- let's do more of those!
Of the two programs above,
- one was complex, the other split code up to make each piece simple
- one had functions that could be understood on their own, and the other didn't
- one was readable, the other was not
What other tenets of the Zen of Python did the programs follow or violate?
Factors of well-designed programs
What are the factors that make a program well designed or poorly designed? This is a big topic, and one that you'll chew on for the rest of your programming career.
The factors and techniques we're going to focus on right now are:
- splitting code into helper functions
- designing functions based on their inputs and outputs
- naming for variables and functions
- using documentation and comments to explain how our code works
- following the Python style guide
- using modules to organize our code
Look back at some of the code you've written for your projects for the last few weeks. Which principles do you notice in your code? What improvements do you think you could make?
Functions
One of the core purposes of functions is to split programs up into pieces that make sense.
Good functions should represent just one task that a program has to do. Instead of doing every operation one line after the other, functions isolate parts of the problem, so that your code can be simpler.
Helper Functions
You might use functions just to help other functions work, making it easier to read and organize your code without so much thinking about reusability. Sometimes we call such functions helper functions. Some people use the names "function" and "helper function" to mean the same thing, as functions always help.
Decomposition
One of the main concepts to approach solving problems is Decomposition. That means taking a big problem and decomposing it into smaller ones.
A task like "build a simulator for a microprocessor" sounds really complicated! But, if you break it down into small pieces, like "add two numbers" and "find which of two numbers is greater than the other", each of those small pieces seems much more manageable.
Approaching each step as a standalone problem makes the whole program easier to implement.
Case Study: Geometry Tutor
Let's apply the Decomposition strategy to design a program.
Imagine you are asked to build a program to assist 7th grade students in understanding how to calculate area of various shapes.
The program should ask the user to enter a shape from a list, for example:
Rectangle
Circle
Triangle
Depending on the choice the user enters, it asks the user to enter the to calculate the area of the needed shape.
One option is to implement the whole code into one long file without splitting it into functions.
- What would need to change about the program if it needed to support another shape?
- What would need to change about the program if it needed to display the perimeter as well as the area?
- If you wanted to use the shape functions in another project, how would you do that?
- A team member of yours wants to give you a hand in implementation - how would you organise this?
Let's explore what the code would look like if we used functions.
- Part 1: Functions - operations that program would need
- Part 2: Main Flow - steps for user interaction, using the helper functions
We will start functions into an internal module called utilities.py:
from math import pi

def circle_area(radius):
    area = float(pi*r*r)
    return area

def rectangle_area(length, width):
    area = float(length * width)
    return area

def triangle_area():
    are = float((base*height)/2)
    return area
Once the helper functions are ready, we can write the main flow:
from utilities import circle_area, rectangle_area, triangle_area

area = 0
shape_choice = input("Enter a shape to find its area: \nCircle \nRectangle \nTriangle")

if shape_choice.lower() == 'circle':
    radius = input("Please enter the radius of the needed circle")
    area = circle_area(radius=radius)

elif shape_choice.lower() == 'rectangle':
    length = input("Please enter the lenght of the needed rectangle")
    width = input("Please enter the width of the needed rectangle")
    area = rectangle_area(length=length, width=width)

elif shape_choice.lower() == 'triangle':
    height = input("Please enter the height of the needed triangle")
    base = input("Please enter the base of the needed triangle")
    area = circle_area(base=base, height=height)

else:
    print(f"Selected shape is not supported {shape_choice.lower()} - Please choose an item from the list")

print(f"Calculated area for {shape_choice} is {area}")
This design has very different answers to our questions above!
What would need to change about the program if it needed to support another shape?
A new shape function will be added to the utility module, so you can import it anywhere in your code.
If you wanted to use the shape functions in another project, how would you do that?
You could import the utilities module using import utilities after having a clear path for module.
A team member of yours wants to give you a hand in implementation - how would you organise this?
Working with other team members will be easier. Team members can use functions the others have written, and add or change functions without all editing the core driving logic.
What makes good functions?
Reusability: Functions should be reusable. Since they can be called from somewhere else in the program, it's important to make sure that they are reusable. Usually, that means writing functions whose inputs and outputs are clear, and don't depend on or affect anything outside of the function.
Readability: Other programmers will read your functions to tell what your code does. Choosing good names for your functions and arguments will make your code more clear to them (or to you!)
Usually, you want functions to be short, do just one job, and be named based on what they do.
Function Arguments
You've written lots of functions that accept arguments. Python has a few ways to write and call functions that make functions more readable and flexible.
Keyword arguments
Python allows us to pass arguments using their names. This way, you can pass arguments without caring about the order. This feature called keyword arguments. Here's a simple example to demonstrate the syntax:
def greet(name, msg):
  print("Hello,", name, msg)

# keyword arguments
greet(name="Bruce", msg="How do you do?")

# change argument order, but the result is the same
greet(msg="How do you do?", name="Bruce")
Both calls will work the same. In the code where you call the function, you can use the name of the argument to assign the value to that argument.
This is particularly useful if a function takes in lots of arguments. It makes it really clear which values are doing which job.
Default Argument Values
If we have a greeting function with two arguments for example, it would look like something like this:
def greet(name, msg):
    print("Hello", name + ', ' + msg)
Let us have a closer look at these arguments. What would happen if we call this function with a wrong number of arguments (one argument for example)? For instance, greet("Alice")
In that case, python interpreter will show an error saying the following:
TypeError: greet() missing 1 required positional argument: 'msg'
We can change the function to use a default value if there is no argument passed in when the function is called.
Provide a default value using the = operator:
def greet2(name, msg="Good morning!"):
    print("Hello", name + ', ' + msg)

greet2("Alice")
greet2("Ben", "How are you?")
The output will be:
Hello Alice, Good morning!
Hello Ben, How are you?
In greet2, there is a default value for the msg parameter that the function will use if no other message is provided. The first parameter name is still required: the function will encounter an error without it.
Mixing default and required arguments
A function may have a mix of default and non default arguments. But, if a parameter has a default value, all the following parameters must also have default arguments.
If we try to write the function with a default argument first, we get an error:
def greet(msg = "Good morning!", name):
    print("Hello", name + ', ' + msg)
Results in: SyntaxError: non-default argument follows default argument.
Variable Number of Arguments
Some functions may need to perform a process on all arguments, regardless of how many arguments we pass.
For instance, no matter how many values you pass into the print function, it
prints all of them out:
print(1)
print(1,2)
print(1,2,3,4,5,6,7,8,9,10)
Python allows you to pass a variable number of arguments to functions, using *args (pronounced 'star args').
*args
*args allows us to pass a variable number of arguments to a function.
The star collects all the arguments into a list.
def greeting(*args)
    # args is a list with the arguments
    for arg in args:
        print(arg)

greeting('Welcome', 'to', 'Programming 1', 'at', 'Kibo')
Output:
Welcome
to
Programming 1
at
Kibo
Star args don't have to appear in the first position.
An example that with another argument first:
def greeting(first_word, *args):
    print("First word :", first_word)
    for arg in args:
        print(arg)

greeting('Greeting','Welcome', 'to', 'Programming 1', 'at', 'Kibo')
Output:
First word: Greeting
Welcome
to
Programming 1
at
Kibo
The name of the collection argument is often called args by convention, but it doesn't
have to be. Here's an example where it's called numbers instead:
def product(*numbers):
  total = 1
  for number in numbers:
    total *= number
  return total

print(product(5, 2, 10, 10))
output:
1000
Note: there is a related concept **kwargs, for keyword arguments that you may have heard reference to online. We'll introduce it when covering Dictionaries later in the course.
Multiple Return Values
You already know how to use the return keyword to return a specific value from a function.
What about the cases where you need to return more than one value?
Python only allows returning a single value from a function, but using a wrapper like a list or tuple, you can return more than one thing.
For example, here is a function that takes two numbers and performs addition, subtraction, multiplication, and division upon them.
def basic_calculator(a, b):
    sum = a + b
    diff = a - b
    mul = a * b
    div = a / b

    return [sum, diff, mul, div]
Tuples
But, a list isn't always the right way to represent this. A list can have items added to it or removed from it, and that isn't what usually what we mean when we return a value.
Python offers another data type called tuple which is like a list, but with immutable values - we can't change what's in it.
Look up the differences between a list and a tuple in the Python docs
From the Python docs:
Though tuples may seem similar to lists, they are often used in different situations and for different purposes. Tuples are immutable, and usually contain a heterogeneous sequence of elements that are accessed via unpacking (see later in this section) or indexing (or even by attribute in the case of namedtuples). Lists are mutable, and their elements are usually homogeneous and are accessed by iterating over the list.
So, in most situations, lists have values of the same type (for example a list of strings or a list of numbers), and a tuple would have a mix of strings, numbers, or other types of values.
Tuples support a pair of useful syntactic operations called packing and unpacking. That means we can rewrite the function like this:
def basic_calculator(a, b):
    sum = a + b
    diff = a - b
    mul = a * b
    div = a / b

    return sum, diff, mul, div
Python will 'pack' the return values into a single Tuple value, then return the Tuple.
How do we access that from the calling side?
If we just do a normal function call, we'd have to remember which index of the result represented which value
result = basic_calculator(5, 10)
# is the product result[1] or result[2]?
Instead, we can use the unpacking feature of Tuples and assign to lots of variables at once:
sum, diff, mul, div = basic_calculator(5, 10)

print(
    f"The sum is {sum}\n"
    f"The difference is {diff}\n"
    f"The multiplication gives {mul}\n"
    f"The division gives {div}\n"
)
Readability
Especially as you work on larger and larger projects with more and more teammates, code readability becomes more and more critical. But, what does it mean for code to be readable? You'll learn a few different strategies for
Comments
So far, you've used comments to explain your code as you've written it. As you've probably seen, some comments are very useful, and others are just taking up space, without helping you understand what is happening. Adding long comments can hurt readability more than it helps!
You should continue to use comments to help organize your thoughts and understand how your code works as you write it. As you learn more, you'll likely find that you will write fewer comments, and they will be more targeted at parts of your code that are surprising or deserve an explanation, rather than sprinkled everywhere.
Docstrings
Python has a special syntax for comments that document a function, called a docstring.
A docstring is a string written as the first statement of a function that explains the function, its parameters, and its return value.
Docstrings can be one line or multiple lines, depending on how much information they include.
Here's a one-line docstring explaining a function:
def divide(a, b):
    """This function divides the value of a by b and returns a float result"""
    return a / b
Longer docstrings add an explanation of each argument as well as the return value
def divide(numerator, denominator):
    """
    This function divides the numerator by the denominator and returns the result without attempting any type conversion.


    :param numerator: (float) the value to be divided
    :param denominator: (float) the value to divide by; the divisor

    :returns: (float) result of numerator divided by the denominator
    """
    return numerator / denominator
This example specifies the parameters and return values in the common Sphinx documentation style. Based on docstrings formatted this way, Sphinx can automatically build pages of documentation.
You can read more about docstrings in PEP 257 - Docstring Conventions, or see an example of the Google Documentation format.
Naming
Names should strive to be:
- short
- meaningful
- unambiguous
Coming up with a good name for a function, variable, or argument can be hard!
When possible, avoid names that don't mean anything. When you can, also avoid naming variables after the type of data that they are, unless you are writing a function that is generic to that data type.
- Bad:
def greet(s) - Bad:
def greet(string) - Better:
def greet(person) - Good:
def greet(name)
It's sometimes helpful to name functions with verbs and name variables with nouns, since functions usually represent actions. This isn't always the case. It's true for functions like List.append() but not for conversion functions like int().
Naming Conventions from the PEP8 style guide is an interesting read. Naming is hard, even for the people who designed Python!
Readable code
What about the code itself? How do you make it so that your code is easy to read?
First, you should follow the Python style conventions. These help other Python coders read your code, since it will look like 'standard' Python.
There are lots of recommendations to follow, like:
- Use blank lines to separate your functions, but keep the body of the function together
- Use lower_snake_case for function and variable names
- Put imports at the top of your file
The full list of recommendations is called PEP8, but it's too long to memorize all at once.
Instead of memorizing all of them, you can configure your editor to format your code for you, and detect any issues using a linter. See the VSCode docs on formatting and linting for help to configure your editor.
But, just following the style guide will not be enough to write code that is readable! You can still write confusing code while remaining compliant with PEP8 and the auto-formatter.
From the Zen of Python:
Simple is better than complex.
Flat is better than nested.
Try to write functions that do fewer things, and do things in simple ways when possible.
Try to avoid code that is complicated. One obvious sign of complicated code is the level of nesting. If you have lots of loops and if statements nested inside of each other so that the code is indented many times, then you know that the code is pretty complicated!
Type Annotations
When we write Python functions, it's often helpful to know the data types of the parameters and return values.
Python lets us add type annotations that specify the types of the values:
# No type hints
def greeting(name):
  return f'Hello, {name}'

# With type annotation
def greeting(name: str) -> str:
  return f'Hello, {name}'
In the Python interpreter, these won't change anything. If you run greet(4.5) it will still do the same thing. However, there are tools like mypy, pyright, and pydantic that can verify that functions are called with the correct kinds of arguments. That can help avoid common issues like passing in a string where there is supposed to be a number.
Why would you use type hints?
- Faster Development: Type annotation will uncover mistakes more quickly and protects from passing wrong values.
- Users of your code: Type hints can make your funcitons more clear for anyone reading or using your code.
- Documentation: Type hints can be part of your documentation. Some people even consider it the whole documentation of the function!
Type hints are a relatively new feature in Python. You can read more about the rationale for adding the feature here: https://peps.python.org/pep-3107/
We won't cover how to write type annotations in this course, but you can read more about them, and you'll see more in future courses.
Modules
In Python, modules are files that contain code that's ready for us to use.
Here are a few examples:
- The
randommodule that we previously used to generate random numbers. - The
cmathmodule offers complex mathematical functionality. - The
csvmodule is for reading and writing tabular data to and from delimited files. - The
emailmodule supports parsing, manipulating, and generating email messages. - The
scikit-learnlibrary contains modules for machine learning work.
There are tons of modules and libraries out there. When you need to implement some feature and you don't know how, you can search for a module that provides these functions for you.
You can also write your own modules, like the utilities module from the first example in the discussion of helper functions.
Importing Modules
To use a module, you’ll need to import it using Python’s module system. You’ve used import before, for code like this:
import random
random_number = random.randint(0, 100)
print(random_number) # 76 (when I ran it - different each time)
random is a module with useful functions like randint, which generates a random number. Modules are python’s way of grouping related functions.
Importing from modules you wrote
You've seen how to import from external modules like random. But what about importing functions from your own code?
You can import functions from other files within your project using import too.
Imagine that you have a file called utilities.py where you have the following function:
def square_area(length, width):
    return length * width
You can import this helper function from another file by using the name of the file it's from:
# (in main.py)
from utilities import square_area

result = square_area(10, 20)
Since square_area is in the file utilities.py, you can import it using from utilities. The name of the file is where you import from.
Note: If you take a look at how the tests work in your exercises, they often import code from
main.pyto test.
Renaming imports
If you want to use a different name for something you import, you can change the name using as. For example:
from utilities import square_area as sq

result = sq(10, 20)
dir() built-in function
One way to know what functions does a module provides is by using the built-in function dir()
For example, run this snippet to see all the variables and functions in the random module:
import random

print("The contents of the random library are:")
print(dir(random))
When I run this, I see:
The contents of the random library are:

['BPF', 'LOG4', 'NV_MAGICCONST', 'RECIP_BPF', 'Random', 'SG_MAGICCONST',
'SystemRandom', 'TWOPI', '_BuiltinMethodType', '_MethodType', '_Sequence',
'_Set', '__all__', '__builtins__', '__cached__', '__doc__', '__file__', '__loader__',
'__name__', '__package__', '__spec__', '_acos', '_ceil', '_cos', '_e', '_exp',
'_inst', '_log', '_pi', '_random', '_sha512', '_sin', '_sqrt', '_test', '_test_generator',
'_urandom', '_warn', 'betavariate', 'choice', 'expovariate', 'gammavariate', 'gauss',
'getrandbits', 'getstate', 'lognormvariate', 'normalvariate', 'paretovariate', 'randint',
'random', 'randrange', 'sample', 'seed', 'setstate', 'shuffle', 'triangular', 'uniform',
'vonmisesvariate', 'weibullvariate']
This is a lot of output! dir() doesn't explain what any of those variables or
functions do, but you can look up the documentation for any of the ones that
seem interesting.
Reading the Docs
To find the functions that a module provides, you can use Google, or look at the documentation (”docs”) for that module.
https://docs.python.org/3/library/random.html#module-random is the link to the docs for the random module. Click it to see everything there is to know about random.
📖 Tips for Reading Documentation
-
Documentation covers everything. You probably only need a small part. Skim, search, and scan to find what you actually need
-
Sometimes it’s helpful to just see the name of a function, then try it out to see what it does.
-
Function descriptions in documentation look like this:
random.choice(seq)
Return a random element from the non-empty sequence seq. If seq is empty, raises
[IndexError](https://docs.python.org/3/library/exceptions.html#IndexError).This one means you can pass a sequence (like a list) into the
choicefunction provided by therandommodule, and it will return a random element from the list.
What modules are available?
You can use Google to find a Python module, or look at the index of all built-in modules. There’s a lot of modules, so you might scan it now, then just Google it when there’s something in particular that you need.
Lots of modules are not built into python — they’re written by other developers. In order to use modules that aren’t built in, you need to install them so that they are available to import.
Later on, you'll learn how to install external libraries, and practice using some of the most common and powerful libraries, like requests and flask.
Modules you’ll use
In the “Distance Traveled” practice, you’ll need to import the math module to use the math.sqrt function. In the "Quick Draw" practice, you imported the random module to generate random numbers, and the time module to measure how long things take.
In the past, students have used modules for special features in their projects, such as:
- the
requestsmodule to interact with data over the web - the
gttsmodule for text-to-speech - the
termcolormodule to change the color of the text output - various modules for drawing images and figures
Practice: Organizing Code
💡 This is your chance to put what you’ve learned into action.
Try solving these practice challenges to check that you understand the concepts.
The solutions to each challenge are available, and you can view a video of the solution below each challenge. Try to go through the whole challenge without using the solution.
If you can’t do the challenge without looking the solution, it means you don’t understand the material well enough yet.
Try the next practice challenges without looking at the solution. If you need more practice challenges, reach out on Discord.
Distance Traveled
In this exercise, you'll use a helper function to help measure how far a footballer has run over the course of a match.

Random Story Generator
In this exercise, you'll write a story with blanks (like your Mad Libs story), but fill them in with random words instead of input from the user.

Date Format
In this exercise, you'll practice with helper functions to format dates.

Refactor another project
Tidying up your old code is a good way to review what you've learned already, and to practice noticing opportunities to reorganize your code.
Using the tips and techniques you learned this week, go back and review code that you wrote for a previous week. What do you see about that code that you can improve?
- Can you extract a helper function?
- Can you rename a function or variable to be more meaningful?
- Can you restructure the code to have less nesting?
Files
You use different kinds of files all the time! Text files, python programs, images, pdfs, audio and video files. Lots of applications are focused on doing different tasks with files. Instagram? Download and display image files. iTunes? Show and play audio files. Photoshop? Microsoft Word? Audacity? They're specialized programs for editing different kinds of files (photos, rich text documents, and audio). Even a web browser is, in some ways, a fancy file viewer, for files shared across different servers.
Files have so many different uses for a few reasons:
- Persistent: they stick around after a program is done running. They're saved.
- Flexible: they can represent lots of different kinds of data
- Shareable: you can share a file between programs, or between computers over a network
Use Cases
You may encounter many use cases to integrate files within your program:
- Data that somebody shared with you as a file. For example, a list of sensor readings stored in a file and you need to process.
- Saving user configurations like font size, color, selected theme, etc.
- Saving user logs. Web servers for example save their logs in files.
Files are super powerful... but they can also be pretty complicated. Python offers a ton of different libraries and functions for working with files. You'll focus on learning to use some of the most useful functions this week - reading and writing files, moving them around, and organizing them in directories.
Learning Outcomes
After this week, you will be able to:
- Use python's built-in tools for managing files and directories
- Read text from files and write text to files
- Check different information about files, like the size or type of a file
- Create, destroy, move, or change files and directories
Assignment
🧑💻 This is an individual exercise. It is based on this week's content so you should review that to set you up for the assignment. You are expected to work independently.
If you get stuck, confused, or have trouble with the project, you should use the #help-prog1 channel in Discord or message an instructor. Try not to spoil the project for others - use Discord spoiler tags if you are going to include a screenshot or code sample.
This week's assignment comprises 2 independent exercises which will test your
understanding of how to manipulate files in python. You are required to complete
all of them in order to get full marks. Specific instructions for each exercise are
in the README.md file within each exercise's folder. The exercises are:
- binary-file-info: Write a program that accepts the name of a binary file from standard input, and prints out the name, size, and type of the file.
- count-file-lines: Write a program that takes in the name of a file as input, then prints out the number of lines in that file. As an option, it can also take in a string to filter the lines. If a string is provided, it should only count the lines that contain that string.

Remember...
- Read the instructions tab in Replit
- Plan before you code
- Debug if you aren't getting the desired output
- Attend office hours if you need additional support
- Ask for help in Discord
7.1 Basic File Operations
Basic Operations
At this section, we will check how do we perform file basic operations in python. These are:
- Opening a file
- Closing a file
- Reading from a file and access file data in code
- Deleting a file
NOTE: There are different ways in python to perform these operations. You are highly recommended to check modules documentation for more information
Opening a file
There are many python functions for open a file. We will visit some of them.
Python Open Function
Python has a built-in function called open(). It is used to open a specific file and it then returns a file object called Handler, that you can then use to manipulate the opened file.
The first argument of the open function is the file name. In case the file exists within the working directory, you can specifcy the nameof the file. Otherwise you may insert the full path for the needed file.
f = open("test.txt")    # open file in current directory
f = open("C:/Python38/README.txt")  # specifying full path
At this snippet, f is our file handler and we will see later how do we perform file operations using handlers.
File Modes
The open function has more than one argument. Apart from a file name, it has a mode and encoding arguments.
The mode argument specifies what we want to do with the file, read r, write w, or append a. We can also specify if we want to open the file in text mode or binary mode.
The default mode for reading is the text mode. This provides contents in the form of strings. On the other hand, a binary mode returns bytes and this is usually used when dealing with image or executable files. Image processing applications for example.
Check the table below for an overview of main file modes
| MODE | DESCRIPTION |
|---|---|
| r | Opens a file for reading. (default) |
| w | Opens a file for writing. Creates a new file if it does not exist or truncates the file if it exists. |
| x | Opens a file for exclusive creation. If the file already exists, the operation fails. |
| a | Opens a file for appending at the end of the file without truncating it. Creates a new file if it does not exist. |
| t | Opens in text mode. (default) |
| b | Opens in binary mode. |
| + | Opens a file for updating (reading and writing) |
Some examples using file modes:
f = open("test.txt")      # equivalent to 'r' or 'rt'
f = open("test.txt",'w')  # write in text mode
f = open("img.bmp",'r+b') # read and write in binary mode
Additionally, open function has the option to use encoding. The default encoding is platform dependent. In windows, it is cp1252 but utf-8 in Linux.
NOTE: You need to take care of encoding, especially when working across platforms. It is highly recommended to specify encoding when using text mode.
f = open("test.txt", mode='r', encoding='utf-8')
Closing File
After performing needed operations on a file, we should close it. Why is this important? Closing the file frees up resources attached to it.
This is usually done using close() method.
f = open("test.txt", encoding = 'utf-8')
f.close()
The close operation can sometimes be not that safe to perform. If an exception happens within the code before we reach closing, our program may exit without closing. How to avoid this? By using what we call a try..finally block
try:
   f = open("test.txt", encoding = 'utf-8')
   # perform file operations here
finally:
   f.close()
This block makes sure that whenever an exception happens within try scope -> the flow is directed to the finally scope and the files is closed.
NOTE: Try..except..finally is the way we handle exceptions within a python program. We will talk about this in detail in Programming 2.
With Statement
The most recommended way to close a file is by using with statement. This ensures that the file is closed when we exit a with block.
When using this approach, we do not need to use the close function to explicitly close the file.
with open("test.txt", encoding = 'utf-8') as f:
   # perform file operations
Most of our examples will use the with approach from now on.
Reading a File
There are several ways that we can use to read from files. When reading from a file, you need to open it using the reading mode r. At this section, we will check the following ways reading data from a file:
- Size
- Lines
Read using size
You can using the read(size) method to read the size number of data. it the size is not specified, it reads and returns till the end of the file.
Imagine that we have the following check.txt file:
Welcome to the Programming 1 at Kibo
This is the first time we use files!
The file has three lines
Reading a file with size would look like:
> f = open("check.txt",'r',encoding = 'utf-8')
> f.read(4) # read the first 4 data
'Welc'

> f.read(4) # read the next 4 data
'ome'

> f.read() # continue till the end
'to the Programming 1 at Kibo\nThis is the first time we use files!\nThe file has three lines'
Read using lines
The most convenient way to read a file is by lines through a for loop.
f = open("check.txt",'r',encoding = 'utf-8')
for line in f:
  print(f"One Line: {line}")
Output:
One Line: Welcome to the Programming 1 at Kibo

One Line: This is the first time we use files!

One Line: The file has three lines
To avoid blank lines when printing, change the print to be print(f"One Line: {line}", end = ''). The line in the file includes a \n itself, so changing the end argument would prevent from having blank lines.
Here is a video that shows how to read a file using a for loop:
Apart from that, the method readline() can be used to read individual lines with no loop:
>>> f.readline()
'Welcome to the Programming 1 at Kibo\n'

>>> f.readline()
'This is the first time we use files!\n'

>>> f.readline()
'The file has three lines\n'

>>> f.readline()
Moreover, there is sometimes the need to get all lines of a file into a list. Python provides a method called readlines() to perform this:
>>> f.readlines()
['Welcome to the Programming 1 at Kibo\n', 'This is the first time we use files!\n', 'The file has three lines\n']
Be careful when using
readlines()method. It may consume a lot of memory if the file is large.
Writing to and Creating a File
When writing to file, we need to use one the following modes: w write, a append, or x exclusive creation mode.
When using the write mode, you need to know that it wil overwrite file contents if it exists. That means that all of the content will be erased.
Writing strings or sequence of bytes to a file is performed using the write function. The function returns the number of characters written.
The following example creates the file test.txt if it does not already exist. It the file is already there, it overwrites it.
with open("test.txt",'w',encoding = 'utf-8') as f:
   f.write("my first file\n")
   f.write("This file\n\n")
   f.write("contains three lines\n")
NOTE: Do not forget to explicitly specify new lines when using the write method. Otherwise, you will overwriting contents.
Here is a video that shows how to write to and append to a file:
Deleting a File
Deleting a file is simple, you can use the os module for this:
import os
os.remove("check.txt")
Example reading sensor data from a file
Assume the following file s1_sensor_data.txt:
1627374600,25.5
1627374605,26.1
1627374610,24.8
1627374615,27.3
1627374620,26.5
The first part of each line is the timestamp and the second part is the temperature reading. Here is the code to read the file and store the data in a list:
file_name = "s1_sensor_data.txt"
timestamps = []
sensor_values = []
# check if the file exists
if not os.path.exists(file_name):
   print(f"File {file_name} does not exist")
   exit(1)

# read the data from the file
with open(file_name,'r',encoding = 'utf-8') as f:
   data = []
   for line in f:
      timestamp, value = line.strip().split(',')
      timestamps.append(int(timestamp))
      sensor_values.append(float(value))

# print the data
print(timestamps)
print(sensor_values)
Notes:
- We used the
rmode to read the file. - Using the
encodingargument is important to avoid any encoding issues when reading the file across platforms. - The
strip()function removes any leading and trailing whitespaces or new lines from the string. - We didn't need to use
close()function because we used thewithstatement
Exercise: Extend the above code to calculate the average temperature and print it.
Example writing log data to a file
Assume that we have a list of log messages that we want to write to a file. The following code snippet shows how to do this:
log_messages = [
   "2021-07-27 10:00:00,INFO,Starting the program",
   "2021-07-27 10:00:01,INFO,Reading sensor data",
   "2021-07-27 10:00:02,INFO,Processing sensor data",
   "2021-07-27 10:00:03,INFO,Writing sensor data to file",
   "2021-07-27 10:00:04,INFO,Program finished"
]
file_name = "log.txt"
with open(file_name,'w',encoding = 'utf-8') as f:
   for log in log_messages:
      f.write(log + "\n")
Notes
- We used the
wmode to write in the file. - Using the
encodingargument is important to avoid any encoding issues when reading the file across platforms.
Other File Methods
You can always check Google for more information about file functions.
Check the following for a documentation of main file methods we talked about many of them in this section.
7.2 Basic Directory Operations
In this section, you will be introduced to basic directory operations in python.
Files & Directories
When working on software solutions, you might come across scenarios where you need to handle files at different locations in the filesystem. You may also need to create directories and move files around. For instance:
- You might need to store log files in directories that are named after the date of the log file.
- You might need to create a directory for each category of files you have.
- You might need to create a directory to store the file uploads of each user of your application.
Listing content of a directory
To check the files and subdirectories inside a certain directory, you can use the os.scandir() method. Suppose that we have a directory called data at our workspace that has the following contents:
- file_1.txt
- file_2.txt
- file_1.csv
- file_1.log
- file_1.mp4
- folder_1
os.scandir() returns at iterator object that we can loop over to get all contents within our directory:
import os
entries = os.scandir('check_dir/')
print(entries)

with os.scandir('check_dir/') as entries:
    for entry in entries:
        print(entry.name)
Output:
<posix.ScandirIterator object at 0x7f2c4fc27ce0>

file_1.txt
file_2.txt
file_1.csv
file_1.log
file_1.mp4
folder_1
Some points regarding the previous example:
- With Scope: We are performing a file operation using the
withsyntax we learnt at our previous lesson. It is useful here as it frees up acquired resources automatically after the iterator has been exhausted. - Scan Method: This method returns a
ScandirIteratorthat points to files within a current directory. We need to loop it over to get exact file names.
Iterator: An Iterator is an object type that has a countable number of values, and it can be iterated upon.
Another way to get the contents of a directory is by using os.listdir(input_dir) method.
import os

for filename in os.listdir(input_dir):
    print(filename)
Try it yourself check the function is_file() and use it to list only the files within a mixed directory (directory may have both of files and directories)
scandir vs listdir
scandir() returns an iterator of os.DirEntry objects. DirEntry objects have attributes that describe the file or directory that they represent like name, path, size, and modification and creation times.
listdir(), on the other hand, only returns a list of strings representing the names of the entries in the directory given by path, It is simpler.
In many scnearios, scandir() is more efficient and faster than listdir().
Creating a Directory
Imagine now that case that your program needs to have a directory that stores output data (files, reports, or logs). How would you create a directory at Python? There are several ways to create a directory, one of them is by using os.mkdir method:
import os

os.mkdir('my_directory/')
In case the directory exists, this method will raise a FileExistsError.
Now if your program needs to create a directory tree, then this method would not be suitable. What should you do?
Python offers a similar method called os.makedirs where you can use it to build a tree of directories.
import os

os.makedirs('path/to/log')
This will create the following tree:
.
|
└── path/

    └── to/

        └── log/
It will create 3 directories: path, to, and log. log will be a subdirectory of to and to will be a subdirectory of path.
NOTE: Check mkdirs() method for more information.
NOTE: Check difference between mkdir() and mkdires() for more information.
Deleting a Directory
Sooner or later, you may start thinking about a clean up function within your program. The aim of this function is to clean all messy files and directories that you may have created through the program. How would you delete a directory in Python?
One way to do that is the os.rmdir()
import os

trash_dir = 'my_documents/bad_dir'

try:
    os.rmdir(trash_dir)
except OSError as e:
    print(f'Error: {trash_dir} : {e.strerror}')
Notice that this method works for empty directories only.
Try it out check shutil.rmtree() for deleting non empty and whole directory trees.
Modifying a Directory
As we have mentioned at the beginning of the lesson, you will notice with time that designing software programs need to modify some directories and paths for various reasons like storing data or generating reports. At some applications you may need to:
- Categorize files based on extension type.
- Process a series of images in a directory and create a new tree of directories based on the path.
At this section, we will target the problem of modifying directories including copying, moving, and renaming files.
As you may already know, python is rich with modules. One main module that we will take a closer look at here is called shutil.
Copying Files & Directories
A simple copy operation from one path to another can be performed as follows:
import shutil

src = 'path/to/file.txt'
dst = 'path/to/dest_dir'
shutil.copy(src, dst)
src stands for the source location of the file, while dst is the destination where want to copy to. We have two options here. If the destination is a file, then the contents of that file are going to be replaced by the source file.
On the other hand, if the destination is a directory, then the source file will be copied into that directory.
NOTE: shutil.copy() copies file contents and permissions only. Other metadata like creation and modification time is not part of the copy.
What about copying the whole directory not just a file? Shutil offers a method called shutil.copytree. A common case to use this is when you want to create a backup for your directory tree before you start developing.
An example to achieve this would be something like:
import shutil
shutil.copytree('data_1', 'data1_backup')
As we notice here, shutil.copytree() takes two arguments; source and destination. It copies the contents of the source to the new destination ('data1_backup' at our example). One note here is that the destination directory must not exist.
Moving Files & Directories
When we need to move the whole file or the needed directory, we can perform that using shutil.move(src, dst). Clearly, src is the file or directory to be moved and dst is the destination.
import shutil
shutil.move('data/', 'backup/')
shutil.move() will move data directory into backup if backup exists. It not, data will be renamed to backup.
Renaming Files & Directories
Renaming a file or a directory is simple. OS module offers a method called rename() that can be used for that aim.
os.rename('file_1.csv', 'file_2.csv') will change the name of the file. In case the destination is a directory, an OS error will pop up.
Check shutil documentation for more information about its methods and functionality.
Watch this video for a demonstration of managing files and directories in Python:
File Metadata
Metadata for a file is simply extra information about the file that makes easier to find and use. A file extension and creation date are examples of a file metadata.
A common case to process a directory is that you loop over the whole contents and decide what to do with each file/folder. We talked about about looping over the contents of a directory. At this section we will apply this and take a step further.
Let us learn how would we check file metadata within a directory. We will use the same data directory contents we referred to at the beginning of this lesson.
Take a look at the following example:
import os

for filename in os.listdir(data):
    print(os.path.splitext(filename)[1])
We used the method os.path.splitext here to split the filename into two parts, the first one is the name of the file, while the second one is the file extension.
Try it yourself Modify the example to print files with .txt extension only.
Let us now modify the example to show more file metadata:
import os

for filename in os.listdir(data):
    print(os.path.splitext(filename)[1]) # File extension
    print(os.stat(f"{file_dir}/{filename}").st_size) # File Size
    print(os.path.getmtime(path)) # File Creation Time
At this example, we added:
-
File Size: we used the
os.stat()function to get file statistics where we used them to get the size usingst_size. Notice that this function needs the whole file path as an argument to work properly. os.stat has plenty os useful metadata that we can use, check: https://docs.python.org/3/library/stat.html -
File Creation Timestamp: Shows a timestamp related to when this file was created. For more context on how to use such functions, please refer to: https://pynative.com/python-file-creation-modification-datetime/
NOTE: Project and Exercises will assist you to apply these functions into real world problems as well as searching for more functions to provide suitable solutions.
Practice: Files
Spelling Corrector
You will write a function that shows a corrected version of a file content

Practice Solution Video
File Checker
In this exercise, you'll write a program to check whether certain files exist.

Practice Solution Video
Data Structures
You've been using data since your very first "Hello, world". You've practiced with strings and lists. You've used functions, loops, and conditionals to organize your code to solve problems. Now, you'll shift your focus to how to organize your data to solve problems.
Lists and strings are data structures. You've seen how they've been useful for solving whole sets of problems, that they are the right kind of fit for. You may have also run into some problems that were tricky to solve. Some of those problems can be made much easier, if you are familiar with different data structures.
These lessons will focus on using dictionaries. Next to lists, dictionaries are the most common data structure you'll use for solving problems in python. Instead of a series of items accessed by a numeric index, dictionaries let you access items using a name. Since dicts can access items by name quickly, they make it easy to solve problems that lists aren't well-suited for.
Other built-in Python data structures include set and tuple, and there are tons of more specialized data structures, like the deque (pronounced 'deck'), namedtuple, or struct. You won't learn about those in these lessons, but with two go-to choices for data structure available to you, you'll start to ask the question: "what is the right data structure for this problem?"
Learning Objectives
After these lessons, you'll be able to:
- Create, update, and read data from Python dictionaries
- Use dictionaries to solve problems
- Recognize which kinds of problems are well-suited for dictionaries, and which ones are better suited for lists
Project: Directory maintainer
🧑💻 This is an individual project. You are expected to work independently.
If you get stuck, confused, or have trouble with the project, you should use the #help-prog1 channel in Discord or message an instructor. Try not to spoil the project for others - use Discord spoiler tags if you are going to include a screenshot or code sample.
In this project, you will be working to clean up a messy directory. The reporting and data team has generated several amazing reports. However, these files need to be organised for them to be useful and manageable. We have to do this using a program because the team will definitely create more amazing reports.
In doing this we shall practice working with files, keeping track of their properties and manipulating their locations.

Remember...
- Read the instructions
- Plan before you code
- Debug if you aren't getting the desired output
- Attend office hours if you need additional support
- Ask for help in Discord
Dictionary Basics
In this section, you will learn a new Python data structure called a Dictionary.
What is it? Why do we need it? How do you use it?
What is a Dictionary?
So far, you've used Lists to manage collections of items.
In a list, items are ordered, and you use numeric indices to access them:
countries = ["Kenya", "Ghana", "Ethiopia", "Zimbabwe"]
countries[2] # "Ethiopia"
A dictionary, like a list, stores a collection of values. Instead of keeping them in order and accessing them with indices, a Dictionary has a key for each value.
capitals = {
  "Kenya": "Nairobi",
  "Ghana": "Accra",
  "Ethiopia": "Addis Ababa",
  "Zimbabwe": "Harare",
}
capitals["Kenya"] # "Nairobi"
Each value has a key, and you can access the value using the key.
Each key is associated with a single value. As in Lists, values can have any type. Keys are often strings, but can have other values too.
The association of a key and a value is called a "key-value pair" or sometimes an "item".
Mathematically speaking, a dictionary represents a mapping from keys to values. You can also say that each key “maps to” a value.
Basic Concepts
As an example, we’ll build a dictionary that maps from English to Spanish words, so the keys and the values are all strings. I encourage you to open a Python repl and run each of these commands yourself as you read. You'll learn it better if you are active, and it gives you a chance to explore.
Let's start with basic commands.
Creating dictionaries and adding items
>>> english_to_spanish = {}
>>> english_to_spanish
{}
The squiggly-brackets, {}, represent an empty dictionary.
To add items to the dictionary, you can use square brackets:
>>> english_to_spanish['one'] = 'uno'
This adds an item to the dictionary that maps from the key 'one' to the value
'uno'. If we show the dictionary again, we see the key-value pair, with a colon
between the key and value:
>>> english_to_spanish
{'one': 'uno'}
This output format is also a valid syntax for creating a dictionary. Instead of adding items one by one, we can create a dictionary with three items:
>>> english_to_spanish = {'one': 'uno', 'two': 'dos', 'three': 'tres'}
Indexing and Order
If you print english_to_spanish, you might be surprised:
>>> english_to_spanish
{'one': 'uno', 'three': 'tres', 'two': 'dos'}
The order of the key-value pairs might not be the same as you entered!
In general, the order of items in a dictionary is unpredictable.
But, that’s no problem, since elements of a dictionary are not indexed by numbers. Instead, you use the keys to look up the corresponding values:
>>> english_to_spanish['two']
'dos'
The key 'two' maps to the value 'dos'. The order of the items doesn’t matter.
Here is a video that demonstrates the basics of dictionaries:
Missing Items
If you try to access a key that isn’t in the dictionary, you get an exception:
>>> english_to_spanish['four']
KeyError: 'four'
How many items in a Dictionary
The len function returns the number of key-value pairs:
>>> len(english_to_spanish)
3
Checking in the dictionary
The in operator works on dictionaries, too; it tells you whether a value
appears as a key (appearing as a value does not count).
>>> 'one' in english_to_spanish
True
>>> 'uno' in english_to_spanish
False
To see whether something appears as a value in a dictionary, you can use the
method values(), which returns a collection of values, and the in operator:
>>> 'uno' in english_to_spanish.values()
True
Further reading: Python docs
Skim the Python documentation on Dictionaries.
What did you learn? What new questions do you have?
Try it: Dictionaries
Practice creating Dictionaries, accessing items, and updating values.
Try to accomplish the following:
- Use ints and floats as Dictionary values.
- Use an int and as float as a key. Are
3and3.0the same key? What about3and3.1?- How do you update a value that's already in a Dictionary?
- How do you delete a key and value in a Dictionary?
- What happens if you try to access a key after it has been deleted?
Further Experimentation
Once you've explored some of the basics, try to figure out some more complicated syntax:
- Add a List as a value in a Dictionary
- Add a Dictionary as a value in a Dictionary
- If you store a Dictionary as a value in another Dictionary, how can you access the inner Dictionary's items?
- Can you use a List as a key in a Dictionary?
Using Dictionaries
When would you use a Dictionary instead of a List?
In this lesson, you'll see two cases where a dictionary is a better data structure to use. There are lots more cases, some of which you'll explore in the weekly Practice.
Representing data: Modeling a Restaurant
Lists are great for storing lots of pieces of identical types of data, like names. But when data has more structure, Lists start to get awkward!
In this example we want to model a Restaurant, to print some information about it.
In our model, a restaurant has a name, a cuisine, a number of dollar signs indicating how expensive it is, and an average rating.
We could keep the information in a list, like this:
restaurant = ["Chicken Republic", "Fast food", "$", 3.7]
When we want to use that information, we have to remember the index for each of the different types of values.
def display_restaurant(rst):
  print("Name: ", rst[0])
  print("Cuisine: ", rst[1])
  print("Expense: ", rst[2])
  print("Rating: ", rst[3])
If we want to add or remove information, we'd have to change our code.
Instead, we can use a Dictionary to represent the structure of our data. Instead of remembering the indexes, we can use the appropriate keys:
restaurant = {
  "name": "Chicken Republic",
  "cuisine": "Fast food",
  "expense": "$",
  "rating": 3.7,
}
Then our function wouldn't have to know about the indexes of the data:
def display_restaurant(rst):
  print("Name: ", rst["name"])
  print("Cuisine: ", rst["cuisine"])
  print("Expense: ", rst["expense"])
  print("Rating: ", rst["rating"])
Try It: Structuring Data
Give structure to this List of information. Rewrite it as a Dictionary with meaningful keys.
device = ["Galaxy Note 9", "Samsung", "Cloud Silver", "201g", "161.9 x 76.4 x 8.8 mm", "1440 x 2960 pixels"]
Counting Items: The histogram function
Another use for dictionaries is when you want to compute a result for lots of different values, and associate the results with the values.
Suppose you are given some text, and you want to count how many times each
letter appears. This is called a histogram - a statistical term for a
collection of frequencies.
There are several ways you could do it:
- You could create 26 variables, one for each letter of the alphabet. Then, as you traverse the string, for each character, increment the corresponding counter.
- You could create a list with 26 elements. Then you could convert assign each character to a number, and use the number as an index into the list to increment the appropriate counter.
Both of these options perform the same computation, but they implement the computation in different ways.
Some implementations are better than others. Using 26 variables will be quite tedious. Using a List might be less typing, but it could be quite confusing to debug.
Both solutions are fragile. They would need to be changed if you wanted to count numbers, symbols, or emoji in the text.
Here's a solution using a Dictionary:
- Create a dictionary with characters as keys and counters as values. The first time you see a character, add an item to the dictionary. After that, increment the value of an existing item if you see that character.
An advantage of the dictionary implementation is that we don’t have to know ahead of time which letters appear in the text. We only have to make room for the letters as they show up.
Here an example implementation using a Dictionary:
def histogram(text):
    counts = {}
    for char in text:
        if char not in counts:
            counts[char] = 1
        else:
            counts[char] += 1
    return counts
The first line of the function creates an empty dictionary. The for loop
traverses each character of the string. Each time through the loop, if the
character is not in the dictionary, we add a new item for the character, with
initial value 1, since we have seen this letter once. If the character is
already in the dictionary, we increment counts[char] by 1.
Here’s the result:
>>> histogram('brontosaurus')
{'a': 1, 'b': 1, 'o': 2, 'n': 1, 's': 2, 'r': 2, 'u': 2, 't': 1}
The histogram indicates that the letters 'a' and 'b' appear once; 'o' appears twice, and so on.
If we wanted to count the characters in text with numbers, symbols, and emoji, the function still works!
>>> histogram("123123 hiii! 🚀🚀🚀!!")
{'1': 2, '2': 2, '3': 2, ' ': 2, 'h': 1, 'i': 3, '!': 3, '🚀': 3}
Using a Dictionary makes this solution easier and more robust. It's a clear winner of a data structure for this problem!
Try it: get
Dictionaries have a method called get that takes a key and a default value.
If the key appears in the dictionary, get returns the corresponding value.
Otherwise, it returns the default value.
For example:
>>> h = histogram('brontosaurus')
>>> h
{'a': 1, 'b': 1, 'o': 2, 'n': 1, 's': 2, 'r': 2, 'u': 2, 't': 1}
>>> h.get('a', 0)
1
>>> h.get('c', 0)
0
Use the
getmethod to rewrite thehistogramfunction more concisely. You should be able to write it without theifstatement!
Think about it: Which data structure to use?
You've seen two examples (structuring information and counting) where dictionaries are a good choice of data structure to use. For each of the following scenarios, think about what data structure you would use.
- The names of all the Pokemon
- The attributes for the Pokemon Pikachu
- A blog post
- The attributes for all of the Pokemon
Explanation
- The names of all the Pokemon
A List makes sense for this one. It's a list of ordered names.
- The attributes for the Pokemon Pikachu
A Dictionary would make it easy to structure this information.
pikachu['health'] would be way easier than remembering the index for
pikachu[3] or something!
- The attributes for all of the Pokemon
This one is tricky! Since it's a lot of Pokemon, it should be a List. But, to structure the information, it should be a dictionary.
One way to model this would be a List of Dictionaries. Each item in the List would be a Dictionary representing the attributes for one pokemon, like this:
pokemon = [
  {
    "name": "Pikachu",
    "health": 50,
    "attack": 27,
    ...
  },
  {
    "name": "Charizard",
    "health": 181,
    "attack": 92,
    ...
  }
  ...
]
- A blog post
There are different options for this, but a String might make the most sense. If you also wanted to include structured information like the date and author, then a Dictionary could also make sense.
Lookup Time
One key factor when choosing data structures is program speed. We haven't covered much about how to consider the speed of different programs, but the basic idea isn't that complicated: the more operations a program has to do, the slower it is.
One of the key properties of Dictionaries is that the lookup time for a key is fast, similar in speed to accessing a list item with a given index.
# These are roughly similar in speed
some_list[6]
some_dictionary["key"]
When designing a system that has to find information quickly, it's often better to use a dictionary, if there is a key that you can use for lookups. That way, you don't have to loop through the whole list to find the item you need.
Here's the (fake) code comparing List and Dictionary versions of the lookup function.
# lookup in a List
def lookup_person(people_list, name):
  for person in people_list:
    if person["name"] == name:
      return person

# lookup in a dictionary
def lookup_person(people_dict, name):
  return people_dict[name]
For the dictionary, there is just one operation. For the List, there is one operation per item in the list. If there were thousands of people in the list, you'd have to check thousands of names!
Think it through: Event Attendees
Imagine that you are asked to organise an event with lots of attendees. Each attendee has a name, badge number, the name of the organization they are part of, and whether or not they've paid.
What would you use to store attendee information, a list or a dict? Why?
Show Discussion
There's no one right answer. The right decision depends on how the data will be accessed.
Design 1: List of Dictionaries
One design might be to use a list to store all attendees, with each item in the list being a dictionary. That way, you could loop through the list to print out all of the badges.
attendees = [
  {
    "name": "John Doe",
    "badge_number": 123,
    "organization": "ACME",
    "paid": True,
  },
  {
    "name": "Jane Doe",
    "badge_number": 456,
    "organization": "ACME",
    "paid": False,
  },
  ...
]
This design would make it easy to print out all of the badges. And if the list of attendees is quite small, searching through the list to find a particular attendee wouldn't be too slow.
Design 2: Dictionary of Dictionaries
A different design might be to use a dictionary, with the badge number as the key.
attendees = {
  123: {
    "name": "John Doe",
    "organization": "ACME",
    "paid": True,
  },
  456: {
    "name": "Jane Doe",
    "organization": "ACME",
    "paid": False,
  },
  ...
}
This design would make it easy to look up the information for a particular badge. You can also use the name as the key, if you want to look up the information by name. But, in this case, you have to be careful to make sure that the name is unique!
There's also other ways to structure data that we haven't explored yet. It might make sense to use another data structure or a database, depending on the situation.
Nesting
In the last lesson, you saw that sometimes it makes sense to model data using both Lists and Dictionaries -- putting Dictionaries inside Lists, or Lists inside Dictionaries.
"Putting things inside each other" is called nesting, and you've seen it before with nested conditionals (and maybe nested loops!). When Dictionaries and Lists get nested in each other, the syntax can be a bit confusing to read and write.
This lesson is just about code with nested dicts and lists.
Lists in Lists
Lists with lists inside are sometimes called 2D Arrays, since they can be said to have multiple "dimensions".
Here's a list of grayscale pixel brightness values for each row in a 9x9 image:
image = [
  [44, 181, 237, 0, 162, 110, 181, 121, 253],
  [106, 9, 210, 250, 135, 207, 139, 121, 237],
  [217, 36, 161, 224, 173, 183, 143, 109, 252],
  [23, 66, 136, 179, 10, 86, 9, 182, 14],
  [186, 99, 123, 213, 191, 45, 139, 146, 85],
  [214, 197, 214, 226, 39, 129, 249, 86, 215],
  [105, 182, 219, 190, 251, 15, 33, 147, 143],
  [216, 100, 234, 139, 14, 98, 249, 26, 144],
  [223, 141, 92, 194, 12, 158, 254, 48, 85]
]
To access the first row, you'd use image[0]. To access the first pixel in the
first row, you'd use image[0][0].
Questions
- How would you update the 4th pixel in the 5th row?
- How would you loop through all the pixels in the last row?
- How would you loop through all the pixels in all the rows?
Lists in Dicts
Dicts are useful for giving structure to data. Sometimes that structure might include Lists! In a previous example, we used a Dictionary to model the attributes for a Pokemon. If we wanted to keep track of the Pokemon's moves, we might keep a list of moves in the dict:
pikachu = {
  "name": "Pikachu",
  "health": 50,
  "attack": 27,
  "moves": [
    "charm",
    "growl",
    "quick attack",
    "thunder shock",
  ]
}
To access the list of moves, you would use pikachu["moves"]. To get the first
move, you would use pikachu["moves"][0].
Questions
- How would you access the third move?
- How would you change the second move to "thunder wave"?
- How would you loop through all the moves and print out each one?
Dicts in Lists
Often, there's a similar structure to add to many identical items. You can add the structure using Dictionaries, then keep all the items in a List.
In a previous lesson, we modeled restaurant information using a dict. Let's see what it would look like with a list of multiple restaurants:
restaurants = [
  {
    "name": "Chicken Republic",
    "cuisine": "Fast food",
    "expense": "$",
    "rating": 3.7,
  },
  {
    "name": "Domino's Pizza",
    "cuisine": "Pizza",
    "expense": "$$",
    "rating": 4.1,
  },
  {
    "name": "Cold Stone Creamery",
    "cuisine": "Ice Cream",
    "expense": "$$",
    "rating": 4.5,
  }
]
To access the first restaurant, you'd use restaurants[0]. To access the name
of that restaurant, you'd use restaurants[0]["name"].
The access syntax is similar! You have to think about whether the list or the dict comes first.
Questions
- How would you access the cuisine of the second restaurant?
- How would you update the expense of the last restaurant?
- How would you loop through all the restaurants and print their names?
- How would you loop through all the restaurants and print their names, but only if the rating is above 4?
Dicts in Dicts
Fairly often, there's structured information inside other structured information. For instance, we might want to know the effects of each of the pokemon's moves. Instead of a List, we could store a dictionary:
pikachu = {
"name": "Pikachu",
"health": 50,
"attack": 27,
"moves": {
"charm": "lowers the opponent's attack",
"growl": "lowers the opponent's attack",
"quick attack": "deals damage to the opponent, with priority",
"thunder shock": "deals damage to the opponent, and has a chance to paralyze the target",
}
}
As before, you would access the moves using pikachu["moves"]. You would get
the effect of the move "charm" with pikachu["moves"]["charm"].
Questions
- How would you access the effect of the move "growl"?
- How would you add the move "thunder wave" and its effect?
- How would you remove the move "growl"?
- How would you loop through all the moves and print out their names and effects?
- If you wanted to keep more information about each move (like the type, level, and power), how would you structure the data?
Deeply Nested Structures
"Dicts in Lists in Dicts in Dicts" sounds like a line straight out of Dr. Seuss, but deeply nested structures show up all the time in real programs!
Let's see it applied to our restaurant example:
restaurants = [
{
"name": "Chicken Republic",
"cuisine": "Fast food",
"expense": "$",
"rating": 3.7,
"menu": [
{
"name": "Express Meal with Chips",
"price": 1900,
},
{
"name": "Quarter Rotisserie Chicken",
"price": 1500,
}
]
},
{
"name": "Domino's Pizza",
"cuisine": "Pizza",
"expense": "$$",
"rating": 4.1,
"menu": [
{
"name": "Any Medium Classic + Free Drink",
"price": 4000,
},
{
"name": "Any Large Classic Thin Crust Pizza",
"price": 5000
}
]
},
]
Accessing the name of the first item on the menu at the first restaurant:
restaurants[0]["menu"][0]['name']
# => "Express Meal with Chips"
It's sometimes helpful in these situations to use intermediate variables, so that you can keep track of what is what:
chicken_republic = restaurants[0]
cr_menu = chicken_republic["menu"]
express_meal = cr_menu[0]
express_meal["name"]
# => "Express Meal with Chips"
Keeping track of deep structure like this is hard! It's often helpful to use the Python repl to navigate step by step towards your target, building up the accessors as you go. Then, you can consolidate into one line of code if you want.
Questions
- How would you access the price of the first item on the menu at the second restaurant?
- How would you access the rating of the second restaurant?
- How would you loop through all the menu items at the first restaurant to find the average price?
- How would you loop through all the restaurants and find the average price of all the items on the menu for that restaurant?
Note that some of these are quite tricky!
JSON
JSON is a common format for data. It looks a lot like a Python dictionary, and has support across lots of different languages and tools.
In this lesson is a brief primer on using JSON in Python.
Quick Facts
- JSON stands for "JavaScript Object Notation", but as you can see, it's not just used in JavaScript
- JSON is commonly used on the Web, as the format for different applications to communicate
- JSON is also commonly used for configuration files for applications
Handling JSON in Python
Python has a built in package called json to work with JSON-formatted data.
A JSON file looks a lot like a Python dictionary:
{
"class A": {
"students": 35,
"location": "campus x"
},
"class B": {
"students": 33,
"location": "campus y"
}
}
Converting from JSON to Python datatypes
When you access a JSON file, it's text - a string. But, that string represents data that has more structure and meaning. It might have numbers, strings, lists, and dictionaries within it.
In order to work with the data in Python, you need to parse the JSON string and convert it to Python datatypes.
Python's built-in json module makes it pretty easy:
import json
# some JSON:
json_text = '{ "name":"John", "age":30, "city":"New York"}'
# parse it using loads
parsed = json.loads(json_text)
# the result is a Python dictionary:
print(parsed) # { "name": "John", "age": 30, "city": "New York" }
print(parsed["age"]) # 30
The difference is a little bit subtle, because the string and the dictionary are visually similar!
However, when you have converted a JSON-formatted string to a python dict, you can access the values inside.
What result would you get if you tried to access
json_text["age"]?
Python to JSON
You can also go the other way and turn a Python object into JSON:
import json
# a Python object (dict):
student = {
"name": "John",
"age": 30,
"city": "New York"
}
# convert into JSON:
json_text = json.dumps(student)
# the result is a JSON string:
print(json_text)
The type of json_text is a string. It's formatted as JSON, which other
programs might be able to use, like if you saved it as a config file, or sent it
over the network to another application.
JSON Files
If you have JSON data in a file, you can load it like this example:
import json
data_file = open("data.json", "r")
data = json.load(data_file)
data_file.close()
data # Parsed data from the file
Or, if you wanted to write to a file, there's a corresponding function:
import json
data = { "name": "John" }
target_file = open("target.json", "w")
json.dump(data, target_file)
target_file.close()
Further Reading: JSON module
For more information about the JSON module and the functions it provides, see the Python docs: https://docs.python.org/3/library/json.html
Practice: Data Structures
💡 This is your chance to put what you’ve learned into action.
Try solving these practice challenges to check that you understand the concepts.
The solutions to each challenge are available, and you can view a video of the solution below each challenge. Try to go through the whole challenge without using the solution.
If you can’t do the challenge without looking the solution, it means you don’t understand the material well enough yet.
Try the next practice challenges without looking at the solution. If you need more practice challenges, reach out on Discord.
Word Frequency
Write a program to calculate word frequency within text.

Word Frequency Solution Video
Phone Book
Write a phone book program that manages contacts and numbers.

Practice Solution Video
JSON Parsing
In this exercise, you'll parse some data using Python's built-in JSON library.

Libraries and complexity
“If I have seen further it is by standing on the shoulders of Giants” Isaac Newton, letter to Robert Hooke in 1675
We might not be Isaac Newton, but the shoulders keep getting better and better.
Learning Objectives
After these lessons, you'll be able to:
- Explain what a library is and the difference between the standard library and external libraries
- Install and manage external libraries for your projects
- Use the
jsonmodule from the standard library to handle JSON data - Fetch data from the web using the
requestslibrary - Explain what an algorithm is and why an algorithm might be considered fast or slow.
Final Project: Log File Analyzer
💡 This is an individual project. You are expected to work independently.
If you get stuck, confused, or have trouble with the project, you should use the #help-prog1 channel in Discord or message an instructor. Try not to spoil the project for others - use Discord spoiler tags if you are going to include a screenshot or code sample.
In this project, you will be working to analyze production log files to produce useful data for management reporting. Some tests have produced a lot of data which they stored in a file with a defined format. It shall be your job to write a program that will parse such a test file and provide a summary of the test outcomes.

Remember...
- Read the instructions
- Plan before you code
- Debug if you aren't getting the desired output
- Attend office hours if you need additional support
- Ask for help in Discord
Libraries
In this section, you'll learn more about libraries and how to use them.
Libraries are other people's code. They let us do tasks that we wouldn't be able to do otherwise -- at least, not without great effort.
For a small example: you've used random.randint throughout the course. How would you write a function that returns a random integer? The python standard library uses a pseudorandom number generation algorithm called the Mersenne Twister, in python and c. It's a few hundred lines of pretty complicated code, especially because the C code and Python code have to interact. (You can take a look here: Python and C code)
Thankfully, you don't have to read that code, and definitely don't have to write that code. Someone else figured out a good way to generate random numbers, and now you can just use that, instead of having to figure it out yourself.
What is a Library?
You've used the keyword import to access external modules. Now, you'll take a closer look at how programmers use code written by other people.
A library is a collection of code that can be used in other programs for specific operations. Other than code, a library may contain documentation, configuration data, message templates, classes, values, and more.
A Python library aims to make programming simpler and more convenient for the programmer. We don’t need to write the same code again and again for different programs.
Python libraries play a vital role in many fields like Machine Learning, Data Science, Data Visualization, and Web Development. As you learn more about those fields, you'll become familiar with the modules that are most often used in those fields.
Libraries & Modules A library is a collection of modules, but the terms are often used interchangeably, especially since many libraries only consist of a single module. Don’t worry if you mix them up.
The Standard Library
The Python Standard Library is a collection of modules accessible to every Python program to simplify the programming process. You have used the Standard library by importing modules at the beginning of your scripts.
The following are among the most common:
- random
- time
- json
- math
- os
- urllib
- re
Exploration
- Look up the documentation each of the libraries listed. What is each library for?
- See the list of all standard library modules at http://www.python.org/doc/. What other modules are you curious about?
Using modules
Use import to load a module into your program. Then, you can use items from the module as module_name.thing_name
Python uses . to mean “part of”.
Here's an example using the string module, a standard library module for common string operations:
import string
print('The lower ascii letters are', string.ascii_lowercase)
print(string.capwords('capitalise this sentence please.'))
Output:
The lower ascii letters are abcdefghijklmnopqrstuvwxyz
Capitalise This Sentence Please.
Installing Libraries
Only some libraries are part of the Python Standard Library that come with every Python installation. They need to be downloaded onto your computer in order to use them.
Python has a built-in package manager called pip for installing external libraries.
You can install a library by running this terminal command:
python -m pip install <library>
Usually, the documentation for a library will tell you the name of the library
to pass into pip, often in a section called "Installation" or "Getting
Started".
Try it: install a library with pip
The requests library is helpful for fetching data from the web. You will probably use it a lot in the future.
Install it with:
python -m pip install requests
Then try it out. Start a python repl, then import and use the library:
$ python
>>> import requests
>>> r = requests.get('https://api.github.com/events')
>>> r.text
There's a big blob of JSON data there, fetched from Github!
Note: installing libraries can get messy. Ask for help in Discord if you encounter any issues with library installation.
Library Contents
You use the keyword help to show the contents of a library once it's installed.
Starting a python repl, then writing help("string") would show the following:
Help on module string:
NAME
string - A collection of string constants.
MODULE REFERENCE
https://docs.python.org/3.6/library/string
The following documentation is automatically generated from the Python
source files. It may be incomplete, incorrect or include features that
are considered implementation detail and may vary between Python
implementations. When in doubt, consult the module reference at the
location listed above.
DESCRIPTION
Public module variables:
whitespace -- a string containing all ASCII whitespace
ascii_lowercase -- a string containing all ASCII lowercase letters
ascii_uppercase -- a string containing all ASCII uppercase letters
ascii_letters -- a string containing all ASCII letters
digits -- a string containing all ASCII decimal digits
hexdigits -- a string containing all ASCII hexadecimal digits
octdigits -- a string containing all ASCII octal digits
punctuation -- a string containing all ASCII punctuation characters
printable -- a string containing all ASCII characters considered printable
Specific Imports
You can use from __<module>__ import __<method>__ to load only specific items
from a library. Then you can refer to them without the library name as prefix.
from string import ascii_letters
print('The ASCII letters are', ascii_letters)
Output:
The ASCII letters are abcdefghijklmnopqrstuvwxyzABCDEFGHIJKLMNOPQRSTUVWXYZ
Import with alias
An alias is an alternate name given to a module in your program, using the as
keyword.
Use import ... as ... to give a library a short alias while importing it.
import string as s
print(s.capwords('capitalise this sentence again please.'))
Output:
Capitalise This Sentence Again Please
Aliasing is useful when a library is used frequently, or if it has a long name.
For example, the pandas library is often aliased to pd, since data
scientists use the library so much!
Note: Like all names, aliases can make programs harder to understand, since readers must learn your program’s aliases.
Try it: Exploring Libraries
Try answering each of the following questions about libraries, using the lesson above and the documentation.
Question: What function from the
oslibrary can you use to determine the current working directory?
Solution
Using help(os), see that os.getcwd() returns the current working directory.
Question: Given the variables year, month and day, how would you generate a date in the standard ISO date format?
- Which standard library module could help you?
- Which function would you select from that module?
- Try to write a program that uses the function.
Solution
The datetime module could help.
You could use date(year, month, date).isoformat() to convert your date
import datetime iso_date = datetime.date(year, month, day).isoformat() print(iso_date)
Question: Match the following print statements with the import statements needed to make them work.
Import statements:
A.
from string import digitsB.
import stringC.
import string as sPrint statements:
print(list(s.digits))print(list(digits))print(string.ascii_uppercase)
Solution
- A == 2: Importing
digitsfrom string provides the digits methods- B == 3: Importing
stringprovides methods such asascii_uppercase, with thestring.prefix.- C == 1: Importing
stringwith the aliassallowss.digits
Common Libraries
In this section, you'll be introduced to several common python libraries and what they can do.
Libraries you've already seen
We won't cover them in depth here, but you've used modules before in some of your projects:
randomjsonmathtime
OS Module
We already touched this module in your lessons about files, so you may already know a bit about the os module.
You have seen this module can interact with directories and files.
os is one of the most useful modules in the standard library. It provides methods to interact with the operating system.
The Operating System controls resources on every computer. That includes things
like files, network access, hardware, and communication between processes.
Sometimes other libraries (like json or requests) will handle dealing with
the operating system for you, but if you need to deal directly with the
operating system, this is the module for you.
The os and os.path modules include many functions to interact with the file system, which is the most common way that you'll use the module right now.
Here's a sample of uses for the os module:
The folder where the Python script is running is known as the Current Directory. Whenever you use a relative name for a file, Python starts looking in the current working directory.
Note that the cwd is not always the path where the Python script is located! You can run a Python program from some other location, and that location will be the cwd.
You can locate the cwd using os.getcwd()
import os
# Get the current working directory
cwd = os.getcwd()
# Print the cwd
print("Current working directory:", cwd)
What if you want to change the cwd? For that, there is os.chdir().
import os
# Get the current working directory
def current_path():
print(os.getcwd())
# Printing CWD before
current_path()
# Changing the CWD
os.chdir('../')
# Printing CWD after
current_path()
The example above changes the current working directory to the parent folder, but you could change directory to any other folder by passing in the path.
Further Reading: OS Module
Read more about the os library in the docs: https://docs.python.org/3/library/os.html
Requests
The requests library makes it easy to get or send data over the internet.
It has functions that correspond to the basic HTTP verbs:
- GET: get or retrieve data from a specified resource.
- POST: alter data on a resource.
- DELETE: remove a resource.
- PUT: update a resource
request to make and parse the response object that we get in return.
import requests
response = requests.get('https://api.github.com')
print(response.text)
You can use the response to see a lot of information about the results of the GET request.
Request
The main part of the request is the method, and depends on what method you use, there is the body of the request.
For Post and Put requests for example, you need to pass a body with the request:
requests.post('https://httpbin.org/post', data={'key':'value'})
Further Reading: Requests Library
For more information about Requests and its functions, check out its documentation: https://requests.readthedocs.io/en/latest
Base64
Base64 encoding is used to convert binary data into ASCII characters. Encoding prevents the data from getting corrupted when it is transferred or processed through a text-only system.
Encoding
Encoding data has two basic steps:
- Convert string data into byte-like objects
- Encode using base64 module
import base64
sample_string = "Welcome to Programming 1 at KIBO"
sample_string_bytes = sample_string.encode("ascii")
base64_bytes = base64.b64encode(sample_string_bytes)
base64_string = base64_bytes.decode("ascii")
print(f"Encoded string: {base64_string}")
Output:
Encoded string: V2VsY29tZSB0byBQcm9ncmFtbWluZyAxIGF0IEtJQk8=
Decoding
Decoding is opposite of encoding.
Take the output from the previous example and decode it back to its original form.
import base64
base64_string ="V2VsY29tZSB0byBQcm9ncmFtbWluZyAxIGF0IEtJQk8="
base64_bytes = base64_string.encode("ascii")
sample_string_bytes = base64.b64decode(base64_bytes)
sample_string = sample_string_bytes.decode("ascii")
print(f"Decoded string: {sample_string}")
Output:
Decoded string: Welcome to Programming 1 at KIBO
Further Reading: Base64
See the docs for Base64: https://docs.python.org/3/library/base64.html
Algorithms
In this lesson, you'll encounter two classic algorithms: Binary Search and Insertion Sort.
In future courses, you'll learn more algorithms in more detail; for now it's enough to get a basic picture of what an algorithm is.
What's an algorithm?
An algorithm is a set of instructions to perform a computation.
By that definition, every program and function you've written so far is an algorithm. That's interesting, but it isn't very helpful.
Typically, when computer scientists describe an algorithm, they aren't talking about a particular implementation, or about any program whatsoever. Usually, they are interested in specific algorithms to solve problems that show up again and again.
Computer scientists are interested both in inventing or applying algorithms to solve problems encountered in the real world, and in analysing and understanding the properties of different algorithms, especially how long they take to run and how much memory they use.
Let's see a couple example algorithms.
Binary Search
Way back when you learned about loops, you may have written the Guess My Number game. The way the game works is that the program chooses a random number between 1 and 100, and the player guesses. If they guess the number, they win. If they guess too low or too high, the program tells them that and lets them keep guessing.
(See the video if you need a refresher)
What is the best strategy for the guesser?
Well, the worst that could happen is that they have to guess all the wrong numbers before they get it right, like if the number was 99 and they started guessing at 1, then 2, then 3 and so on. That would take 99 guesses.
The same would be true you started guessing at 99, then counted down -- the random number might be 1, and you would have to guess 99 times.
If you started at 50, then no matter if the program said your guess was too high or too low, you would always only have 49 more guesses to go. You cut the search space in half.
If you keep guessing the middle number of the range of numbers that are left, then you keep cutting the search space in half every time.
I'm thinking of a number between 1 and 99
Enter a guess: 50
Your guess is too low
Enter a guess: 75
Your guess is too low
Enter a guess: 87
Your guess is too high
Enter a guess: 81
Your guess is too low
Enter a guess: 84
Congrats! The number was 84
This strategy is called Binary Search.
The idea of the binary search algorithm is to cut the search space in half at each point, and then cut in half again.
To specify the steps more carefully for the number game:
- Start the low end of the range at 1 and the high end of the range at 100
- Choose the midpoint of the range with Floor(low + high / 2)
- Check the midpoint
- If it's the answer, stop
- If too high, set the high end of the range to the midpoint
- If too low, set the low end of the range to the midpoint
- Repeat with the updated range
For the guess my number game, we're guaranteed that the number is in the range. Usually, we don't get that guarantee!
Challenge: If instead of an interactive game, you had a sorted list of 100 elements, could you write a Python function to check if a particular element is in the list? Use binary search and the
==operator, not theinkeyword.
Further Reading: Binary Search on Wikipedia
Insertion Sort
In order for Binary Search to work, the numbers have to be in sorted order.
Binary search works well on data like:
[2,4,12,19,20,22,23,29,31,32,33,40,45,49,53,54,68,71,72,73,76,81,88,91,99]
But it doesn't work if that data is shuffled around:
[12,49,72,33,40,81,19,53,88,99,32,2,4,76,68,23,71,20,91,45,31,54,73,29,22]
If you tried to check the midpoint, it wouldn't tell you anything about whether your number was in the list!
Sorting a list so that it's in ascending (or descending) order is a really common problem, so there are a few algorithms to do the job.
One algorithm to sort a list is called Insertion Sort. Here's the idea:
- keep a sorted sublist, which starts empty
- step through each element in the list to sort
- search through the elements in the sublist to find where it belongs (the first element it is smaller than)
- insert it in that spot
You step through the whole list, finding the right spot in the resulting sorted array for each element and inserting it there.
Here's one version of the algorithm in Python:
def insertion_sort(a_list):
results = [a_list[0]]
for item in a_list:
if item >= results[-1]:
results.append(item)
continue
for i in range(len(results)):
if item <= results[i]:
results.insert(i, item)
break
return results
It starts by adding the first item to the result list (instead of starting the result list empty) and it has to have an additional check to see if the item is larger than all the items in the sublist. Otherwise, it just does the nested loop, like the description.
Question: How many times does this function have to compare two items?
Challenge: Could you implement this function "in place"? That is, can you rewrite it so that it changes the original array instead of creating a results array?
Complexity
When computer scientists think about algorithms, they care about how fast the algorithm will be.
Of course it will take longer to sort a list of 1000000 items than to sort a list of 100 items. So, instead of considering how many seconds a given program takes to run, it's better to compare algorithms based on how the runtime increases as the size of the input increases.
- If an algorithm takes the same amount of time, no matter how big the input is, that's great!
- If the algorithm takes one more step for every item in the input, that's okay.
- If the algorithm takes twice as much time for every item in the input, that's really bad!
Complexity is how you can measure how fast an algorithm is, relative to the size of the input.
Binary Search
On average, how many guesses does it take to win the Guess the Number game?
Well, each time, we cut the search space in half. We win when the search space is down to just 1 element. Here's the search space size by step:
- Step 0: 100
- Step 1: 50
- Step 2: 25
- Step 3: 12.5
- Step 4: 6.25
- Step 5: 3.125
- Step 6: 1.5625
- Step 7: 0.78125
So, it will take us six or seven guesses to get to the answer.
Question: How many guesses would it take if the number was between 1 and 1000? What about 1 and 1 million? 1 and 1 billion?
Binary Search complexity grows with the log base 2 of the input size.
log2(100) = 6.644
That's really good! The logarithm function grows very slowly. Even if we had to search among 10 billion random numbers, it would only take about 33 guesses!
>>> math.log2(10000000000)
33.219280948873624
Insertion Sort
To analyze how many steps there are in insertion sort, we have to think about the nested loops.
Here's the core of the algorithm, with some pieces left out:
for item in a_list:
for i in range(len(results)):
if item <= results[i]:
results.insert(i, item)
If a_list is 100 items long, and results is 100 items long (which it will
be, at the end of the process), then this loop has to check 100 * 100 = 10000
times.
How does that grow when the input grows?
| List size | Steps in worst-case insertion sort |
|---|---|
| 1 | 1 |
| 10 | 100 |
| 100 | 10000 |
| 1000 | 1000000 |
| 10000 | 100000000 |
| 100000 | 10000000000 |
Yikes!
The steps grow with the square of the input size. That's bad, because the square grows quickly!
Any time you have nested loops, take care. If both loops will have as many steps as the elements in the list, and the list might get big, then you could be creating a big source of slowness in your program.
Thankfully, there are sorting algorithms that are faster than insertion sort!
Practice: Libraries
💡 This is your chance to put what you’ve learned into action.
Try solving these practice challenges to check that you understand the concepts.
The solutions to each challenge are available, and you can view a video of the solution below each challenge. Try to go through the whole challenge without using the solution.
If you can’t do the challenge without looking the solution, it means you don’t understand the material well enough yet.
Try the next practice challenges without looking at the solution. If you need more practice challenges, reach out on Discord.
Matrix Row Sum
You will write a function to provide the sum of matrix rows.

Practice Solution Video
Fetching Web Data with Requests
Scrape data from the web using the requests library.

Message Encode and Decode
In this exercise, you'll explore encoding and decoding messages.

Review
This is the end of the material for this course.
Instead of introducing any new topics to use in your project, you'll review all that you've learned. It's key to take time to reflect on what you know now, what you're still confused about, and what you might learn next.
Preview
There's tons more to learn about Python and programming.
Here's our list of some of the topics to study next. Before looking at the list, take a few moments to write down what questions you have, and what topics you'd like to learn more about. Think about which ones are coming next, which ones you might learn in a future class, and which you might want to try to learn outside of class.
Programming Topics To Explore Next
- More Python syntax: comprehensions, decorators, lambdas, context managers
- Object Oriented programming
- Regular expressions
- Algorithms and program performance
- SQL and databases