Future Proof With Python
Welcome to Future Proof with Python! You are joining a global learning community dedicated to helping you learn and thrive as a technologist
What you'll learn
This course provides a foundation in Python programming, one of the most versatile and useful programming languages. You will learn core programming concepts such as variables, functions, conditionals and loops.
The course culminates in a project where you'll create Python programs that are dynamic
Course Overview
- Week 1: Working with data
- Week 2: Conditionals
- Week 3: Loops
- Week 4: Lists and loops
- Week 5: Review and Final Project
How the course works
There are multiple ways you'll learn in this class:
- Read and engage with the materials on this site
- Attend live class and complete the activities in class
- Practice with exercises to try out the concepts
- Complete projects to demonstrate what you have learned
You are encouraged to seek out additional practice outside of the practice problems included in the course. You should also try building various programs so that you can explore the concepts in a variety of ways.
Now, you are ready to start onboarding. Tap "Next Lesson" below
Copyright © 2024 Kibo, Inc. All Rights Reserved.
Start Onboarding
Deadline: Thursday, May 2 at 12pm GMT.
Welcome to Try Kibo onboarding. You’re now ready to get set up for class. Ensure to read and understand all the information below as you will be asked some questions at the end of this process.
During this process, you will:
- Select a live class.
- Join your class Replit team.
- Learn about how you will learn at Kibo.
- Join Discord, update your profile, and introduce yourself.
- Submit an onboarding checklist form
As you get through these steps, you will complete 3 activities that will help us verify that you are ready for class.
Virtual sessions during Try Kibo
While you study at Kibo, there will be weekly live events that you will attend. These events are:
-
Live class(90 minutes): Mandatory weekly live sessions on Google Meet, led by an instructor or teaching assistant. It will include collaborative problem-solving (1 hour) and opportunities to ask questions about your lessons (30 minutes). You will select a live class time below.
-
Office hours (60 minutes): Personalized help with your projects and lessons. This session is optional and led by a teaching assistant.
-
Community Friday (60 minutes): Career-focused events featuring tech professionals and mentors like software engineers, product managers, and data scientists.
Activity 1 - select a live class
Below is a list of weekly live classes available. Submit the form below to pick a live class time that works best for you. You can only select one live class. Time is in GMT(convert to your local timezone)
| Time (in GMT) | Day | Led by |
|---|---|---|
| 5:00pm GMT | Tuesdays | Ayomide O |
| 3:00pm GMT | Thursdays | Theresa A |
| 7:00pm GMT | Fridays | Praise I |
| 5:00pm GMT | Saturdays | Omowunmi O |
Learning at Kibo
You will be learning with peers, instructors, and teaching assistants from across the continent. In this section, you will learn about the support system available to you and how you can get help.
- The Kibo Support System: This includes community managers, instructors, and teaching assistants who are available to help you throughout your learning journey. Feel free to reach out and connect with any of them
- How to get help: Even though you will have a host of people who will support you throughout your journey, you will also refine your problem-solving abilities. As a rule of thumb, if you need help with your lessons, follow these steps to get help.
- Google: Try to find answers to your questions online – a great way to polish your Google searching skills
- Community: Ask your peers in the #help channels on Discord. They might have similar questions or answer
- Kibo: If you still need assistance, contact the Kibo team—your instructor, TAs, or community managers.

Tools for Success
During your class, you will use various tools for your learning. These tools are:
- Anchor: If you can read this, you are on Anchor. All your lessons will be released here – bookmark this site: lms.kibo.school
- Replit: You will write your code and submit it using. It has everything you need to build and run computer programs. You will join a replit team to access your lessons below
- Zoom & Google Meet: You will use these tools to attend your live classes, office hours, and events.
- Discord: This is our community platform, where you'll communicate and connect with peers and instructors. Joining Discord is mandatory once the program starts, as all communication from the Kibo team will be conducted there. You will join Discord and introduce yourself below
Activity 2 – Join Replit Team
You have already created a Replit account during the admissions challenge. Now, you need to join the Replit team so you will be able to access your work in class.
- Go to replit.com
- Select "Log in" at the top right corner to login to your account
- Click this link to join the Replit team for the class.
Activity 3 – Join Discord and complete the onboarding checklist
After the class starts, all communication from the Kibo team will occur on Discord, so joining is mandatory. Follow the steps below to join Discord, introduce yourself, update your profile, and complete the onboarding checklist form.
🚨Note: If you witness any delays trying to join Discord, be patient and try again in a few hours. Discord may ban your account if they see multiple activities happening at one time, and it may take up to 20 days to resolve.
-
If you already have a Discord account, log in. Otherwise, create an account and verify it via email. Check your spam folder if the email is not in your inbox
-
Join the Try Kibo Discord Server: https://discord.gg/skbZYFttNP and follow the steps until you submit the onboarding checklist
Steps
- Introduce yourself in the #introductions channel
- Your full name
- Your location(city, country)
- A fun fact about you
- An image or gif that represents you
- Update your Discord name to your first name and last initial e.g., "Jessica A", "Sydney W"
- Add a preferred profile picture
- Submit the onboarding checklist form
- Introduce yourself in the #introductions channel
Once you have done all the above, you’re ready for class! You will get an invite to the mandatory orientation on or before the end of today.
Orientation date: Friday, 3rd May from 2 - 3:30pm GMT. Mark your calendar
Community Orientation
The community orientation challenges are required for all students in the program. By the end of the challenge, you will have:
- Set an intention for next 5 weeks
- Built your first squad project
- Understood the tools you will use for class
Demo video
Instructions
- These challenges are best done on a computer
- The challenge should take you 60 - 90 minutes to complete
- The feedback form at the end of this page indicates that you have completed the challenge. You must submit the feedback form to receive credit for attending orientation.
- If you have questions or need help, post a question in the #help Discord channel
Let’s see who can finish all the challenges the quickest! 🏁
Ready?

Challenge 0: All onboard - meet your squad ⛰️
Description: Join your squad channel, introduce yourself, and pick a scribe
- Log in to Discord, under the Squad channels category, you will find your squad e.g., 'Squad #'
- Join the voice channel and post a message in the chat introducing yourself e.g., "Hello, My name is Emmy from Lagos, Nigeria"
Wait for other Squad members to join and introduce themselves. After all squad members have posted a message and joined the squad voice channel:
- Pick a "scribe". Your scribe will act as the moderator and will be in charge of creating/sharing links, sharing screens, and asking questions that your squad might have in the #help channel.
- All squad members will remain in the Squad voice channel throughout the community orientation.
Completion criteria: Every squad member has sent a message in the squad chat, has joined the voice channel and your squad has a scribe.
Challenge 1: Letter from the future ✉️✍🏾
Description: Imagine it's week 5 of Try Kibo. Write a message to your present self in the padlet below. Describe how you will work to make sure you successfully complete the program. Every team member should post a message.
- Click on the + sign
- Enter your first name and last initial in the "Subject"
- Write your intention
- Add an image or GIF to accompany your message (optional)
- Click "Publish"
Completion criteria: Every squad member has posted an intention in the padlet
Challenge 2: Build Team Info Program👩🏾💻
Description: In this challenge, you will build a site in Replit with info about your team. Every team member should still be on the Squad voice channel
- Your scribe should share their screen
- While sharing screen, the team scribe should go to the replit team for the Future Proof with Python class, and create a replit group for today's challenge
Watch the video below to see how to do this.
NB: If you can't find the replit team for your program on Replit, this means that you have not joined the replit team yet! Join here here
- Once your scribe has created a group, everyone needs to go and join that same group. Everyone should log in to Replit , navigate to "teams", find "Try Kibo 10: Future Proof with Python", find the group that your scribe just created.
NB: DO NOT create another group or join a different group erroneously! Ask your scribe for their replit name, and find it amongst the groups. See video demo on how to join the repl your scribe created below.
Once all team members have joined the repl that your scribe created, you will discuss and write your program in your repl as a team.
- The program should use
printto display the following information:
- Your Squad name
- One thing that everyone in the squad has in common
- For each team member, add:
- First name and last initial (e.g., Mercy W, Osamudiamen O)
- One-sentence biography
- Why you are learning python
In the end, your program should look similar to this example program
Once the Team Info Program is done, ensure all team members have a link to the info program - you will all submit that link in the next challenge.
Completion criteria: Every squad member’s information is on the program and it prints successfully
Challenge 3: Submitting the feedback form
Description: Submit the feedback form below indicating that you have completed the challenge. If you do not submit the feedback form, it will be considered that you did not participate during the orientation.
-
Each squad member should submit this form
-
After each member has submitted the form above, your scribe should get the link to the website and share it in the #random channel saying "Squad # has completed all the challenges."
Once this is done, the community orientation leaderboard will be updated with your Squad name
Completion criteria: All squad members have submitted the feedback form and your scribe has sent a message in the #random channel saying you have completed all the challenges.
The End of Orientation
You’re done with orientation and ready to begin class. The Week 1 Lesson will be released on Monday, Oct 30.
Program overview
Estimated time: 10 minutes
Skills
In the next few weeks, you’ll learn to make programs that can:
- Get input from the user, and show them messages
- Work with numbers and text
- Make decisions
- Repeat operations over again
- Work with lists of data
Final Project Example
At the end of the course, you’ll make a final project of your own design, using the skills you learn in the program.
So that you have a picture of what kind of project you can aim for by the end of the course, here’s a Guess the Capital project by a past student.
You can try the program yourself by clicking on this link.
Topics
In week 1, you’ll learn the basics: data, variables, operators, input and output.
In week 2, you’ll learn flow control and how to make decisions with conditions
In week 3, you’ll learn more on flow control and how to repeat operations with loops
In week 4, you’ll learn about storing data in lists and do more practice with loops
In week 5, you’ll build your final project
Mindset
Along the way, your mindset will change.
- You’ll be less scared about computers and more confident 💪🏿
- You’ll know how to debug and find a solution when things don’t work 🐛
- You’ll learn how to break problems down into smaller pieces and solve them piece by piece 🧩
- You’ll make friends and collaborate with teammates 👥
Let’s hear from some Kibo alumni about their learning journey.
Alexis (Try Kibo Alum)
Ayo (Try Kibo Alum)
Programs and comments
Estimated Time: 20 minutes
Programs
Everything on a computer is a program behind the scenes.
This very moment, you are reading on a computer, with a web browser. The browser is a program, built by a large team. But, how do they actually do it? What does a program look like when they are writing it? How does it work?
This is the question we'll focus on first: What are computer programs?
In the Intro to Programming in Python in the admissions challenge, you learned...
- Programming languages let us write instructions for computers using words
- Programming languages get translated into 1s and 0s the machine understands
- Python is a beginner-friendly language that has tons of real-world use
- You can make basic programs in Python using
print,input,+, and=
Let’s review.
Programs are...
Programs are text that a computer can execute as instructions.
That means you can read them and write them with the keyboard.
Programs use special symbols and keywords. The symbols and the order they have to go in is called the syntax.
If a program has valid syntax, then the computer can run it. If the program has the right logic, it will do what the programmer wanted. The syntax, grammar, and vocabulary make up a Programming Language.
We're learning Python, so we're going to learn what words and symbols are allowed in Python, and how to structure them to make the computer do what we want.
How do you write programs?
We need two things to start writing programs of our own:
- A Text Editor: A tool to write text
- An Interpreter or a Compiler: A tool to translate your code to computer-executable programs.
In this course, we're going to use Replit, because it has both of those pieces: a text editor and an interpreter.
Replit also has other helpful features that we'll use: multiplayer mode, comments, sharing, and assignments.
Further Exploration: Plain text vs. Rich text
Why not use something like Google Docs to write code?
Google docs is awesome for writing formatted text. It's got highlighting, different fonts, sizes, alignment, tables, and lots of different options for formatting.
But... Python doesn't understand any of that formatting. Python only understands the text. That's true of most programming languages: they only consist of text.
Google docs is known as a "Rich Text Editor". It's the text, plus the formatting.
For programming, we use something called a "Plain Text Editor", or just "Text Editor". That means we can't use bold, center, or other formatting options. We only type the characters and symbols.
But... in the examples above, the code has colors!?
Text Editors for programming have features like Syntax Highlighting that display your code in color to help you. The colors aren't saved with the code, and you can't change them word-by-word. Replit has built-in features like Syntax Highlighting, so you don't have to worry about it as long as you're using Replit.
Code Comments
Programs are written and read by people.
That means that when writing code, we prioritize both making the computer do what we want and making sure someone else can understand what the code means.
We can help others make sense of our code through its structure, and with comments.
Comments
In the example below, the first two lines are code comments.
# Prints "Programming" ten times
# string * number copies the string that many times
message = "Programming"
number_of_copies = 10
print(message * number_of_copies)
Comments communicate with the other people that read our code. While code can sometimes make sense on its own, comments fill gaps in explanation.
In Python, comments start with the # character (called ‘hash’ or ‘octothorp’). Anything after the # gets ignored by Python - it won’t try to run it as code.
In Kibo, we’ll often use comments to explain code and to illustrate what code does. When you see a snippet like:
# prints message lots of times
print(message * number_of_copies)
# => ProgrammingProgrammingProgrammingProgrammingProgrammingProgrammingProgrammingProgrammingProgramming
The comments explain the result of running the code.
Variables and assignment
Estimated Time: 15 minutes
What you need to know about variables
- A Variable is a name you give to data, so you can use it later in the program
- You assign a variable with
= - There are lots names you can use for variables, but there are some rules
- Using meaningful variable names makes your program better
Video: What are variables?
Variable Names
Good and Bad Variable Names
Variable names should be descriptive and help a reader understand the code.
For example, take a look at the code below:
x1q3z9ocd = 35.0
x1q3z9afd = 12.50
x1q3p9afd = x1q3z9ocd * x1q3z9afd
print(x1q3p9afd) # 437.5
The variable names above are allowed in Python, but they are not helpful.
Contrast with:
hours = 35.0
pay_rate = 12.50
pay = hours * pay_rate
print(pay) # 437.5
These variable names are descriptive and helpful!
Practice: Assigning and printing variables
Solution (try for 5 minutes before looking!)
books_read = 13
print(books_read)

meals_eaten = 4
meals_eaten = meals_eaten + 1
print(meals_eaten)
Data types operators and expressions
Estimated Time: 20 minutes
What you need to know about data types
- Python can store different types of data
- The basic types of data you’ll learn about first are:
- Strings
- Integers
- Floats
- Booleans
- Python can do different operations based on the data type
- like
+to add numbers together
- like
Basic Data Types
Your name, age, date of birth, and photo are different pieces of data. Data, and the variables that refer to them, are represented by different types.
Every programming language has data types, but the built-in types are different from one programming language to another. In Python, we have more than 10 built-in data types. Here are the 3 types we need in this lesson:
- int (for integer)
- Represents integer numbers, like
1,4, or10
- Represents integer numbers, like
- float (a floating-point number)
- Represents floating-point numbers, like
1.0,4.32, or10.189 - You might know these as ‘decimal’ numbers or fractions - numbers that have a dot separating the integer part from the fractional part.
- Represents floating-point numbers, like
- str (for string)
- Stores text as character-based data like words, e.g.,
Hello World
- Stores text as character-based data like words, e.g.,
These are called primitive types. Python can represent more complicated data using compound types like List and Dictionary, which are made out of the primitive types. We’ll learn about some of those in later lessons.
Python figures out the type automatically based on some rules:
- numbers without a decimal point are treated as ints (like
10) - numbers with a decimal point are treated as floats (like
1.0) - text between quote marks is treated as strings (like
"Hello"or'100.5')
There are more rules for other types, but we're skipping them for now.
Video: Data Types
Operators
Operators are symbols that represent computations like addition and multiplication.
+performs addition-performs subtraction*performs multiplication/performs division**performs exponentiation%performs remainder (or modulus) operation
What would happen?
Try to guess what each snippet would print out. Then, click the arrow to see an explanation.
print(5 + 10)
print(5 + 10)
It would print 15.
First, python adds 5 and 10, then it does the print.
print(4 + 3 * 2)
print(4 + 3 * 2)
It would print 10.
Python uses the same order of operations as school
arithmetic, so the * comes before the +.
print(10 ** 5)
print(10 ** 5)
It would print 100000.
** is the exponentiation operator, so it's as if Python did 10 * 10 * 10 * 10 * 10.
print(12 % 10)
print(12 % 10)
It would print 2.
The % operation calculates the remainder. 12 divided by 10 has remainder 2.
Expressions
An expression is a sequence of operands and operators, like 15+5, that gets evaluated to a certain result.
Python doesn’t do everything all at once. It runs a program line by line, in order. Within a line, Python has an evaluation order that decides what comes first.
In the below code, the right hand side is evaluated before assignment.
age = 15 + 5
print(age) # 20
The 15 + 5 part of the line is called an “expression”. It’s a part of a line in Python.
Expressions get evaluated before assignment. So in the above code, 15 + 5 is evaluated to 20, and then the value 20 is assigned to the variable age.
Expressions also get evaluated before they get printed out in print():
print(10 / 2) # 5
Python does the 10 / 2 first, then the print()
Math operators and evaluation order
Python uses the same order of operations that arithmetic traditionally uses.
5 + 4 * 3 # 17 (not 27)
6 * 2 ** 2 # 24 (not 144)
This is the order for the math operators:
- Parenthesis
- Exponentiation (raising to the power)
- Multiplication/division/remainder
- Addition/subtraction
- Left to right to break any ties
You can use parentheses for grouping. They can change the order, or make it more obvious:
5 + (4 * 3) # 17
(5 + 4) * 3 # 27
6 * (2 ** 2) # 24
(6 * 2) ** 2 # 144
Parentheses are also used for calling functions like str() or print(), but it’s usually not that confusing to tell which is which.
Every opening paren needs a closing paren. You can’t do just (5 + 7, it needs to be (5 + 7).
Practice: Working with operators
Solution Code (try for 5 minutes before peeking)
a = 15
b = 7

# Print the sum (+) of a and b (this one is done for you)
print(a + b)

# Print the difference (-) of a and b
print(a - b)
# Print the product (*) of a and b
print(a * b)
# Print the quotient (/) of a and b
print(a / b)
# Print the remainder (%) of a and b
print(a % b)
TypeError and Type Conversion
If you try to add a number to a string, Python will raise a TypeError. It doesn’t know what you want to do. Do you want to concatenate the two, as if they are both strings? Or, add them together mathematically, as if they are numbers? Python refuses to guess.
age = "15" # a string
age + 5 # TypeError, tried to add a string and an int
To solve this error, you can convert between data types.
- Turn a string into an int with the function
int(). - Turn an integer into a str with the function
str()
age = "15" # a string
int(age) + 5 # 20
age + str(5) # "155"
Input and output
Estimated Time: 30 minutes
Key ideas
- Show output with
print() - Get data from the user with
input()
Printing Output
Websites and apps you have used in the past have a whole screen full of text and buttons. Eventually, you’ll learn to build those kinds of programs, but we’re starting with the basics: programs that work with text.
print shows some output to the Console:
print("Hello, world")
You’ve written code like this from your first “Hello, World” program. When you run it, the output shows up.
In Replit, output shows in the ‘Console’ tab. On early computers, there was only a text console. On the earliest computers, there wasn’t a screen at all. Instead, the output was printed out on paper. The output now shows up in the Console in our web browser, but we still call the function print.
print("We can print any string we want")
x = ("If the string is in a variable, we can print the variable")
print(x) # If the string is in a variable, we can print the variable
Getting Input from the User
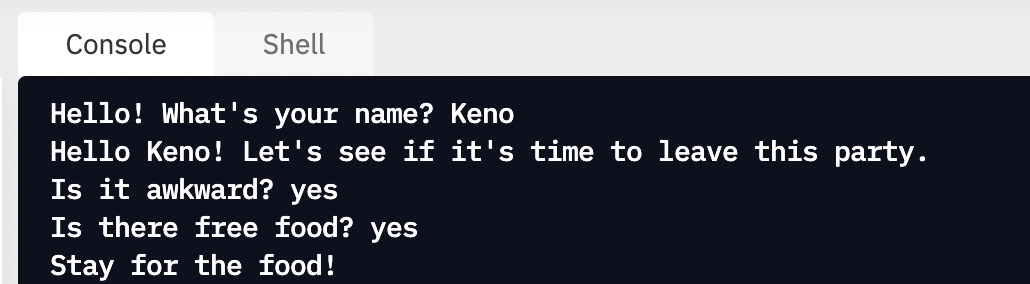
You've already used the input() function in earlier challenges to get the name from the user.
When Python sees input:
- It prints out the arguments to
input, similar toprint. - It pauses to wait for the user to type something in
- It waits for the user to press Enter
- When the user presses Enter,
inputgives the program the text that the user typed in
We can design lots of text-based interactions using input. A calculator, a search engine, a quiz, a chatbot - all of these and more can be designed to use text input and output.
Converting Inputs
The input() function returns a string. If you want a number, need to convert the data type using int or float.
response = input("How old are you?")
age = int(response)
It’s common to see the input and the conversion all at once, like this:
age = int(input("How old are you?"))
Converting to a float is similar:
soda_price = float(input("How much does a soda cost?"))
What does python do if you try to convert a string like "3.5" to an integer using int?
int("3.5") # ValueError: invalid literal for int() with base 10: '3.5'
⚠️ Python doesn’t want to accidentally lose information. Instead of guessing whether you want to round up or down, it raises a ValueError and halts the program.
Practice: Assigning and printing user input
Experimenting With Print
print()
print
print("Hello", "world")
What happens when there’s nothing between the parentheses? Or if you leave off the parentheses? Or if you put more than one thing between the parentheses?
Sometimes, the best way to find things out about how Python works is to try it out.
Experiment with
Print with multiple arguments
The print() function can take more than one argument. It can have more than one thing inside the parentheses (...)
However, you must separate arguments by commas.
name = "Emmy"
print("Hello" name) # SyntaxError: invalid syntax (because there's no comma)
print("Hello", name) # Hello Emmy
Example: Input and Output
Here's the code for the exercise:
1. first_num = int(input("enter first number: "))
2. second_num = int(input("enter second number: "))
3.
4. total = first_num + second_num
5.
6. print("the sum is: ", total)
In plain English, here is what the code does:
- line 1: Ask the user for an input. Convert the input to an integer, and store it in a variable named
first_num - line 2: Ask the user for another input. Convert the input to an integer, and store it in a variable named
second_num - line 4: Add
first_numandsecond_numand put the result in a third variable namedtotal - line 6: Print out the string
"the sum is"and the value of the variable namedtotal
Practice: Add three numbers
Solution: Add Three Numbers
first_num = int(input("enter first number: "))
second_num = int(input("enter second number: "))
third_num = int(input("enter third number: "))

# change the line below
total = first_num + second_num + third_num

# edit the text that will show up
print("the sum of the three numbers is: ", total)
String concatenation and f strings
Estimated Time: 30 minutes
Key ideas
- Using formatted strings
- Concatenating strings
String Concatenation and f-strings
When there’s a variable we want to combine with a string to print out a message, so far we’ve added the strings with +.
name = "Mercy"
print("Hello, " + name) # Hello, Mercy
When the message is longer, this becomes more confusing and harder to type.
name = "Mercy"
print("The alarm went off at exactly 6:00 AM as it had every morning for the past five years. " + name + " began her morning and was ready to eat breakfast by 7:00 AM. The day appeared to be as normal as any other, and " + name + " was not expecting anything to change.")
There’s another way to format long text that uses variables, called f-strings.
name = "Mercy"
print(f"Hello, {name}") # Hello, Mercy
print(f"The alarm went off at exactly 6:00 AM as it had every morning for the past five years. {name} began her morning and was ready to eat breakfast by 7:00 AM. The day appeared to be as normal as any other, and {name} was not expecting anything to change.")
Instead of using + to combine the variable and the string, we start the string with f and we use {} to insert the variable right inside the string. That way, there’s less confusion about quote marks and spaces.
Other f-string uses
We can also use f-strings for rounding.
one_third = 1/3
print(one_third)# 0.3333333333333333
print(f"{one_third:.2f}") # 0.33
f-strings have other formatting powers, but we’ll leave it at rounding floats for now.
Practice: f-strings
Solution: F-strings practice
first_num = float(input("enter first number: "))
second_num = float(input("enter second number: "))

# change the line below
result = first_num / second_num

print(f"the result is {result:.3f} ")
Practice
Estimated Time: 30 minutes
The solutions to each challenge are available in Replit, and you can view a video of the solution below each challenge. Try to go through the whole challenge without using the solution.
If you can’t do the challenge without looking the solution, it means you don’t understand the material well enough yet.
Try the next practice challenges without looking at the solution. If you need more practice challenges, reach out on Discord.
If you get stuck
- Read the instructions again.
- Remember Go Climb Kibo - first Google, then ask the Community on Discord, then reach out to Kibo instructional team.
- You can click ‘Submit’ in Replit to view a solution. Don’t forget to try the solution out in your own code, and submit the project again.
Currency Conversion
Watch the video below to see the full solution. Make sure you give yourself enough time to solve the practice without watching the video; It is really important for your learning.
Currency Conversion Solution Video

2. AC Load Estimator
Watch the video below to see the full solution. Make sure you give yourself enough time to solve the practice without watching the video; It is really important for your learning.
Load Estimator Solution Video
There is a typo in the code at the end of the video ("numbe" should be "number").
3. Body Mass Index
Watch the video below to see the full solution. Make sure you give yourself enough time to solve the practice without watching the video; It is really important for your learning.
Body Mass Index Solution

Project
Estimated Time: 1 hour
Team Project: Mad Libs
Due date: Sunday, May 12
Remember...- Read the instructions tab in Replit
- Plan before you code
- Debug if you aren't getting the desired output
- Attend office hours if you need additional support
- Ask for help in Discord
Wrap up
Estimated time: 5 minutes
Summary
- Comments let us put text in a program that will be ignored by the program but are useful for humans reading the program. Comments in Python start with the
#sign. - Variables are a way to store data with a name, so you can use it later. Creating a variable looks like
name = "Mo"orage = 22 - Strings are the Python data type for text, and they look like
"hello world" - Ints and Floats are the Python data types for numbers, and they look like
9or0.7 - Python can use operators like
+to add numbers or concatenate strings printshows output to the user, andinputasks the user to type in text- You can format the output in a variety of ways using f-strings
- Strings can be concatenated (added together) using the
+and usingf-strings
How was this lesson?
Feedback is a gift! We use your feedback to improve our lessons for future students.
Thank you!
Split strings
Estimated Time: 30 minutes
⚠️ This is a bonus section. Only complete it if you have time after completing the rest of this week's lessons.
You've learned how to do some useful operations with strings, like concatenating and combining. There’s one more operation — splitting — that will help you prepare for your projects and do some cool stuff.
Key ideas
- Using split() method to convert string into a list
Video: Splitting strings
The debugging mindset
Estimated Time: 15 minutes
Learning programming is challenging!
On this page, we’ve collected skills, tips, and mindsets helped students get the most from the program. We hope that they help you too.
🌱 Growth Mindset
In this class and beyond, we hope you use the following methods mentioned in the video to improve your learning:
- Maintaining a growth mindset
- Using and refining a process
- Seeking advice and feedback from peers and teachers
- Doing challenging things
🐛 Debugging Mindset
What we see as a good program with a small bug, the child sees as “wrong”, “bad”, “a mistake”. School teaches that errors are bad; the last thing one wants to do is to pore over them, dwell on them, or think about them. The child is glad to take advantage of a computer’s ability to erase it all without any trace for anyone to see. The debugging philosophy suggests an opposite attitude. Errors benefit us because they lead us to study what happened, to understand what went wrong, and, through understanding, to fix it. Experience with computer programming leads children more effectively than any other activity to “believe in” debugging.
Seymour Papert, Mindstorms
When you see errors in your code, how do you feel?
When you see the red Python error message, the Replit tests don’t pass, or your program isn’t doing what you want, it’s natural to feel scared, stressed, or frustrated.
However, errors don’t mean your program is bad, and they definitely don’t mean you are a bad programmer.
Debugging is the process of making programs better - and learning means running into lots of bugs.
Our version of the Growth Mindset is the Debugging Mindset.
- You will run into lots of errors.
- When you do, try to treat each one as a chance to learn.
- Bugs and errors are normal. Everyone learning to program creates lots of buggy programs - then debugs them. You will too.
Alumni Advice
Here’s a clip from Alexis, a Try Kibo alumni, on how to succeed in the program:
Don’t give up, and if you’re having a problem, don’t be afraid to speak up.
You can also check out the YouTube Playlist with more student stories and advice from alumni.
👨👩👧👧 Learn from Your Peers
Here’s what past Kibo students have said about working together:
I loved the sense of community and connection that Discord provided. I found it easier asking for help when I got stuck from my squad members and the other classmates
Discord helped a lot, before i asked a question i found that someone else already had. Most of the questions i had were already answered in the threads.
Working as a group always helps to solve issues quicker.
Discord helped me know that I was not the only one struggling with that assignment. And when people asked questions, I kinda took a piece of their assignment that I did not understand and that they did really well.
Sometimes I don’t even know I’m having certain issues until someone else asks
We’re a learning community. Since lots of other students are going through the same struggles you are, it helps everyone to learn together.
Here’s some tips and rules for making the most of the learning community:
- Be involved. Participate in discussions, find time to work with other students
- Ask each other for help. Other students might be able to help you, or they might have the same issue that you do. Asking for help helps everyone.
- Share your knowledge. If you think you’ve got a concept mastered, offer to help someone else.
- Celebrate creativity. When you make a cool project, share it with the group! If someone else shares a great project, celebrate them!
Kibo made programming FUN!
❓ Ask for Help
Learning should not be a solitary pursuit. If you have trouble understanding the concepts, can't find the assignment details, or have issues with one of the program tools, we expect you to reach out for help!
Here’s more quotes from past students:
The office hours were very helpful in helping me to get me one on one helping my assignments.
It was easy to share images/screenshots when we needed help. When someone had a question, it was so easy to just send a screenshot or image of what they are doing wrong.
I wonder why I didn't attend more office hours sooner.
What I found valuable was the fact that I was not going to be judged for asking questions, no matter how "Useless" it sounds.
How to ask for help
When you need to ask for help, you might send a message that only says, "I need help". Unfortunately, this message does not have the information needed to help you. You won’t get the help you need.
When asking for help, include the following information:
-
Details of your goal.
"I am trying to [goal]."
-
Details of what you have tried so far.
"I have tried [details of how you have tried to solve the problem already]."
-
Helpful context.
“Here’s a screenshot of my code."
❌ Don’t Write
- “need help”
- “I’m stuck on problem 3”
- “Can anyone help?”
- “Hi”
✅ Do Write
- “I’m working on solving problem three, and getting this error when I run my code: [screenshot]. Can anyone help explain this error? I don’t get it.”
- “I’m trying to print all the values in this list for my project, but it keeps saying
NameError: name ‘item’ is not defined. Here's a screenshot of my code. I tried changing the list, but that didn't work."
Screenshots
It’s often helpful to include a screenshot with your question. Here’s how:
- Windows: press the Windows key + Print Screen key
- the screenshot will be saved to the Pictures > Screenshots folder
- alternatively: press the Windows key + Shift + S to open the snipping tool
- Mac: press the Command key + Shift key + 4
- it will save to your desktop, and show as a thumbnail
Conditionals

Intro
So far, the Python programs you’ve written have all run step by step, from top to bottom, executing each line exactly once. This week, and the next week, you’ll learn to write programs where the flow of control is more complex.
Programs can execute code based on some conditions, skip certain lines of code, or run code more than once. In these lessons, you’ll learn the Python tools to control the flow of the program.
Conditional statements will give you the power to write code that makes decisions. Loops will let you write code that goes back and repeats again.
Learning Outcomes
After this week, you will be able to:
- Use comparison operators to check whether values are greater, less than, or equal
- Use conditional statements to run different code in different situations
Welcome Video
Simple decisions
Estimated Time: 10 minutes

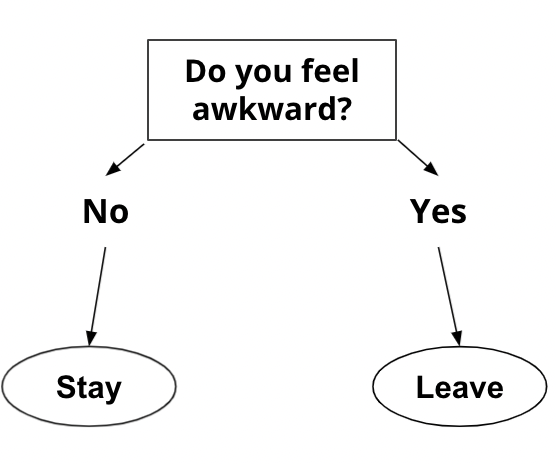
Life is full of decisions.
- Do I stay at the party, or is it too awkward?
- Is the price too high?
- Should I study more for the exam?
Programs also need to make decisions. Depending on the circumstances, programs should behave differently.
In this lesson, you’ll learn how to write programs that can make simple decisions using if statements. if (and related keywords else and elif) will let you write code that can handle different situations appropriately.
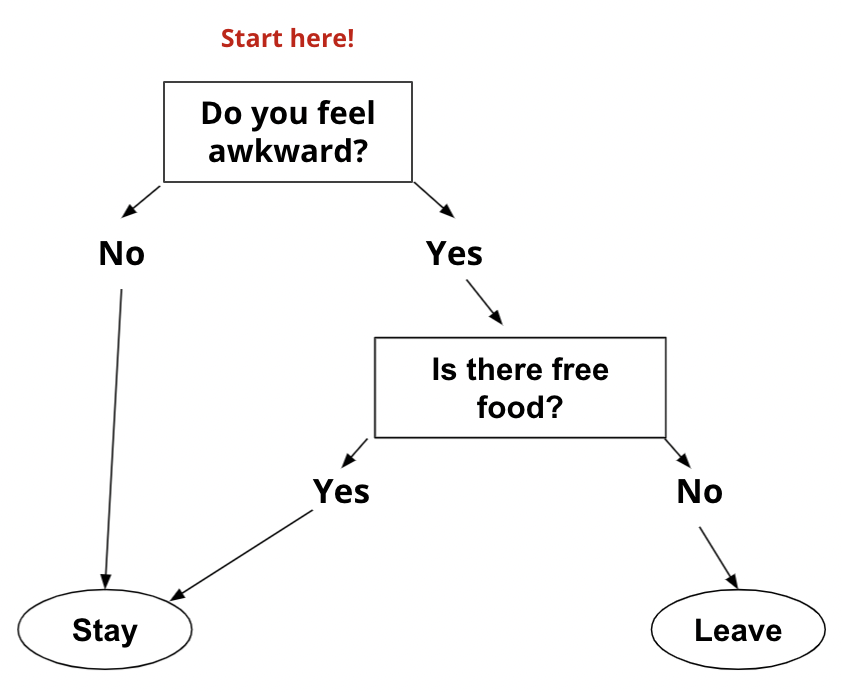
In the example above, you are going to stay at the party if you do not feel awkward. You can write that decision in a general if statement:
if I don't feel awkward:
  stay at the party
This example isn’t quite something Python could execute, but it’s surprisingly close!
If statement
The if statement is the simplest tool for controlling the flow of the program in Python.
if x > 0 :
    print('x is positive')
Up until now, Python has run every line of code in our programs, in order. With the if statement, that’s no longer the case. The print here only runs if x really is more than 0. Otherwise, the print will never run at all.
A one-branch if statement is the simplest conditional statement. Below is a flow control diagram for the code snippet.
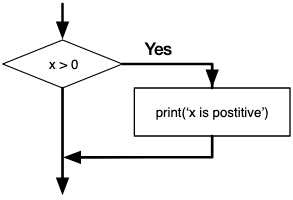
The boolean expression after if, in this case x > 0, is called the condition. If it is true, then the indented statement gets executed. If not, nothing happens.
In the rest of this lesson, you’ll learn more about:
- boolean values and boolean expressions
- conditional statements
if,elif, andelsekeywords
Boolean Expressions
Estimated Time: 20 minutes

Boolean is another Python data type. The only two Boolean possible values are True and False. These values are useful for writing code that makes decisions, like deciding whether or not to stay at the party.
Boolean Expressions
The simplest boolean expressions are the keywords True and False. Just like
we can do arithmetic with numbers, we can also build more complicated statements
that turn into True or False.
One kind of operation that results in boolean values is comparisons.
Comparisons
You can compare values in Python using comparison operators. These operators produce True or False based on the values on either side.
# '<' is the 'less than' operator
5 < 10 # True
15 < 10 # False
Here are the other comparison operators:
- == means Equal to
- < means Less than
- <= means Less than or Equal to
- >= means Greater than or Equal to
- > means Greater than
- != means Not Equal to
Here’s some examples:
x = 10  # Set x to 10. Note that the usage of "=" is not a boolean expression.

x == 10 # True (check if x equals 10)
x == 6  # False
x < 8   # False
x > 8   # True
x > 10  # False
x >= 10 # True
x <= 90 # True
Comparisons work on strings too:
y = "Hello"    # set y to "Hello"

y == "Goodbye" # False
y == "Hello"   # True
y == "hello"   # False (!!! equality is case-sensitive)
y != "Goodbye" # True
y != "Hello"   # False
y == 5         # False
y > 5          # TypeError
If/Else
Estimated Time: 30 minutes
Conditional statements
A conditional statement runs code based on a specific condition.
In Python, the syntax uses the keyword if, a condition followed by a colon :, and then an indented block of code to run.
if response == "yes":
	print("Proceeding...")
The print only runs if the value of the variable response is equal to "yes"
In this example, the condition is response == "yes" and the code block is print("Proceeding...").
The code block ends when you stop indenting.
In the following example, "Goodbye" is always printed, no matter what the response is. It’s outside of the code block, because it’s no longer indented.
response = input("Type 'yes' to proceed")
if response == "yes":
	print("Proceeding...") # only runs if response is equal to "yes"

print("Goodbye")         # runs no matter what
Practice
If-Else
Sometimes we want to do one thing if a boolean expression is true, and something else if it is false. In those cases, we can write an if-else statement.
Take a look at the example below. It prints a different message based on whether x is even or odd.
if x % 2 == 0:
    print('x is even')
else:
    print('x is odd')
We want to check if a given number x is even or odd. The % operator is called ‘modulo’ and it returns the remainder after division. If the remainder is 0 when x is divided by 2, then x is even. The flow control diagram looks like this:
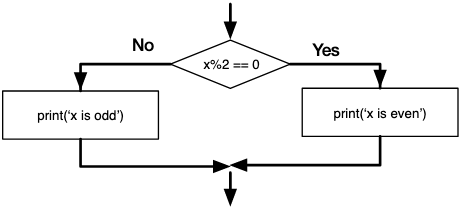
The boolean expression x % 2 == 0 checks to see if the remainder of x divided by 2 is equal to 0. If this is true, then the first indented statement (called a branch) gets executed and the program prints "x is even". If the boolean expression is false, then the branch after theelse gets executed instead and the program prints "x is odd".
When writing conditional statements, you must pay attention to indentation. You must indent after an if statement, maintain the indent as long as you want to be in the if block, then reduce the indent when done with the if block. Also, don't forget to add the : after the condition, and another : after the else if you have one.
Practice
A sample run of the code should look like this:

Multi way decisions
Estimated Time: 10 minutes

In this section, we will explore writing conditional statements when there are more than two possible outcomes.
First, we'll learn the elif keyword. It lets you add another conditional
statement to the regular if/else statement, so that you can write code for
situations that look like this:

Next, we'll focus on combining conditional expressions with and, or, and
not. These logical operators let you express more complicated conditions
that you might use in the real world,
like "age is greater than 18, or a parent has signed the permission slip".
Finally, we'll talk about nested conditions. Lots of situations have complicated flow charts, where you take some action and then check another condition as part of that action.
Nested if statements can express almost any flowchart, but the syntax
sometimes trips people up!
Elif
Estimated Time: 15 minutes

If-elif statements
if and else let us express conditions with two possible outcomes. But what if there are more than two possibilities we want to express in our program? elif stands for "else if". It lets us check more conditions, so we can cover as many conditions as we want.
Below is the flow control diagram for a multi-branch program:
Here is the corresponding Python code:
if x < y:
    print('x is less than y')
elif x > y:
    print('x is greater than y')
else:
    print('x and y are equal')
The code runs line by line. So, the conditions are checked in the order the code is written. The code does not look ahead. So, in the example above, assuming x = 3 and y = 3, the code will do 2 comparisons:
- Check if x is less than y. Since x = 3 and y = 3 this statement is false, and it keeps going
- Check if x is greater than y. Since x = 3 and y = 3, this statement is false
- Execute the else statement and print 'x and y are equal'
But with x = 4 and y = 6, the code will run the first comparison, print 'x is less than y' and finish. It will never even run the second check!
There is no limit on the number of elif statements that can be added, but the code will evaluate them from top to bottom. Having an else statement is optional, but if you have one, it has to be at the end.
Practice

Sample run of the code now look like this:
not can be combined with other conditions, like and and or. It’s often useful to group expressions with parentheses when making combinations.
if not (x < 10 or x > 100):
	print("x is a medium sized number")
Practice: Print multiples
In this practice, you will write a program that asks the user for a number then prints a statement based on the number the user enters.