Authentication
Authentication is how a user proves they are who they say they are.
Apps can use different combinations of factors to authenticate who a user is. That could mean:
- Credentials: tokens, usernames, email accounts, or passwords
- Device identifiers: cookies, long-lived application sessions, phone numbers, or multi-factor auth
- Third-party services and SSO: using protocols like Oauth for 'Sign in with Github' (or other providers)
As you can see, there are many options, but we will focus on the easiest one - Credentials, particularly with tokens. A token is very large string, like a password, but it's the server that creates it for you. It looks like this:
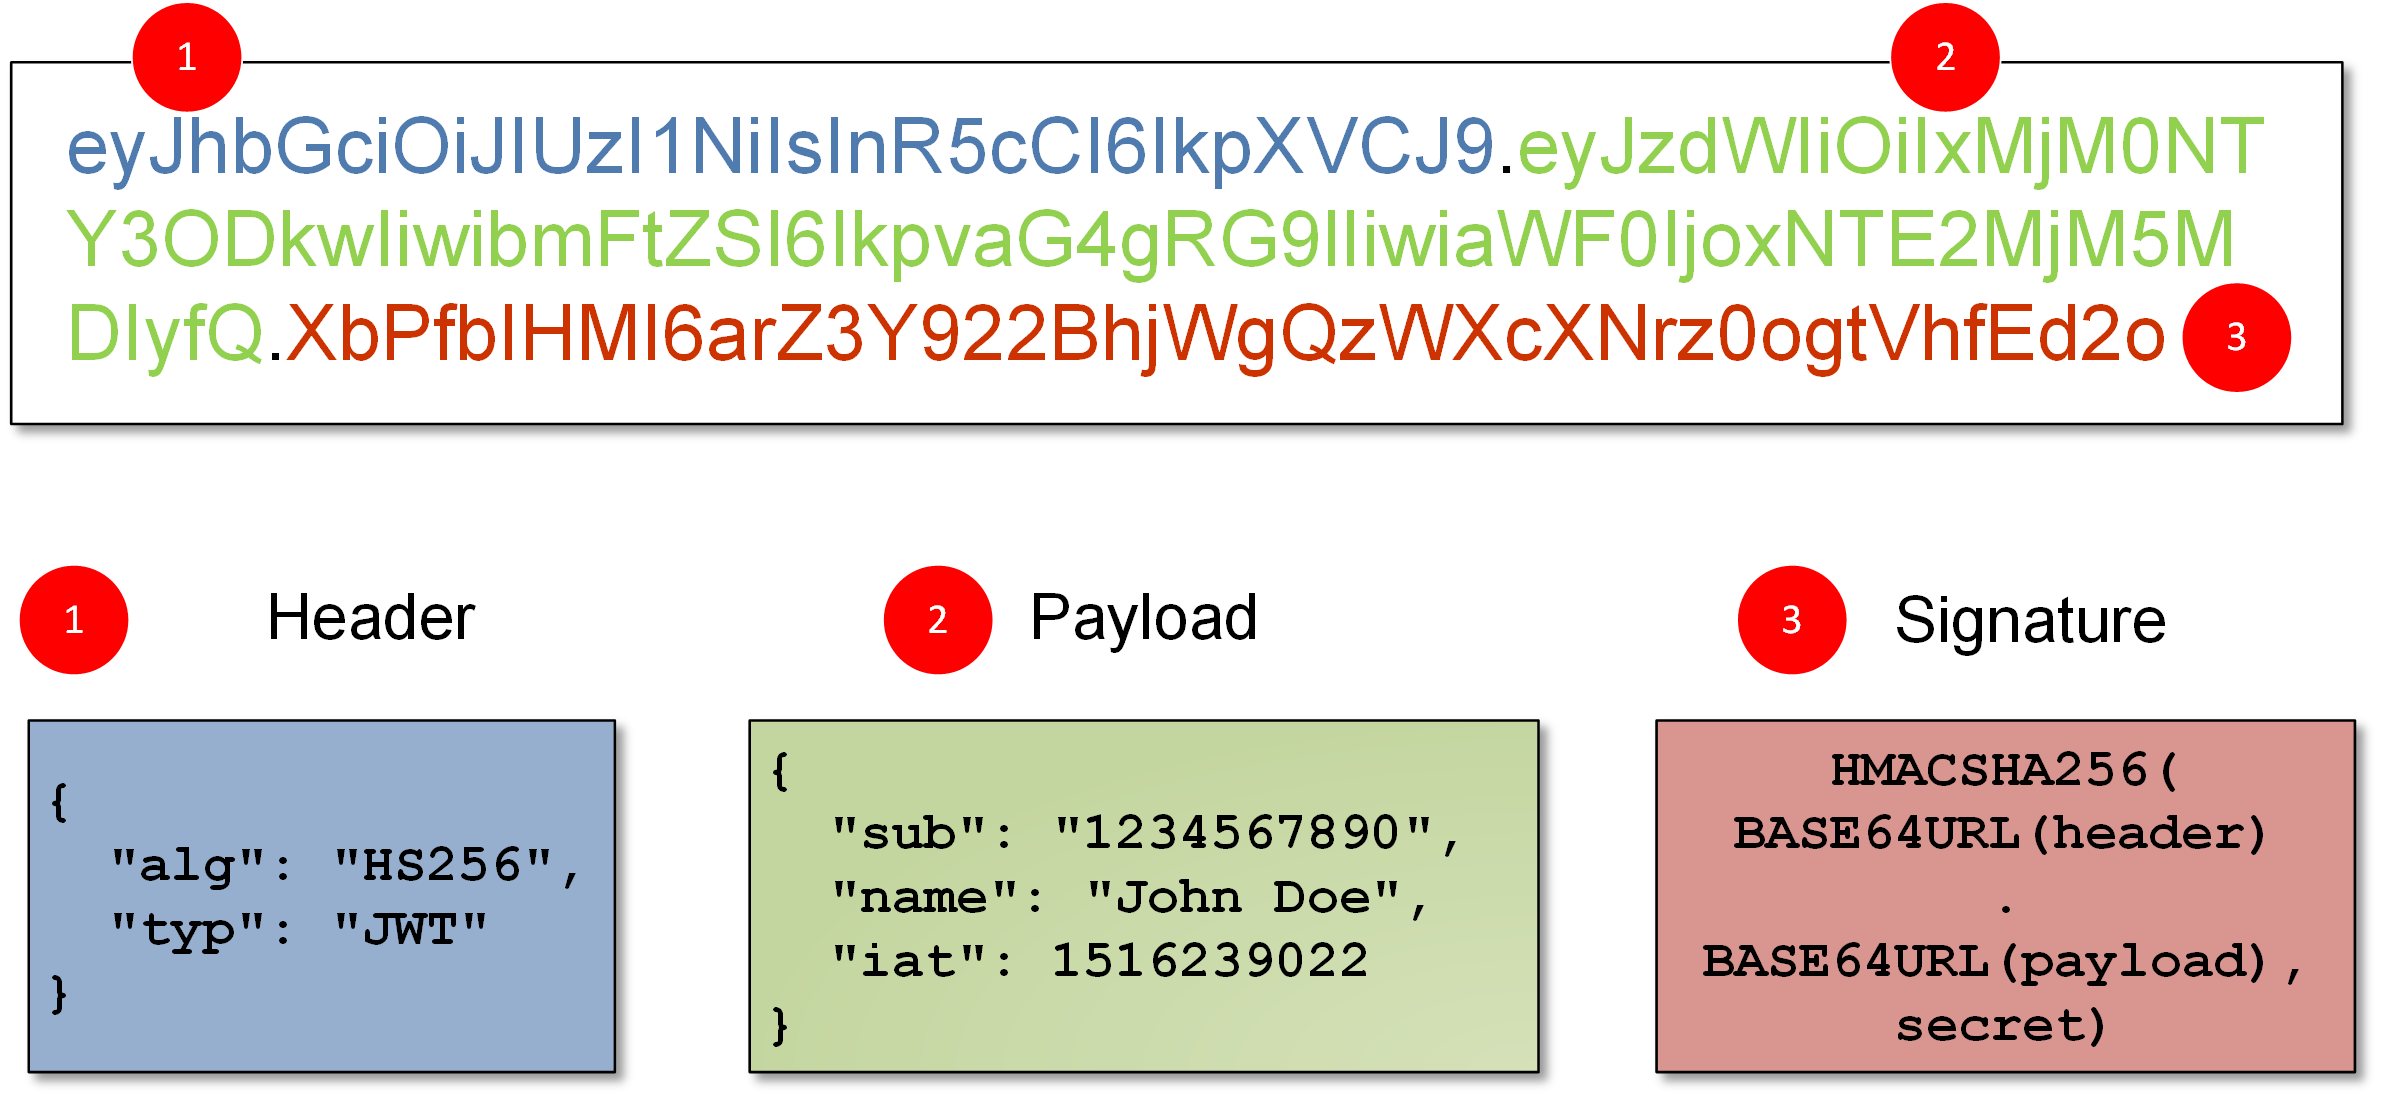
This is a JWT token. JWT stands for JSON Web Tokens. You can read more about it here. As you can see, JWT tokens have 3 different parts: the header, payload and signature.
You will usually provide your email and password to the server and once the server verifies that the email and password are correct, it will give you back a token (if email or password are incorrect it will return an error).
Once you have this token, you are Authenticated and you will not need to send your email and password every time you want to do a request. You will only need to send the token. This token will prove that you are who you say you are.
This is how we implement this basic flow in Javascript:
1. Setting Up the Environment
Initialize a new Node.js project and install the necessary packages:
npm init -y
npm install express jsonwebtoken
- Express: Web framework for Node.js
- jsonwebtoken: For creating JSON Web Tokens (JWT) for sessions.
2. Registration Process
Step 1: Set up a basic Express server:
const express = require('express');
const app = express();

app.use(express.json()); // For parsing JSON body

app.listen(3000, () => {
  console.log('Server started on http://localhost:3000');
});
Step 2: Implement the registration endpoint:
// In-memory user storage. In a real-world application, replace with a database.
const users = {
  "john@email.com": "password123",
  "jane@email.com": "password456"
};

app.post('/register', (req, res) => {
  const { email, password } = req.body;

  // Store user data (in a real-world application, use a database)
  users[email] = password;

  res.status(201).send('User registered');
});
As you can see:
-
In-Memory User Storage: The code begins by initializing a
usersconstant. This object simulates a storage mechanism by using email-password pairs. In real-world applications, this data would typically be stored in a secure database. -
Endpoint Definition: The code defines an endpoint (
/register) to handle POST requests. This endpoint is responsible for user registration. -
Extract User Credentials: Within the
/registerendpoint, the code extracts theemailandpasswordfrom the incoming request's body using destructuring. -
Store User Data: The provided email and password are stored in the
usersobject. This step mimics storing the user's data in a database. When a new user registers, their email becomes a key in theusersobject, and their password becomes the corresponding value. -
Send a Response: After successfully storing the user's data, the server sends a
201 Createdstatus code along with a message "User registered" to indicate that the registration process was successful.
Storing passwords in plain text, as done above, is not secure. It's highly recommended to hash passwords before storing them.
Step 3: Implement the registration endpoint:
// Endpoint to handle user login
app.post('/login', (req, res) => {
  // Extract email and password from the incoming request body
  const { email, password } = req.body;

  // Fetch the stored password for the given email
  const storedPassword = users[email];

  // Check if the user exists and the provided password matches the stored password
  if (!storedPassword || storedPassword !== password) {
    return res.status(400).send('Invalid email or password');
  }

  // If credentials are valid, generate a JWT token
  const token = jwt.sign({ user: { email } }, 'SECRET_KEY', { expiresIn: '1h' });

  // Send the generated token as the response
  res.json({ token });
});
As you can see:
-
Endpoint Definition: The code starts by defining a
/loginendpoint to handle POST requests. This endpoint is responsible for authenticating users. -
Extract User Credentials: Within the
/loginendpoint, the code extracts theemailandpasswordfrom the incoming request's body using destructuring. -
Retrieve Stored Password: The code then fetches the password associated with the provided email from the
usersobject, mimicking a database query. -
Credential Verification: The system checks if the provided email exists within the
usersobject and if the associated password matches the provided password.- If either condition is not met, the server responds with a
400 Bad Requeststatus and a message "Invalid email or password," indicating a failed login attempt.
- If either condition is not met, the server responds with a
-
Token Generation: If the credentials are valid, the server generates a JSON Web Token (JWT). This token contains a payload with a
userobject that has theemailproperty. The token is signed using a secret key ('SECRET_KEY') and is set to expire in one hour (expiresIn: '1h'). -
Send Token as Response: The server sends the generated JWT as the response in JSON format. This token will typically be used by the client to authenticate subsequent requests, verifying that the user is logged in and has the appropriate permissions.
Normally, when the client of this API recives the token, they will store it in local cookies or local storage to use it later.
Something interesting about the JWT, is that inside of the string is your email, but you need to decrypt it first (we will do that in the next lesson). Actually anyone can decrypt your JWT, but only the server can create one. Go to this video to learn more.