Course Overview
Welcome to Web Application Development
Watch this welcome video from your instructor.
You can also find the video here.
What you'll learn
This course builds on Web Development Fundamentals, and provides a comprehensive introduction to client and server-side development for the web.
In this project-based course, you will work independently to build web applications, and progressively apply new knowledge to your projects. You will deepen your knowledge of HTML and learn advanced CSS, including how to use CSS variables and modern frameworks for motion and interaction. You will learn about accessible web design, and how to create websites and apps that work well on mobile devices, and that support use of assistive technologies like screen readers.
You will build the front-end of a web application using HTML, CSS and JavaScript, and write a supporting back-end using a JavaScript or Python framework. In doing so, you will demonstrate knowledge of the request-response cycle, database management, and JSON-based APIs. You will also apply technical communication skills by writing technical specs, drafting architecture diagrams, and documenting APIs.
Learning Outcomes
By the end of the course, you will be able to:
- Use HTML, CSS, and JavaScript to build interactive websites
- Describe and implement common web accessibility practices
- Design and implement mobile-first principles to build responsive websites
- Use a modern backend framework to build database-driven websites
- Develop and deploy a web application
Instructor
- Dr. Olaperi Okuboyejo
- olaperi.okuboyejo@kibo.school
Please contact on Discord first with questions about the course.
This course also has a Teaching Assistant, who will have their own office hours and who you can reach out to for additional assistance.
The Teaching Assistant and their contact information is:
- Michael Zatey
- michael.zatey@kibo.school
Live Class Time
Note: all times are shown in GMT.
- Mondays at 3:00 PM - 4:30 PM GMT
The following week’s lessons will be released every Sunday.
Office Hours
- Instructor: Wednesdays at 12:00 PM - 1:00 PM GMT
- Teaching Assistant: Fridays at 12:00 PM GMT
How the Course Works
There are multiple ways you'll learn in this course:
- Read and engage with the materials on this site
- Attend live class and complete the activities in class
- Practice with exercises to try out the concepts
- Complete projects to demonstrate what you have learned
Active engagement is necessary for success in the course! You should try to write lots of programs, so that you can explore the concepts in a variety of ways.
You are encouraged to seek out additional practice problems outside of the practice problems included in the course.
Live Classes
Each week, you will have a live class (see course overview for time). You are required to attend the live class sessions.
Video recordings and resources for the class will be posted after the classes each week. If you have technical difficulties or are occasionally unable to attend the live class, please be sure to watch the recording as quickly as possible so that you do not fall behind.
| Week | Topic | Materials | Live Class |
|---|---|---|---|
| 1 | Web Applications | Class Slides | Class Recording |
| 2 | Templating | Class Slides | Class Recording |
| 3 | Databases | Class Slides | Class Recording |
| 4 | Forms | Class Slides | Class Recording |
| 5 | Data Modeling | Class Slides | Class Recording |
| 6 | More Web Frameworks | Class Slides | Class Recording |
| 7 | |||
| 8 | |||
| 9 |
Project: Number Guessing Game
This is an individual project. You are expected to submit your own solution, not to work with a partner or team.
Number Guessing Game
In this project, you'll build a number guessing game using Flask. You'll practice the basics common to all web applications: routing and templating.
The game will work similarly to the Guess My Number game you have seen in past courses. There is a secret number, the user is prompted to guess, and the app tells them if the guess is too high, too low, or correct.

https://github.com/kiboschool/wad-flask-guess-my-number
Submission
In order to get credit for your project, you must:
- push your code to Github Classroom
- submit your work in Gradescope
- submit your project in Anchor
This video walks through the process of submitting your project:
Third-party code
Libraries and packages help you build common features that would be hard or
time-consuming to build on your own. In Python, you can use pip to install
packages and import to load them into your code. As it turns out, there are
lots of other ways to install and use packages.
When using third-party packages for the web, the big question is: "where does this code run?"
-
Server-side packages might help you connect to a database, render templates, or use an API. You install them using the package manager for your server's language or framework. (For Flask, that's
pip. For Express, it'snpm). -
Client-side packages are HTML, CSS, or JS that add some functionality to your web page, like a set of styles, widgets, or interactive feature. The code has to be loaded onto your webpage, so there are a few different ways to set that up.
Note: some packages have both a server-side and client-side component. We'll ignore those for now, but they typically have setup guides that help install and configure them.
This lesson will focus on client-side packages, since you've already got some experience installing and using libraries in Python. There are several options for using client-side packages, they include:
- Using a CDN
- Serving the files yourself
- Bundling
Loading third-party code from a CDN
The easiest way to load some third-party code into your page is by using some other host.
As you remember from Web Development Fundamentals, you use the <link> tag to load CSS, and
the <script> tag to load JavaScript. To load the client library Bootstrap onto
your site, you'd use
CSS:
<link href="https://cdn.jsdelivr.net/npm/bootstrap@5.3.0-alpha1/dist/css/bootstrap.min.css" rel="stylesheet" integrity="sha384-GLhlTQ8iRABdZLl6O3oVMWSktQOp6b7In1Zl3/Jr59b6EGGoI1aFkw7cmDA6j6gD" crossorigin="anonymous">
JS:
<script src="https://cdn.jsdelivr.net/npm/bootstrap@5.3.0-alpha1/dist/js/bootstrap.bundle.min.js" integrity="sha384-w76AqPfDkMBDXo30jS1Sgez6pr3x5MlQ1ZAGC+nuZB+EYdgRZgiwxhTBTkF7CXvN" crossorigin="anonymous"></script>
(See https://getbootstrap.com/ for more.)
Instead of hosting the code on your own server, you tell the browser to load it from another server. In this case, jsdelivr, which offers free hosting for open-source assets like Bootstrap.
Further Reading: What is a CDN?
A Content Delivery Network (CDN) is a set of servers that are configured for serving static assets quickly, all over the world. There are lots of different CDNs! They typically have datacenters in many locations, so that no matter where the user is, they can get a quick response.
CDNs are great for serving static files like CSS, JavaScript, images, or documents. There is not much configuration if you are just using a CDN to load assets like Bootstrap, but if you want to host your own files on a CDN, there's typically more steps.
Read more from Cloudflare about what CDNs are and how they work.
Serving the files yourself
As you saw, you can serve static files in Flask by placing them in the /static
directory. There is usually a similar mechanism in any web framework.
If you download the CSS and JS files for the third-party code you want to use (like Bootstrap), then you can host those static files from your server, instead of relying on the CDN.
Instead of using urls that point to the CDN, you'll instead use urls that point to your application, like:
CSS:
<link href="static/bootstrap.min.css" rel="stylesheet">
JS:
<script src="static/bootstrap.bundle.min.js"></script>
Databases
Web applications need to store data.
Instead of keeping the data in program memory (where it would get lost when the application restarts) or saving it to a file, web applications typically store information in databases.
In this week, we'll focus on relational databases. In the begining of the week, we will only learn about SQL alone, then we will learn how to use SQL and Flask all together.
While there are some use cases for other styles of database, relational databases are more generally applicable, and illustrate many of the principles you'd need to know to use a non-relational database.
To start, we'll focus on selecting data from tables in SQLite, a database that is both powerful and simple to use. Later on, you'll learn how to create, update, and delete data, as well as how to manage the structure of the data that's stored in the database.
Relational DBs
What are Relational DBs?
A relational database is an application that organizes data into one or more tables (or "relations") of rows and columns, with a unique key identifying each row. The tables are typically related to each other through the use of foreign keys, which allow data to be linked across tables. This structure allows for data to be queried and manipulated in a flexible and efficient manner.
The most popular type of relational database is SQL (Structured Query Language) databases, such as SQLite (which we'll use in class), MySQL, SQL Server, Oracle, and PostgreSQL. These databases are widely used in many types of applications, from small personal projects to large enterprise systems.
See these videos for further explanation of relational databases.
Key ideas
- A database is a program that stores data
- Databases persist to disk instead of just in your program's memory
- They make it efficient to organize and manipulate data
- Structured as typed columns and rows of items
What does a relational DB look like?
A table is made of rows and columns.
A row is a set of data that corresponds to one item or object in the real world, such as a customer, an order, or a product. Each row has a unique identifier, called a primary key, that allows it to be easily accessed and distinguished from other rows in the table.
A column, also known as a field, represents a specific attribute or piece of data within a row. For example, in a table of customers, a column could represent the customer's name, address, or phone number. Each column has a specific data type (e.g. text, integer, date) and often has certain constraints applied to it (e.g. not null, unique).
Consistency: Preventing Data Errors
Databases are designed to help prevent inconsistencies in data. They ensure, for instance, that every row has the same fields, and that the fields have exactly the right types. A customer's birthdate should be a date (and not text or a url or a number).
As you'll see, databases have many other ways that they help keep data consistent.
Try it: Explore an example database
Explore this visual database in Airtable: https://airtable.com/shr5RgFWwaFQ46VXd
Ask yourself:
- What are the columns?
- What are the types of the columns?
- What does one row represent?
- What kinds of operations would you want to do with this data?
If you need to, sign up for Airtable here
Setting up a SQLite database
SQLite
SQLite is a convenient database that we'll use throughout the course:
- it stores data in a file, which is convenient for seeing, sharing, and understanding databases
- it's a real database. It supports a full version of SQL, and it's the most widely deployed SQL database.
- Python includes an sqlite3 library, so there's less to install or configure
SQLite from the Terminal
Check that SQLite is installed:
sqlite3 --version
If it is not installed, you can install it using your package manager (scoop or brew).
You can run sqlite3 [name-of-db-file] to connect to a file-backed database and
using the SQLite CLI interface.
Download the countries dataset from Kaggle so you have some interesting data to explore. (You may need to create an account).
Unzip and move the file to a directory, then run it with sqlite3:
❯ sqlite3 countries_database.sqlite
SQLite version 3.37.0 2021-12-09 01:34:53
Enter ".help" for usage hints.
sqlite>
If you enter .help you can see a full listing of the sqlite commands that
can change settings or show you meta information.
Now that you have the database open, you are ready to start executing SQL commands!
sqlite> SELECT * FROM countries;
If you run this, you should see a bunch of country data.
See the next few pages on querying and filtering for more about SQL syntax and what you can do with queries.
SQLite from Python
To connect a Python program to your SQLite database, you need to
- import the
sqlite3library - connect to the database (often by specifying a file)
- execute queries
Here's what that looks like in Python:
import sqlite3

DATABASE_FILE = 'countries_database.sqlite'

db = sqlite3.connect(DATABASE_FILE)
cursor = db.execute('SELECT * FROM countries')
print(cursor.fetchone())
You'll learn more about how to use SQLite from Python over the next few lessons.
A few quick tips:
db.executetakes in a query and returns a cursor object (not the results). You have to call.fetchoneor.fetchallto get resultsfetchonereturns a tuple with all of the data for the first row. Callingfetchoneagain returns the next row.fetchallreturns all of the rows, as a list of tuples.
Further reading: When to use SQLite - or not
SQLite's documentation includes a page explaining appropriate uses.
See the page Appropriate Uses for SQLite to learn more about when SQLite is and is not the right choice of database.
Querying
What is a query?
A SQL (Structured Query Language) query is a command used to communicate with a relational database to retrieve or manipulate data. SQL is the standard language used to interact with relational databases, and it allows you to perform a wide range of operations on the data stored in them.
A SQL query is a statement written in SQL that is used to retrieve or manipulate data in a database. Queries can be used to select specific data from one or more tables, insert new data into a table, update existing data, or delete data from a table.
For example, a SELECT statement is used to retrieve data from a table, and it may look like this:
SELECT first_name, last_name FROM customers WHERE city = 'New York';
This query retrieves the first and last names of customers who live in the city of New York.
Another example, an INSERT statement is used to insert new data into a table, it may look like this:
INSERT INTO customers (first_name, last_name, email) VALUES ('John', 'Doe', 'johndoe@example.com');
This query inserts a new customer with first name "John", last name "Doe" and email "johndoe@example.com" into the table 'customers'.
There are many other types of SQL statements, each with its own specific syntax and use cases. A good understanding of SQL is essential for working with relational databases and building efficient and effective database-driven applications.
Querying from SQLite in the Terminal
If you followed the SQLite Terminal setup steps, you're ready to start making some queries.
Let's see some examples of queries on the countries database.
sqlite3 countries_database.sqlite
SELECT
The SELECT statement lets us pick out data from the database.
First, lets try selecting all the data:
sqlite> SELECT * FROM countries;
Afghanistan |ASIA (EX. NEAR EAST)         |31056997|647500|48,0|0,00|23,06|163,07|700|36,0|3,2|12,13|0,22|87,65|1|46,6|20,34|0,38|0,24|0,38
Albania |EASTERN EUROPE                     |3581655|28748|124,6|1,26|-4,93|21,52|4500|86,5|71,2|21,09|4,42|74,49|3|15,11|5,22|0,232|0,188|0,579
(..224 rows)
Zimbabwe |SUB-SAHARAN AFRICA                 |12236805|390580|31,3|0,00|0|67,69|1900|90,7|26,8|8,32|0,34|91,34|2|28,01|21,84|0,179|0,243|0,579
That's more data than we wanted!
Let's turn on some sqlite settings to make the data easier to read:
sqlite> .headers on
sqlite> .mode columns
Instead of selecting everything, lets just select the country and population.
sqlite> SELECT country, population FROM countries;
Country                            Population
---------------------------------  ----------
Afghanistan                        31056997
Albania                            3581655
...
Zimbabwe                           12236805
SELECT lets us get data from the database. There are a lot more ways to use SELECT, but it's better to practice hands-on than to just read!
Practice: SQL Select in SQLBolt
SQL takes a lot of practice!
Read the introduction and first lesson on SQLBolt.
Complete the interactive exercises to practice writing queries.
Selecting and filtering
In SQL, you can filter records by using the WHERE clause in a SELECT, UPDATE, or DELETE statement. The WHERE clause specifies a condition that must be true for a row to be included in the result set or affected by the statement. The syntax for a basic WHERE clause is as follows:
SELECT column1, column2, ... FROM table_name WHERE condition;
For example, you can use the following query to retrieve all customers whose last name is "Smith" from the customers table:
SELECT first_name, last_name FROM customers WHERE last_name = 'Smith';
Multiple conditions with AND, OR, and NOT
You can also use multiple conditions in the WHERE clause to filter records using the AND, OR and NOT operators.
SELECT column1, column2, ... FROM table_name WHERE condition1 AND/OR/NOT condition2;
For example, you can use the following query to retrieve all customers whose last name is "Smith" and live in the city "New York":
SELECT first_name, last_name, city FROM customers WHERE last_name = 'Smith' AND city = 'New York';
Other operators: BETWEEN, LIKE, IN, IS NULL
Additionally, you can use the BETWEEN operator to filter records based on a range of values. For example, you can use the following query to retrieve all customers whose age is between 25 and 40:
SELECT first_name, last_name, age FROM customers WHERE age BETWEEN 25 AND 40;
You can also use the LIKE operator to filter records based on a pattern. For example, you can use the following query to retrieve all customers whose first name starts with the letter "J":
SELECT first_name, last_name FROM customers WHERE first_name LIKE 'J%';
You can also use the IN operator to filter records based on a list of values. For example, you can use the following query to retrieve all customers whose city is either "New York" or "Los Angeles":
SELECT first_name, last_name, city FROM customers WHERE city IN ('New York', 'Los Angeles');
You can also use the IS NULL operator to filter records where a specific column contain null value. For example, you can use the following query to retrieve all customers whose phone number is null:
SELECT first_name, last_name, phone FROM customers WHERE phone IS NULL;
These are just a few examples of how you can filter records in SQL, and there are many other ways to filter data depending on the specific needs of your query.
Practice: Constraints and Filtering in SQLBolt
Read the SQLBolt lessons on constraints and filtering:
Practice with the interactive exercises to solidify your SQL syntax.
Limit and Order
In SQL, the LIMIT and ORDER BY clauses are used to retrieve a specific subset of records from a table, and to control the order in which the records are returned.
LIMIT
The LIMIT clause is used to limit the number of rows returned in a query. The syntax for the LIMIT clause is as follows:
SELECT column1, column2, ... FROM table_name LIMIT number;
For example, you can use the following query to retrieve the first 10 customers from the customers table:
SELECT first_name, last_name FROM customers LIMIT 10;
ORDER BY
The ORDER BY clause is used to sort the results of a query by one or more columns. The syntax for the ORDER BY clause is as follows:
SELECT column1, column2, ... FROM table_name ORDER BY column1 [ASC|DESC], column2 [ASC|DESC], ...;
For example, you can use the following query to retrieve all customers from the customers table and sort them by last name in descending order:
SELECT first_name, last_name FROM customers ORDER BY last_name DESC;
Combining LIMIT and ORDER BY
The ORDER BY clause is often used in conjunction with the LIMIT clause to retrieve a specific subset of records and sort them in a specific order. For example, you can use the following query to retrieve the first 10 customers from the customers table and sort them by last name in ascending order:
SELECT first_name, last_name FROM customers ORDER BY last_name ASC LIMIT 10;
You can also use multiple columns for ordering. For example, you can use the following query to retrieve all customers from the customers table and sort them by city in ascending order and last name in descending order:
SELECT first_name, last_name, city FROM customers ORDER BY city ASC, last_name DESC;
Keep in mind that the order of the columns in the SELECT statement doesn't affect the order of the result set, the order is defined by the ORDER BY clause.
Practice: Limit and Order
Read the SQLBolt lesson on filtering and sorting results:
Practice the interactive exercise to improve your SQL skills.
Database Management
So far, we've focused on reading the data in the database. There are also another set of commands that focus on managing the database itself. This includes creating and connecting to databases and managing the database schema.
Managing the schema of a database involves creating and modifying the structure of the database, including the tables, fields, and relationships between them.
This includes tasks such as
- creating new tables
- altering the structure of existing tables
- adding or modifying indexes to improve performance.
The Schema
A database schema is the blueprint that defines the structure of a database, including the tables, fields, and relationships between them. It describes the organization of data and the rules that govern it, including constraints, defaults, and null values.
The schema is defined using a set of SQL statements that create the tables, fields, and relationships between them. These statements are typically executed when the database is first created, or when the schema needs to be modified.
To see the schema of an existing table in SQLite, you can use the .schema command from the terminal:
❯ sqlite3 countries_database.sqlite
sqlite> .schema
CREATE TABLE IF NOT EXISTS "countries" (`Country`, `Region`, `Population`, `Area (sq. mi.)`, `Pop. Density (per sq. mi.)`, `Coastline (coast/area ratio)`, `Net migration`, `Infant mortality (per 1000 births)`, `GDP ($ per capita)`, `Literacy (%)`, `Phones (per 1000)`, `Arable (%)`, `Crops (%)`, `Other (%)`, `Climate`, `Birthrate`, `Deathrate`, `Agriculture`, `Industry`, `Service`);
This provides the schema in the form of a CREATE TABLE statement. This one
says to create a table named "countries" (if there is not one already), with the
fields listed (country, region, population, etc).
Creating a table
A CREATE TABLE statement in SQL is used to create a new table in a database.
The basic syntax for creating a table is as follows:
CREATE TABLE table_name (
    column1_name data_type constraint,
    column2_name data_type constraint,
    ...
    constraint
);
table_nameis the name of the table being created.column_nameis the name of a column in the table.data_typeis the type of data that the column will store (e.g. INT, VARCHAR, DATE, etc.).constraintis an optional clause that specifies additional properties for the column such as primary key, not null, check etc.
For example, the following SQL statement creates a table named "employees" with three columns: "id", "name", and "salary":
CREATE TABLE employees (
    id INT PRIMARY KEY,
    name VARCHAR(255) NOT NULL,
    salary DECIMAL(10,2)
);
This creates a table named 'employees' with three columns 'id','name','salary' where
- 'id' is a primary key
- 'name' cannot be null
- 'salary' is decimal with 10 digits and 2 digits after the decimal.
It's worth noting that different database management systems (DBMS) have slightly different syntax for creating tables, so the exact syntax may vary depending on the specific DBMS you are using.
Practice: Creating a table
Read the SQLBolt lesson on creating tables:
SQL Lesson 16: Creating tables
Practice writing a CREATE TABLE statement.
Altering and Dropping tables
The ALTER TABLE statement in SQL is used to add, modify, or delete columns in an existing table, or to change the table's constraints. The basic syntax for the ALTER TABLE statement is as follows:
ALTER TABLE table_name
    [ADD | DROP | MODIFY] column_name data_type constraint;
- ADD is used to add a new column to the table.
- MODIFY is used to change the definition of an existing column.
- DROP is used to delete a column from the table.
For example, the following SQL statement adds a new column named "email" to the "employees" table:
ALTER TABLE employees ADD email VARCHAR(255);
The following SQL statement modifies the data type of 'salary' column in "employees" table:
ALTER TABLE employees MODIFY salary DECIMAL(12,2);
The DROP TABLE statement in SQL is used to delete a table from the database. The basic syntax for the DROP TABLE statement is as follows:
DROP TABLE table_name;
For example:
DROP TABLE employees;
This will delete the table named 'employees' and all the data inside it permanently.
It's worth noting that dropping a table will also delete all the data stored in the table, so you should be careful when using this statement, and make sure you have a backup of the data before you drop a table.
Practice: Altering and Dropping tables
Read the SQLBolt lessons on Altering and Dropping tables:
Practice the exercises to work on your database management skills.
Flask and SQL
Building web applications often requires storing and retrieving data, such as user profiles, posts, or product details. Flask, combined with SQL, makes it very easy to integrate this database functionality into web applications.
Let's explore how to do it.
Setting Up
Before diving in, ensure you have Flask installed and a project structure ready. For database operations, we'll use the SQLite database through Python's built-in sqlite3 library.
Integrating SQLite with Flask
-
Create a brand new Flask app.
-
Setting up the Database: Create a new file called
db.pyin the root folder of your app and paste this code.import sqlite3 def init_db(): db = sqlite3.connect('app.db') cursor = db.cursor() # Create table cursor.execute(''' CREATE TABLE IF NOT EXISTS users ( id INTEGER PRIMARY KEY, username TEXT, email TEXT )''') db.commit() print("DB successfully created") init_db()
Now go to your terminal and execute this python file:
python db.py
As you can see, we are creating a table called users and populating it with 3 fields: id, username and email.
This database is stored in a new filed called app.db that is also stored in your root folder. Don't touch this file.
- Seeding the first data
Now create a new file called seed.py in the root folder of your project with the following content:
import sqlite3

DATABASE = 'app.db'

def seed_db():
    conn = sqlite3.connect(DATABASE)
    cursor = conn.cursor()

    # Sample data
    users = [
        ("Alice", "alice@example.com"),
        ("Bob", "bob@example.com"),
        ("Charlie", "charlie@example.com"),
        ("David", "david@example.com"),
        ("Eva", "eva@example.com")
    ]

    cursor.executemany('INSERT INTO users (username, email) VALUES (?, ?)', users)
    conn.commit()
    conn.close()

    print("Database seeded successfully!")

seed_db()
Now run the seed file from your terminal with:
python seed.py
After running the script, your app.db will have 5 users. Remember, this script will insert these users every time it's run.
-
Database Connection from Flask: Open
app.pyand paste the following lines in the beginning:Establish a connection to the SQLite database when needed:
 import sqlite3

 def get_db():
    db = sqlite3.connect('app.db')
    return db
As you can see, we are creating a new function that will allow us to call the db whenever we need it (most of the time this will be done inside of a route)
- Fetching Data:
Go to app.py again and create a new route with the following code: (don't forget to import render_template)
@app.route('/users')
def users():
    db = get_db()
    cursor = db.cursor()
    cursor.execute('SELECT * FROM users')
    users_list = cursor.fetchall()

    return render_template('users.html', users=users_list)
- Visualization:
Create a template file calledusers.html with the following content:
<ul>
{% for user in users %}
    <li>{{ user[1] }} ({{ user[2] }})</li>
{% endfor %}
</ul>
After this step, run your Flask app. You should be able to go to http://localhost:5000/users in your browser and see a list of users in your app.
Practice: Databases
💡 This is your chance to put what you’ve learned into action.
Try solving these practice challenges to check that you understand the concepts.
Submission
To log your practice for credit:
- Practice exercises will be graded for completion not correctness. You have to document that you did the work, but we won't be checking if you got it right.
- You are encouraged to engage with all the exercises listed on the practice page.
- You are expected to submit only the details requested on the Gradescope submission.
SQLBolt: SELECT Queries Review
Check your knowledge of SELECT queries by completing the review on SQLBolt:
SQL Review: Simple Select Queries
SQLZoo: More SELECT Practice (optional)
Get another perspective on SELECT queries with SQLZoo.
Making it real (optional)
Learn about mock data, and practice making real SQL queries from a python CLI application.
Open "Making it real" in Github Classroom
Show solution video walkthrough
Midterm Project: Quiz App
In this project, you'll build a custom quiz app using Flask.
This is a Team Project. You'll work in groups of 2-3 students to design and build your application.
- Form your groups and communicate with your team before you accept the assignment in Github Classroom.
- Join the same team in Github Classroom. Work on your project together. Ideally, find a time when you can all join a video call and work together on the project. Everyone in the group should have a roughly equal contribution to the project.
- Submit your project as a group in Gradescope.
Accept the Assignment on Github
Quiz App
Quiz apps are really popular.
Sporcle, for instance, offers tons of different types of quizzes, usually with a timer.
Have you ever taken a Buzzfeed-style Quiz? If you haven't (or even if you have), take a look at These Disney Channel And K-Pop Songs Have The Same Title — Which Do You Prefer?. The quiz isn't really about knowing anything or getting the answer right, it's about entertainment.
Mentimeter is a quiz app for education, and SurveyMonkey is a quiz app for surveys for businesses.
In this project, you'll use what you've learned so far about web apps to make your own quiz app. You can pick any style - you don't have to follow the style any of these apps.
Requirements
- Your application must use Flask
- Your application must render a quiz using a template
- Your application must allow users to answer questions using a form
- Your application must handle the response to the form, and show the user their results
Optional
- You may add styles to the quiz app pages
- You may use a CSS framework
- You may render questions from a fixed list in your code, or from a database
Submission
- Commit and push your project to Github.
- Submit your project in Gradescope (as a team).
- Upload your work to Anchor (each team member should upload the files to Anchor).
Accept the Assignment
Accept the Assignment on Github
Bonus: Migrations and Seeding
Migrations and Seeds are two tools that teams of developers use to keep their database schemas in sync with each other.
Migrations
Your application expects the schema to have a particular shape. When you change the schema, you often change the code too.
Using Git, it's easy (well, at least possible) to share your code changes. How do you share your schema changes?
The answer is migrations.
Database migrations are a way to change the structure of a database schema over time, in a controlled and organized manner. They are often used in software development to evolve the database schema as the application code changes.
Database migrations typically involve applying a series of incremental changes to the database schema, called migration scripts. Each migration script represents a specific change to the schema, such as adding a new table or column, modifying an existing column, or removing a table. The scripts are executed in a specific order to bring the database schema from one version to another.
The process of applying migration scripts is typically automated by a migration tool, which keeps track of which scripts have been executed and in what order. The tool is able to compare the current schema version with the desired version and execute the necessary scripts to bring the database up to date. This ensures that the database schema is always in a known, consistent state, and that any changes made to the schema are tracked and can be easily rolled back if necessary.
Database migrations are important because they enable teams to make changes to the database schema without affecting the data stored in the database, and without having to manually make changes to the database. They also provide a way to version and rollback the database schema, which helps to ensure the integrity of the data.
Example: Customers database migrations over time
Migrations are often created in response to changing needs. This small story illustrates how migrations might help evolve a "customers" database over time.
- We need to track customers!
First, the business recognizes that it needs to track customers. It creates a migration for creating the customers table:
-- 001_create_customers_table.sql
CREATE TABLE customers (
  id INT PRIMARY KEY,
  name VARCHAR(255) NOT NULL,
  email VARCHAR(255) UNIQUE NOT NULL,
  address VARCHAR(255),
  created_at TIMESTAMP DEFAULT NOW()
);
Every developer can run this sql on their system to bring their local database schema up to date. The primary database server also runs this migration, and the application begins tracking customers.
- Customer support needs phone numbers!
The customer support team has asked that we track a phone number for every customer in the database.
Here's the migration for adding phone numbers to the customer table:
-- 002_add_phone_number_to_customer.sql
ALTER TABLE customers ADD phone_number VARCHAR(20);
Now we can track the phone numbers.
- Missing addresses
The shipping team has complained that they have to call customers because they don't have an address on file. They have painstakingly collected and updated the address for every customer, so there are no more NULLs in the table. Now, you want to change the table so that no more NULLs can be added.
Here's the sql:
-- 003_make_customer_address_non_null.sql
ALTER TABLE customers MODIFY address VARCHAR(255) NOT NULL;
- Adding a foreign key constraint for a orders table
Business is growing, and you're now encountering different kinds of bugs. Here's the latest one: Shipping has complained that some orders are missing customers!
You can fix it by adding a referential integrity constraint. The database will ensure that every order has a customer_id, and that the customer_id refers to an actual customer in the database. Here's the sql:
-- 004_order_customer_id_referential_integrity.sql
ALTER TABLE orders
ADD CONSTRAINT fk_orders_customers
FOREIGN KEY (customer_id) REFERENCES customers(id);
- Getting rid of the phone numbers
The customer support team has shifted to exclusively using email for support (phone calls took too much time). Now they want to get rid of the phone numbers for all the customers:
-- 005_remove_customer_phone_number.sql
ALTER TABLE customers DROP COLUMN phone_number;
- Becoming a services business
It's been decided that instead of selling products to customers, the company will now sell consulting services to clients. Now you are renaming the table.
-- 006_rename_customers_to_clients.sql
RENAME TABLE customers TO clients;
Each time a new migration is introduced, all of the developers can keep their databases in sync by running the migrations in order. The migrations help the team track and manage the changes to the database schema, in response to business needs.
For databases in real organizations, there are often hundreds of migrations, to represent all of the changes to the database over time!
Seeding
Seeding a database refers to the process of inserting default or initial data into a database. This data is typically used to populate the database with a set of known data, which is required for the application to function correctly. The data can be inserted directly into the database using SQL statements, or it can be done through a script or application code.
Seeding a database can be useful in various scenarios, for example:
- When a new database is created, it can be seeded with data that is needed for the application to function correctly.
- When an application is being developed, it's often useful to have a set of test data that can be used for debugging and testing the application.
- When an application is deployed to a production environment, it can be seeded with data that is required for the application to function correctly.
The data that is used for seeding a database can be stored in a variety of formats, such as CSV, JSON, or XML, and it can be read into the database using a variety of tools, such as SQL scripts, ORM libraries or other database management libraries.
Further reading: Seeding
For more on seeding, check out the Prisma docs on seeding
Forms
Forms are among the most common modes of user interaction on the web. Any time you want someone to enter some data online, a form is the go-to tool.

Forms make your web applications interactive. Forms are part of a multi-request flow in your application. You'll see how different requests and responses work together to create the normal user experience of filling out a form.
As you'll learn this week, there are lots of considerations when building forms! What kinds of inputs should you use? What should happen when the form is submitted? How do you check that the user has submitted valid information? How do you make sure that the form works well on devices with different screen sizes?
This week you'll also continue to learn more about relational databases and SQL, practicing inserting and updating data in the database. In this week's assignment, you'll see first-hand the importance of validating user input and taking extreme care when crafting your queries, working with a SQL injection attack.
Topics
- HTML form elements
- Handling form data
- Inserting and updating data in the database
- Parsing and input validation
- SQL injection
- Styling forms
- Accessibility
HTML Forms
HTML forms are used to collect user input. They typically consist of a set of form elements, such as text fields, checkboxes, and submit buttons, enclosed within <form> tags.
When the user submits the form, it sends an HTTP request to the server with the data entered into the inputs.
Forms Intro Video
Check out this quick overview video covering the basics of HTML forms and input elements.
Note the use of the
<label>tag to label the forms.
Form elements
The <form> tag defines a form.
Form elements, such as text fields, checkboxes, and submit buttons, can be created using the <input> element, with different types:
<input type="text">is a text box<input type="checkbox">is a checkbox<input type="radio">is a radio button<input type="submit">is a submit button. When clicked, it will submit the form.
The <label> tag is used to provide a text description for form elements.
The <select> and <option> tags are used to create a drop-down list.
The <textarea> tag is used to create a multi-line text input field.
The <fieldset> and <legend> tags are used to group related form elements together.
Form tag attributes
The <form> tag defines the form. It goes on the outside of the input elements.
- All the inputs inside the form get included when it is submitted
- The
actionattribute specifies where the form data will be sent when the form is submitted. - The
methodattribute specifies what HTTP method to use to submit the data.
Forms method attribute can only be set to "get" or "post". Other HTTP methods aren't allowed, and will send a "GET" request.
"GET" sends the form data as part of the URL, while "POST" sends the form data in the body of the HTTP request.
The action attribute specifies the route on the server to send the form data.
Form Examples
A login form
<form action="/login" method="post">
    <label for="username">Username:</label>
    <input type="text" id="username" name="username">
    <label for="password">Password:</label>
    <input type="password" id="password" name="password">
    <input type="submit" value="Login">
</form>
This form contains two text fields for the username and password, and a submit button to send the form data to the server for processing. It submits a POST request to the /login route.
A contact form
<form action="/send_message" method="post">
    <label for="name">Name:</label>
    <input type="text" id="name" name="name">
    <label for="email">Email:</label>
    <input type="email" id="email" name="email">
    <label for="message">Message:</label>
    <textarea id="message" name="message"></textarea>
    <input type="submit" value="Send">
</form>
This form contains text fields for the user's name and email address, a textarea for a message, and a submit button to send the form data. It sends a POST request to the /send_message endpoint on the server.
A survey form
<form action="/color_survey" method="get">
    <fieldset>
        <legend>What is your favorite color?</legend>
        <input type="radio" id="red" name="color" value="red">
        <label for="red">Red</label>
        <input type="radio" id="blue" name="color" value="blue">
        <label for="blue">Blue</label>
        <input type="radio" id="green" name="color" value="green">
        <label for="green">Green</label>
    </fieldset>
    <input type="submit" value="Submit">
</form>
This form contains radio buttons for different color options, and a submit button. It submits a GET request to the /color_survey route when the submit button is clicked.
In all above examples, the form data is sent to the server when the form is submitted. The server can use the data from the form to perform various actions such as logging in a user, sending an email, or storing data in a database.
Further Reading: Forms and Form Elements
HTML forms are complicated! There are a ton of different kinds of elements with many options to control their behavior.
MDN has a learning track about forms
We recommend that you read these pages to learn about forms:
- Your first form
- How to structure a web form
- Basic native form controls
- HTML5 Input Types
- Other form controls
There is also a reference page for the <form> element.
Check your understanding: HTML Forms
Answer these questions to check what you know about HTML forms.
-
How do you create a text input field in an HTML form?
-
What attribute determines the HTTP method used when submitting a form?
-
How do you create a drop-down list in an HTML form?
-
How do you create a submit button in an HTML form?
-
What is the purpose of the
<label>tag in an HTML form? -
How do you create a multi-line text input field in an HTML form?
-
What is the role of the
actionandmethodattributes in form?
Practice: Create a form
Create an HTML form with input fields for a theme park survey.
Your form should include:
- Text inputs for the user's name and email
- Radio buttons for providing an overall rating of the park, 1-5.
- Checkboxes for selecting their favorite attractions.
- A select field for entering the age range, with the ranges
"<17","18-24","25-34","35-44","45-55","55+" - Labels for each of the form fields.
- Set the form to submit to the "/park-survey" route, using a "POST" request.
- Include a Submit button that says "Submit your survey".
Form Data
When an HTML form is submitted, the data is sent to the server in the form of key-value pairs. For each form element, the key is the name attribute of the element, and the value is the user's input (the value attribute).
For example, let's say you have a simple form with two text fields, one for the user's name and one for their email address:
<form action="/signup" method="post">
    <label for="name">Name:</label>
    <input type="text" id="name" name="name">
    <label for="email">Email:</label>
    <input type="email" id="email" name="email">
    <input type="submit" value="Submit">
</form>
When the user submits the form, the data is sent to the server as key-value pairs, formatted like "name=John" and "email=john@example.com".
If the form's method is "get", it is submitted with a GET request, and the data is appended to the URL as query parameters. For example, if the form action is "/signup" and the user input for name is "John" and email is "john@example.com", the data will be sent in the URL as:
/signup?name=John&email=john@example.com
For POST requests, the data is sent in the body of the HTTP request. The browser will form-encode the data, and include a Content-Type header "x-www-form-urlencoded", which is a standard format for sending data in HTML forms. The server looks at that header and decode the data in the body.
Form data video
See this video on the basics of submitting form data and accessing it using Flask.
Here's a longer video that shows building forms in more detail.
Data for other form elements
For form elements like radio buttons, checkboxes, and select fields, the data is also sent as key-value pairs. The key is the name attribute of the form element, and the value is the selected or entered option.
Radio buttons
For radio buttons, the value attribute of the selected option is sent as the value of the key. For example, if a form has a radio button group with the name "color" and options for "red" and "blue",
<input type="radio" id="red" name="color" value="red">
<label for="red">Red</label>
<input type="radio" id="blue" name="color" value="blue">
<label for="blue">Blue</label>
If the user selects "blue", the data sent upon form submission would look like this:
color=blue
Select
For select fields (usually styled as dropdown inputs), the value attribute of the selected option is sent as the value of the key. For example, if a form has a select field with the name "colors" and options for "red", "green", "blue":
<select name="color" id="color">
  <option disabled selected>Choose a color</option>
  <option value="red">Red</option>
  <option value="green">Green</option>
  <option value="blue">Blue</option>
</select>
and the user selects "green", the data sent upon form submission would look like this:
colors=green
Checkboxes
For checkboxes, the value attribute of the selected option is sent as the value of the key. For example, if a form has a checkbox group with the name "fruits" and options for "apple", "banana", and "pear", and the user selects "apple" and "banana", the data sent upon form submission would look like this:
fruits=apple&fruits=banana
It's worth noting that, when multiple options are allowed in checkboxes or select fields, the data is sent as multiple key-value pairs with the same key, one for each selected option.
In case of the select fields, it is possible to send multiple options at the same time if the select element has the attribute multiple in the HTML form.
<select name="color" id="color" multiple>
Further Reading: Sending Form Data
Read MDN's guide on submitting forms
Note: we will use native form submission in this class. However, in many applications, developers submit forms using JavaScript instead of letting the browser handle the form submission. See https://developer.mozilla.org/en-US/docs/Learn/Forms/Sending_forms_through_JavaScript
Accessing form data in Flask
In Flask, you can access the values from a submitted form in a few different ways, depending on the method used to submit the form.
For a GET request, you can access the form data as query parameters in the request object. Here is an example of a Flask route that handles a GET request with a form that has two fields, "name" and "email":
from flask import Flask, request

app = Flask(__name__)

@app.get('/submit')
def handle_form_submit():
    name = request.args.get('name')
    email = request.args.get('email')
    return 'Name: {} Email: {}'.format(name, email)
For a POST request, you can access the form data in the request object's form attribute. Here is an example of a Flask route that handles a POST request with a form that has the same fields as before:
from flask import Flask, request

app = Flask(__name__)

@app.post('/submit')
def handle_form_submit():
    name = request.form['name']
    email = request.form['email']
    return render_template('welcome.html', name=name, email=email)
Bonus: File uploads
There are a lot of types of HTML inputs! Most behave like the ones above, with a key/value pair in the submitted data.
<input type="file"> allows uploading a file, and it is encoded differently when submitted.
- The Content-Type header is "multipart/form-data" instead of "x-www-form-urlencoded"
- The data will be encoded differently and it will be accessible in the server side using a different method.
When a form includes a file upload field, the browser will typically submit the form using the "multipart/form-data" content type. This content type uses a different encoding method to send the form data to the server.
When the form is submitted, the browser will send the data in multiple "parts", each with its own content type and headers. Each part will contain the data for one form field, including the file data.
For example, if a form includes fields for the user's name, email address, and a file upload field, the data sent to the server might look something like this:
Content-Type: multipart/form-data; boundary=----WebKitFormBoundary7MA4YWxkTrZu0gW

------WebKitFormBoundary7MA4YWxkTrZu0gW
Content-Disposition: form-data; name="name"

John Doe
------WebKitFormBoundary7MA4YWxkTrZu0gW
Content-Disposition: form-data; name="email"

johndoe@example.com
------WebKitFormBoundary7MA4YWxkTrZu0gW
Content-Disposition: form-data; name="file"; filename="image.jpg"
Content-Type: image/jpeg

[binary data for image file]
------WebKitFormBoundary7MA4YWxkTrZu0gW--
Here, the "boundary" is a string that separates the different parts of the data. Each part begins with a "Content-Disposition" header that specifies the name of the form field, and for file fields, it also contains the "filename" and "Content-Type" headers.
On the server side, the file data can be accessed by reading the raw data of the request and parsing it based on the boundary, this process is called "multipart parsing". Different languages and frameworks have their own libraries and methods to handle the multipart/form-data.
If you'd like to handle file uploads in Flask, see the Flask docs on file uploads.
INSERT, UPDATE, and DELETE
So far, the only thing we've done with data submitted from forms is to show it back to the user.
But, usually, that's not all we want to do! Other things we might want to do with form data:
- Log the user into the site
- Make an HTTP request to another service with the data
- Compute some logic based on the data
Or, what we're going to focus on now:
- Store the data in a database
First, let's focus on the SQL syntax for creating, updating, and deleting rows. Then, we'll focus on how to connect that to our form submission for an end-to-end example.
Saving new data with INSERT
If you made it further in the SQL practice, you've probably seen hints of the INSERT statement. It's how you add a new row to a SQL table. The syntax for a SQL INSERT statement is as follows:
INSERT INTO table_name (column1, column2, column3, ...)
VALUES (value1, value2, value3, ...);
INSERT INTOis used to indicate that you're inserting data into a table.table_nameis the name of the table where the data will be inserted.(column1, column2, column3, ...)is a list of the columns in the table where the data will be inserted. This is optional and only necessary if you want to specify which columns the data should be inserted into.VALUESis used to indicate the values that will be inserted into the table.(value1, value2, value3, ...)is a list of the values that will be inserted into the table, in the same order as the columns specified.
For example, if you have a table called "employees" with columns "id", "name", and "salary", you could insert a new employee into the table with the following SQL statement:
INSERT INTO employees (id, name, salary)
VALUES (16, 'Oluwaseun Oyebola', 50000);
This would insert a new employee with an id of 16, a name of "Oluwaseun Oyebola", and a salary of 50000 into the "employees" table.
Video: Inserting Data
Here's a pair of videos on inserting data into a SQLite database. The first shows how to run an INSERT statement, and the second provides more details about inserting and placeholders with the Python sqlite module.
Updating data with UPDATE
To change an existing row in a table, you use the UPDATE statement.
The syntax for a SQL UPDATE statement is as follows:
UPDATE table_name
SET column1 = value1, column2 = value2, ...
WHERE some_column = some_value;
UPDATEis used to indicate that you're updating data in a table.table_nameis the name of the table where the data will be updated.SETis used to indicate the new values that will be set for the columns in the table.column1 = value1, column2 = value2, ...is a list of the columns and their new values that will be set.WHERE some_column = some_valueis used to specify which rows in the table will be updated.
Important: Do not forget the WHERE clause in an UPDATE statement! If you don't include a WHERE, you will update all rows.
For example, if you have a table called "employees" with columns "id", "name", and "salary" and you want to update the salary of the employee with id 16 to 100000, you could use the following SQL statement:
UPDATE employees
SET salary=100000
WHERE id = 16;
This would update the salary of the employee with id 16 to 100000 in the "employees" table.
Here's a quick video on updating and deleting data in SQL: Updating/Deleting Data (YouTube)
Deleting Data with DELETE
To remove a row from a table, you use the DELETE statement.
The syntax for a SQL DELETE statement is as follows:
DELETE FROM table_name
WHERE some_column = some_value;
DELETE FROMis used to indicate that you're deleting data from a table.table_nameis the name of the table where the data will be deleted.WHERE some_column = some_valueis used to specify which rows in the table will be deleted.
For example, if you have a table called "employees" with columns "id", "name", "salary" and you want to delete the employee with id=1 you could use the following SQL statement:
DELETE FROM employees
WHERE id = 1;
This would delete the row with id=1 from the "employees" table.
It is important to note that DELETE statements without a WHERE clause will delete all rows from the table! Always include a condition to specify which rows should be deleted.
Practice: SQLBolt Insert, Update, and DELETE
Practice the syntax for INSERT, UPDATE, and DELETE with SQLBolt:
Inserting form data into the database in Flask
Now we have all the tools we need to save form data submitted to the server to the database.
We'll need:
- a route to serve the html form
- the form itself, with inputs, action, and method
- a route to handle the form submission
- logic to insert the data into the database
from flask import Flask, request, render_template
import sqlite3

app = Flask(__name__)

def connect_db():
    return sqlite3.connect('employees.db')

@app.get('/new_employee')
def new_employee_form():
    return render_template('new_employee.html')

@app.post('/create_employee')
def create_employee():
  name = request.form['name']
  salary = request.form['salary']
  conn = connect_db()
  c = conn.cursor()
  c.execute("INSERT INTO employees (name, salary) VALUES (?,?)", (name, salary))
  conn.commit()
  conn.close()
  return 'Employee added.'
<!-- new_employee.html -->
<form method="post" action="/create_employee">
  Name: <input type="text" name="name"><br>
  Salary: <input type="number" name="salary"><br>
  <input type="submit" value="Add Employee"><br>
</form>
In this example, we have a route /new_employee that serves the HTML form. The form has inputs for the name and salary. The action and method attributes tell the browser where and how to submit the form data.
When a user clicks the "Add Employee" button, the browser submits the form with a POST request to the /create_employee route. The request is handled by the create_employee function. The form data is accessed using request.form. Then, we open a connection to the database and insert the form data into the "employees" table, using an INSERT statement.
Preview: Validation and SQL Injection
In this example, there is no validation for the name or salary submitted in the form. The user could enter anything! That means that the data going into the database could end up being nonsense, like a blank name or a salary less than 0.
The good thing about this example is that it does not allow SQL injection. The sqlite execute method lets you add placeholders in the query and pass in arguments to fill them in:
c.execute("INSERT INTO employees (name, salary) VALUES (?,?)", (name, salary))
The execute method replaces the ? placeholders with the values name and salary safely. It makes sure that the values won't get mixed up with the SQL code, so that the query is safe to execute.
When querying the database, never use string concatenation to build the query yourself.
In the next lessons, you'll learn more about validation and SQL injection.
Preview: SQLAlchemy and ORMs
You've been learning to write SQL queries by hand, so that you understand what's happening under the hood. In many large web applications, developers use libraries that manage the database connection, send queries, and turn the response from the database into Python objects. Libraries that do this are called ORMs, for Object-Relational Mappers.
A very popular Python ORM is called SQLAlchemy. By using it, you can write queries like
User.query.filter_by(id=15).first()
instead of using the SQLite library to write a query like:
conn.execute("SELECT * FROM users WHERE id = ?;", 15).fetchone()
The same (or very similar) SQL will be generated by the ORM, and the same result is returned from the database. Especially for more complicated queries, an ORM can be easier than writing SQL statements by hand.
Here's a video on using Flask-SQLAlchemy to insert, update, and delete data.
Parsing and Validation
As you've probably seen when creating CLI programs, users cannot be trusted to enter the right information into your program.
A big job for most applications is validating user input. That means:
- parsing data into the appropriate types (e.g. from a string into a float)
- checking that the data makes sense for the application (e.g. the name should not be blank, the password should have 8 characters)
- showing helpful information to the user, so that they can enter the information correctly
Parsing and validating form inputs is an important step in ensuring that the data submitted by the user is accurate and can be safely processed by the application.
Parsing data types
Input to your application need to be converted to the appropriate data type before they can be used.
Even if an input element has a specific type like number or date, the form-encoded data will come into your request handler as a string.
You'll need to convert it to the correct type in order to store it in the database or use it for some other computation.
Here's a basic example parsing string data:
@app.post('/submit')
def submit():
    # Get form data as strings
    name = request.form['name']
    age = request.form['age']
    salary = request.form['salary']

    # Parse age and salary
    age = int(age)
    salary = float(salary)

    # Do something with the parsed data, e.g. insert into a database
    # ...

    return 'Form data parsed and converted successfully'
What would happen if age or salary was not able to be parsed as an int or float?
Python raises a ValueError when it cannot convert a string into the right type.
Flask will handle the error, so instead of crashing your program, it will return a 500 error page to the client.
Instead of a 500 error, you could check the values before you convert them: Validation. Then, you could return a meaningful error to the client, instead of a 500. That way, the user can correct their submission.
Client, Server, and Database Validation
In the web applications we've seen, there are three places code runs, so three places where you can validate input:
- On the client
- On the server
- In the database
On the client side, you can use HTML elements and attributes to provide basic validation, and add JavaScript for more advanced or custom validation. This can include simple validation checks such as ensuring that a required field has been filled out, that an email address is in the correct format, or that a password meets certain requirements. Client side validation improves user experience by providing instant feedback, but it should not be the only source of validation: it can be easily bypassed.
On the server side, parsing and validating inputs can include more complex validation checks such as ensuring that a username is unique, that a phone number is valid, or that a date is in the correct format. Server-side validation is more secure because it cannot be easily bypassed by attackers, or by accident, if there is a bug in the client application.
In the database, you can use constraints to specify rules that prevent invalid data. These aren't always easy to construct or as flexible as your application code, but they provide the most robust protection against invalid data in your application.
Both client-side and server-side validation should be used together, so that users have clear feedback, and your application is secure from attackers and invalid data.
Client side validation
HTML input elements
First, it's helpful to ask the user to input the right types of data! The browser will enable basic validation (as well as autofill) if you use the right type of input.
<input type="email">for email<input type="search">for search<input type="phone">for phone numbers<input type="url">for urls<input type="number">for numbers<input type="range">for a range slider- various input types (
time,week,month,datetime-local) for dates and times
The browser will only let the user enter the right type of data, and it will make it easier for the user to enter the data. Compare typing a date vs. picking from a calendar.
See the list of HTML input types for more.
Input element attributes
You can use specific attributes to provide further validation and feedback to the user:
required: This attribute indicates that the input field must be filled out before the form can be submitted. If a user attempts to submit the form without filling out a required field, the browser will display an error message.pattern: This attribute can be used to specify a regular expression that the input's value must match. If the input's value does not match the pattern, the browser will display an error message.minandmax: These attributes can be used to specify a minimum and maximum value for an input field. If the input's value is less than the minimum or greater than the maximum, the browser will display an error message.step: This attribute can be used to specify the increment or decrement of the input's value.minlengthandmaxlength: These attributes can be used to specify a minimum and maximum number of characters that can be entered into the input field.
You can read more about HTML constraint validation on MDN
Validation using JavaScript
Particularly for more complicated constraints, another approach is to validate the form using JavaScript.
Client-side form validation using JavaScript involves checking the form inputs in the browser before they are sent to the server. This can improve user experience by providing immediate feedback to the user if they have entered invalid data.
Form validation using JavaScript typically involves the following steps:
- Attach an event listener to the form, typically to the submit event, so that the validation code runs when the user attempts to submit the form.
- In the event listener callback function, access the form input elements and check their values.
- If the input values are invalid, display an error message to the user and prevent the form from being submitted by calling
event.preventDefault().
Here's an example:
// Get the form element
const form = document.querySelector("form");

// Attach an event listener to the form's submit event
form.addEventListener("submit", function(event) {
    // Get the input elements
    const name = document.querySelector("input[name='name']");
    const age = document.querySelector("input[name='age']");

    // Check if the input values are valid
    if (name.value.trim() === "" || age.value.trim() === "") {
        // Display an error message
        alert("Name and Age are required fields");
        // Prevent the form from being submitted
        event.preventDefault();
    }
});
This example uses an alert to let the user know what's wrong. A better design would be to add inline warning messages that specify what is wrong with the form.
Further Reading: Client-side validation
MDN's page on form validation explains the principles of client-side validation, with examples.
Server side validation
Client side validation is great for user experience, but it cannot prevent malformed data from reaching your application.
For one, you could have a bug in your client-side validation, allowing the user to submit invalid data.
Perhaps more concerningly, you can't control the client! An attacker is allowed to send any HTTP to your application, including requests that don't pass the client-side validation, no matter how good.
You must validate data on the server.
First, we'll look at manually validating data. Since validating data is so common, we'll also look at using a libary to handle common validation tasks.
Video: Handling Form Errors
This video demonstrates form validation in Flask.
Manually validating data
The basic idea of validation is to check the form data against a series of validation rules.
For example, check that a required field is not empty, that a field's length is within a certain range, or that a field's value is within a set of allowed values.
If the form data is not valid, the handler should return an error message to the user and render the form again.
If the form data is valid, it can go ahead and insert or update the data in the database, or use the data however it was intended.
Here's an example of validating a form that has a "name" and "age" fields, where "name" is a required field and "age" should be between 18 and 99:
from flask import Flask, request, render_template
app = Flask(__name__)

@app.get("/form")
def show_form():
  return render_template("form.html")

@app.post("/form")
def handle_submit():
  # Get the form data
  name = request.form["name"]
  age = request.form["age"]

  # Validate the form data
  errors = {}
  if not name:
      errors["name"] = "Name is a required field"
  if age:
      age = int(age)
      if age < 18 or age > 99:
          errors["age"] = "Age should be between 18 and 99"
  if errors:
      # Return the form with errors
      return render_template("form.html", errors=errors)

  # Insert the data into the database
  #..

  # Redirect the user to a confirmation page
  return redirect("/success")
In this example, we are using request.form to access the form data, checking if the name is not empty, and checking if the age is between 18 and 99.
If there's an error, we store it in a dictionary, and then pass the dictionary to the template to show the errors to the user.
If the form data is valid, the app redirects the user to a success page.
Server-side validation using libraries
Converting values to the correct types and checking their formatting often go hand in hand. For almost every backend framework, there are a number of parsing and validation libraries that you can use. Sometimes, these are built into the framework itself. Other times (especially with lightweight frameworks like Flask) they are separate packages to install and use.
There are a lot of data validation libraries in Python. We'll focus on showing examples with just one library, and suggest some others to read more about.
webargs is a library that provides powerful validation without having to learn too much new syntax.
Webargs is designed to validate HTTP Requests. Under the hood, it uses a validation library called Marshmallow for the actual data parsing and validation.
Here is a simple example using webargs to perform the same validation as the manual example above:
from flask import Flask, redirect
from webargs import fields
from webargs.flaskparser import use_args

app = Flask(__name__)

@app.post("/form")
@use_args({
    "name": fields.Str(required=True),
    "age": fields.Int(validate=[validate.Range(min=18, max=99))
  }, location="form")
def handle_submit(args):
    return redirect("/success")
This will validate that the name field is present (required=True) as form data (location="form").
It will also validate that the age field is between 18 and 99.
Using a library means learning how the library works, but it results in code that is more concise and easier to reason about, once you understand what the library does.
More about webargs
- Here is a larger example from webargs repository
- See the Quickstart guide for more details about using the library
- See the marshmallow.fields docs for a list of all of the different types of data that webargs can validate.
Further reading: more validation libraries
Since data validation is common to many applications, validation libraries typically have a general validation core, and another library connects them to Flask.
Validation libraries we suggest looking at are:
- Marshmallow with Flask Marshmallow
- Pydantic with flask-pydantic
- WTForms and FlaskWTF
Styling Forms
As you've seen in these lessons, forms are complicated! That's even more true when it comes to styling.
A big reason for the complexity is that forms are made of so many interacting pieces with specific behavior. They've also evolved over time, adding new features and more complexity.
For a history on the form specification and how browser-native forms have grown, see this article from Smashing Magazine.
Game: User Inyerface
Sometimes the best way to get a sense for what makes a good form is to see a very bad one.
Check out User Inyerface, a game.
Learning Path: MDN Form Styling
MDN has a series of posts about styling forms.
- Start with the forms guide within the CSS Building Blocks Tutorial
- Next, read Styling web forms for a comprehensive overview.
- Next up is a guide to styling based on the state inputs with pseudo-classes
- Last is the Advanced Form styling guide
Styling forms
Forms and inputs are still subject to the basic CSS rules you've learned: typography, colors, the box model, and layout.
Since they have lots of nested and interacting elements, it's worth practicing styling them. There are also some kinds of inputs (like the browser-native file picker) that can't be styled normally.
The principles of design for input elements are all about clarity and usability.
You have to make it clear what the user is supposed to do with an input, and you have to make that thing easy to do.
Two important rules for achieving those goals are: labels and size.
-
Inputs need to be clearly labeled.
-
Inputs need to be big enough to see, click, and enter text.
Using a library
Forms are a great case to use a CSS library for styles. Writing consistent CSS styles yourself can be very challenging!
For a long time, Bootstrap has been a popular choice for open-source styles. Check out the Bootstrap page on styling forms for a sense of what using the library looks like.
Accessibility
Accessible websites are ones that everyone can use. They are understandable (even if you can't see, or see in color), they are navigable (using either the keyboard or mouse), and they try to make things as clear as possible for the user -- especially when they ask the user to input data.
This guide from the Web Accessibility Initiative (WAI) introduces accessibility.
Accessible forms guidelines
Forms are a particularly important thing to design well. While many pages on a site can have design issues, no issues are as painful to users as form design issues.
Here are the core rules for designing accessible forms:
- Use the appropriate HTML elements (especially for form inputs)
- Label form inputs
- Show meaningful error messages, near the inputs
- Allow tab navigation
- Highlight the inputs on focus
- Break long forms into labeled sections
- Lay out form inputs vertically, not horizontally
- Enable copy, paste and autofill
Use appropriate elements
It is possible, with 'clever' JavaScript, to make any element sort of act like a form element.
This is bad:
<div class="button">Submit</div>
While it is possible to make a div look button-like and do something when clicked, it's hard to give it all of the behaviors that 'real' buttons normally have, like tab-selection, focus, keyboard commands, and access via a screen reader.
Always use the appropriate element for the job: an <input> when you want an input, a <button> if you want a button, or an <a> when you want a link.
Include labels for form inputs
Users don't know what to type into a form without a label.
<label for="email">Email:</label>
<input id="email" type="text" name="email"></input>
The for attribute of the label connects the label, based on the id of the input.
Note: Only use placeholders for additional info. A placeholder may be helpful, but it isn't a label! See this from MDN or this article from Smashing Magazine
Provide helpful error messages
When the user enters invalid data, you have to tell them what went wrong!
- the error should be near the invalid input
- the error should explain what the user can do to fix the problem
- the message can use contrasting color (but should not use only color) to indicate what went wrong
See these guides on error messages:
Focus management and tab control
By default, it's possible to navigate through a form using the keyboard, mostly by using the Tab key to advance.
Some web developers accidentally disable this navigation through some combination of CSS and JavaScript. That takes away the default accessibility of the browser. Don't do it!
Similarly, focused elements are usually surrounded by a 'ring' to visually highlight them. If a developer disables that highlight, it's difficult for the user to tell which element is focused.
Ordering and grouping elements
Logical ordering and grouping of related inputs makes forms easier to fill out. The <fieldset> and <legend> tags create a grouping of related elements.
See the page WAI: Grouping Controls for more about grouping elements.
Typically, it's easier to fill out forms from top to bottom, instead of having many elements arrayed horizontally.
Enable copy, paste, and autofill
Copy, paste, and autofill help users enter information easily. They are enabled for most elements by default. Don't disable them!
If you use appropriate input types and labels, the browser can also help users to autofill details like emails, names, addresses, and credit cards.
By using the right labels, you can make your forms easier for everyone to use.
Further Reading: Accessible Forms
There are a lot of articles and resources online explaining top accessiblity tips, especially for forms.
- UX Design blog: 10 tips for designing accessible forms
- A11y Project: How to write accessible forms
- Logrocket: A Practical Guide to Accessiblity for forms
- Formspree: Accessible forms
MDN and the W3 Web Accessibility Initiative (WAI) also have tons of great resources on accessible design:
SQL Injection
SQL injection is a type of security vulnerability that allows an attacker to insert malicious code into an SQL statement, usually through an unprotected user input in a web application. The injected code can then be executed by the database, potentially giving the attacker access to sensitive data or allowing them to make unauthorized changes to the database.
Video: Building a SQL Injection Attack
This video shows the attacker's perspective on attacking a website. It walks through building a basic SQL injection attack, and then how to use various tools to analyze and protect vulnerabilities.
There's a lot of extras in this video about security and networking. We're focused on SQL injection right now, so don't worry about all of the other tools and terms.
What is SQL injection?
For example, let's say a web application has a login form that takes a username and password and checks them against a database to see if they match.
If the application is not properly protected, an attacker could enter a malicious username and password like this:
username: admin
password: anything' OR '1'='1
This would cause the application to create an SQL statement like this:
SELECT * FROM users WHERE username = 'admin' AND password = 'anything' OR '1'='1';
The result is that the query will find the admin user, even without the correct password. The attacker could gain access to the system, and cause all kinds of havoc.
To prevent SQL injection, you can use prepared statements or parameterized queries and use libraries that to handle input validation and sanitization. Always validate input before using it in a query.
And the biggest rule of all:
Do not concatenate user input into SQL statements
Example: vulnerable Flask code
This is bad code, because an attacker could write a SQL injection. Don't copy this code into a real application!
from flask import Flask, request, render_template
app = Flask(__name__)

def connect_db():
    return sqlite3.connect('employees.db')

@app.get("/login")
def show_login():
  return render_template("login.html")

@app.post("/login")
def handle_login():
  username = request.form["username"]
  password = request.form["password"]
  conn = connect_db()
  user = conn.execute("SELECT * FROM users WHERE username = '" + username + "' AND password = '" + password + "';").fetchone()
  if user:
    return show_user_page()
  else:
    redirect("/login", error="User not found")
An attacker could submit a password like "anything' OR '1'='1", and the resulting SQL would be
SELECT * FROM users WHERE username = 'admin' AND password = 'anything' OR '1'='1';
This would return the admin user, even without knowing the password!
Note: this example also assumes that passwords are stored in plain text in the database. That's another bad idea! It's important to hash passwords and compare against the hashes, instead of using the database query like this. This is just example code.
Preventing SQL injection
The reason SQL injection can happen is that some characters have a special meaning in the SQL syntax. Characters like ' and ; and -- are not just values, they tell SQL where values and commands start and stop.
To prevent users from including these characters in the SQL query, the input is sanitized. Those characters are escaped, so they don't count as SQL syntax.
Don't try to sanitize queries yourself. Don't build SQL statements by hand.
It's quite easy to mess up when sanitizing inputs. Instead, you can rely on the sqlite3 module, which automatically sanitizes parameters to the execute method. Here's fix for the code above that uses placeholders, and sanitizes the inputs.
user = conn.execute("SELECT * FROM users WHERE username = ? AND password = ?;", (username, password)).fetchone()
The execute method sanitizes the password, so it doesn't contain the raw ' character any more.
Database constraints
A key software design principle is "Defense in depth". It's commonly applied to security, but it applies equally well to data validity and ensuring that there aren't bugs.
Client-side validation can be bypassed by an attacker. Even server-side validation can still have errors.
Database validation can provide another layer of constraints that ensure that your data is valid.
While the constraints provided by a database are often less flexible than ones you can write for your server, they are critical to prevent weird bugs and situations.
For instance, your application probably is not designed to have two different users with the same email address. That would probably cause all kinds of headaches! Database constraints can prevent that kind of issue.
Read the SQLBolt Lesson on Creating Tables for a taste of the types of constraints you can create, and the syntax for doing so.
What are some of the key ways constriants can protect the validity of your data?
- Validate the type of data
- Check the uniqueness of a field across all the rows in a table
- Make sure a field is not null
- Confirm that a foreign key exists in another table (e.g. make sure that a
userexists before creating anorderassociated with them)
You can also create custom CHECK constraints, but we won't cover those.
Next week, we'll discuss constraints in more detail when we cover Data Modeling.
Data Modeling
So far, you've been working with databases with a single table. This week, you'll work on applications with many tables.
Databases like Postgres and SQLite are called relational databases because
they let you express the relationships between data in different tables. The
running example this week will involve a products table, which could be
related to sellers, categories, orders, and more. You'll learn how to
express those kinds of relations in the structure of the table, and how to
construct queries that join data from multiple tables together.
Like so many things in programming, there are lots of possible ways to express relationships between data. This week, we'll also focus on some of the rules and principles for designing good data models for applications. Those principles will help you avoid common design issues that lead to inconsistent data and errors.
One powerful tool you'll learn for visualizing application data is diagramming. Diagrams of the entities and relationships in applications are called Entity Relationship Diagrams or ERDs. Drawing these diagrams will help you put the data design principles into practice.
Table relations
So far, our data has been simple. In the link shortener application, for instance, we had just one table. The full power of SQL shows when there are many related tables.
Picture the schema for a microblogging application like Twitter. What data does it store?
- Users
- Posts
- Likes
- Comments
- Follows
- Direct Messages
- ...probably many others!
If we store all this information in a single table, we would have a mess. It would be very hard to query information and organize it.
Why don't we split information in different tables and then connect them?
Introducing Table Relationships.
With this technique you will improve your database design skills. Let's explore.
Types of Table Relationships:
-
One-to-One (1:1) Relationship:
- Each row in the first table corresponds to one and only one row in the second table, and vice-versa.
- Example: A country has one and only one capital, and each capital is linked to one and only one country.
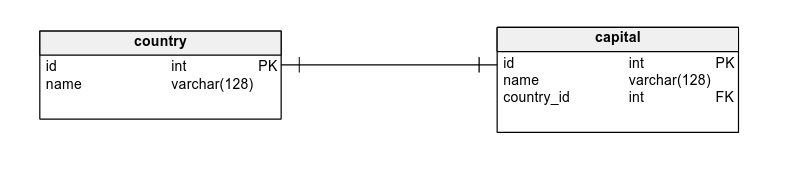
-
One-to-Many (1:N) or Many-to-One (N:1) Relationship:
- Each row in the first table can relate to many rows in the second table, but each row in the second table relates to one and only one row in the first table.
- Example: One employee can have many addresses, and only one address can belong to one employee.
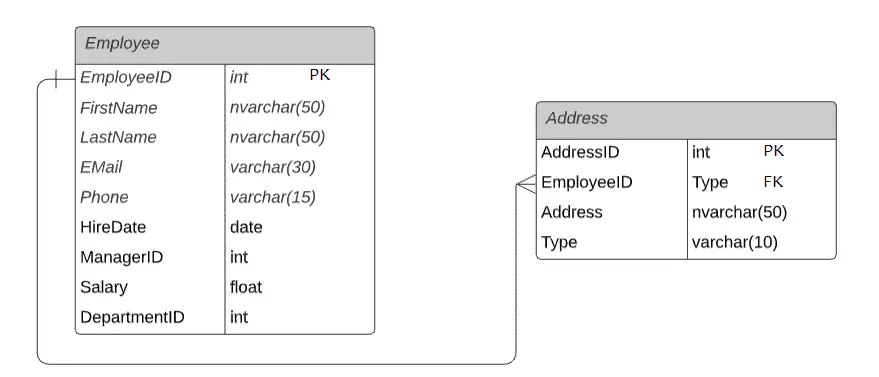
-
Many-to-Many (M:N) Relationship:
- Each row in the first table can relate to many rows in the second table, and vice-versa.
- This relationship is typically implemented using a join table (or bridge table).
- Example: One author can write many books, and each book can have many authors.

Problems Solved by Table Relationships:
-
Data Duplication: By setting up proper relationships, you ensure that each piece of data is stored once and then referenced elsewhere as needed.
-
Maintaining Consistency: Relationships ensure that related records in different tables correspond correctly to each other (i.e while editing information in tables, you make sure that the data is properly edited).
-
Efficient Querying: With the right relationships, complex queries can be simplified, and data retrieval can be made faster.
In the following lessons, we will explore in more detail how to implement this table relationships.
Foreign Keys and JOINS
Foreign keys and JOINs are the basic SQL tools for creating and using relationships between tables.
A foreign key is a unique identifier that will allow to reference of one record into a another table.
Let's take the following example, let's say we have a database of customers and orders.
To connect the information of one Order to one Customer (an order that included a chair and belongs to a customer named Sally) you will need a unique identifier for both: Order and Customer. Those numbers help to make the connection between information across different tables. It looks like this:
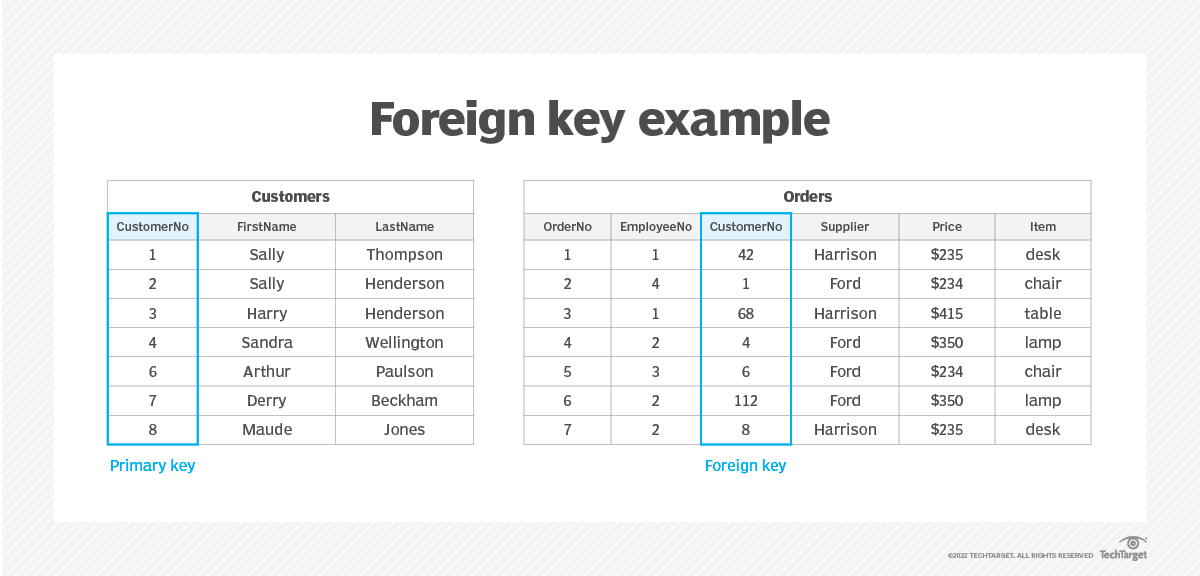
As you can see in the table Customers, Customer No 1 is Sally Thompson. Now to table Orders, Customer 1, made an order for a chair (Order No 2).
Video: Linking Tables with Keys
This video illustrates linking the Primary key of one table with the Foreign key of another table:
FOREIGN KEY
As we saw just before, Foreign keys are a way of linking data in two different tables in a relational database. They are used to establish a relationship between two tables, where the values in one table depend on the values in another table.
A foreign key is a column or set of columns in one table that refer to the primary key of another table. The purpose of a foreign key is to ensure data integrity, which means that the data in the database is consistent and accurate.
For example, consider a database that has two tables: a customers table and an orders table. The customers table contains information about customers, including a unique identifier for each customer, which is the primary key. The orders table contains information about the orders placed by each customer, including the customer's identifier.
CREATE TABLE customers (
  id INTEGER PRIMARY KEY AUTOINCREMENT,
  name TEXT NOT NULL,
  email TEXT NOT NULL UNIQUE
);

CREATE TABLE orders (
  id INTEGER PRIMARY KEY AUTOINCREMENT,
  customer_id INTEGER NOT NULL,
  product TEXT NOT NULL,
  quantity INTEGER NOT NULL,
  FOREIGN KEY (customer_id) REFERENCES customers (id)
);
The customer_id column in the orders table is a foreign key. It refers to the primary key of the customers table. It tells us which customer the order belongs to.
The FOREIGN KEY statement is a database constraint. It creates a relationship between the two tables, where each order in the orders table must correspond to a customer in the customers table. If you try to insert an order into the orders table with a customer_id that doesn't exist in the customers table, you'll get an error.
One-to-one relationships
What is a One-to-One Relationship?
A one-to-one relationship between two entities (or tables) means that a single record in the first entity corresponds to one (and only one) record in the second entity, and vice versa.
For instance, consider the relationship between a person and a passport. In many countries, a person can have only one valid passport, and each passport is issued to a single individual. This relationship between a person and a passport is a one-to-one relationship.

Characteristics
- Uniqueness: Each record in Table A can have only one corresponding record in Table B.
- Bidirectional: If Table A has a relation to Table B, then Table B also has a relation to Table A.
- Foreign Key: One of the tables usually has a foreign key that references the primary key of the other table.
Implementation Guide
Let's use the aforementioned "Person and Passport" example to demonstrate a one-to-one relationship implementation in a relational database (using SQL as an example).
Step 1: Create the Tables
We'll start by creating the Person and Passport tables:
CREATE TABLE Person (
    person_id INT PRIMARY KEY,
    name VARCHAR(100),
    age INT
);

CREATE TABLE Passport (
    passport_id INT PRIMARY KEY,
    issue_date DATE,
    expiration_date DATE,
    person_id INT,
    FOREIGN KEY (person_id) REFERENCES Person(person_id)
);
In the above structure, person_id in the Passport table acts as a foreign key that references person_id in the Person table.
Step 2: Inserting Data
Insert a person and a corresponding passport:
INSERT INTO Person (person_id, name, age) VALUES (1, 'John Doe', 30);

INSERT INTO Passport (passport_id, issue_date, expiration_date, person_id) VALUES (101, '2023-01-01', '2033-01-01', 1);
Step 3: Querying Data
To fetch the details of a person and their passport:
SELECT p.name, pp.issue_date, pp.expiration_date
FROM Person p
JOIN Passport pp ON p.person_id = pp.person_id
WHERE p.name = 'John Doe';
This will retrieve John Doe's passport details. The query uses a JOIN, we will review JOINs in a subsequent lesson.
One-to-many relationships
What is a One-to-Many Relationship?
A one-to-many relationship between two entities (or tables) signifies that a single record in the first entity can relate to multiple records in the second entity. However, a record in the second entity can relate to only one record in the first entity.
For instance, consider the relationship between an Author and Books. An author can write multiple books, but each book has only one primary author. This relationship between an author and books is a one-to-many relationship.
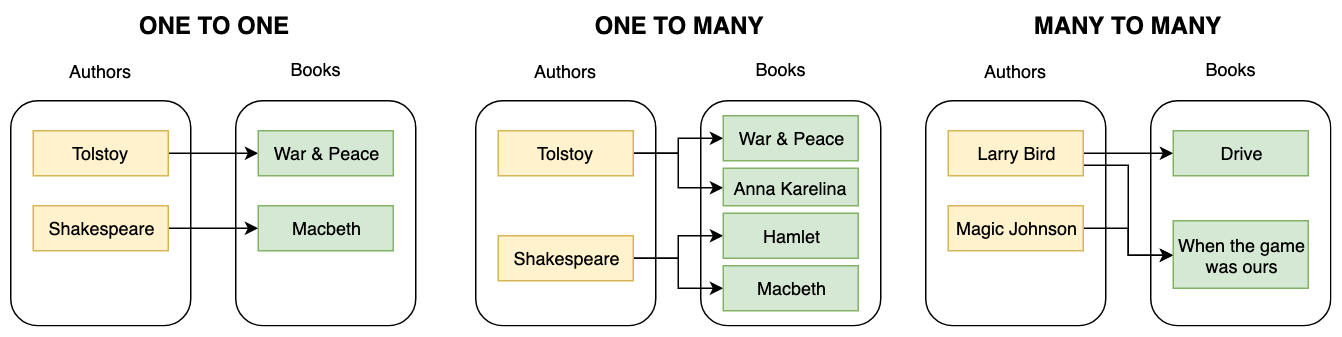
Characteristics
- Multiplicity: One record in Table A can be associated with multiple records in Table B. However, each record in Table B can be associated with only one record in Table A.
- Foreign Key: The table representing the "many" side (Table B) contains a foreign key that references the primary key of the "one" side (Table A).
Implementation Guide
Using the "Author and Books" example, let's demonstrate a one-to-many relationship implementation in a relational database (using SQL as our guide).
Step 1: Create the Tables
We'll begin by creating the Author and Book tables:
CREATE TABLE Author (
    author_id INT PRIMARY KEY,
    name VARCHAR(100),
    birthdate DATE
);

CREATE TABLE Book (
    book_id INT PRIMARY KEY,
    title VARCHAR(200),
    publication_date DATE,
    author_id INT,
    FOREIGN KEY (author_id) REFERENCES Author(author_id)
);
In the structure above, author_id in the Book table acts as a foreign key that references author_id in the Author table.
Step 2: Inserting Data
Insert an author and their corresponding books:
INSERT INTO Author (author_id, name, birthdate) VALUES (1, 'J.K. Rowling', '1965-07-31');

INSERT INTO Book (book_id, title, publication_date, author_id) VALUES (201, 'Harry Potter and the Philosopher's Stone', '1997-06-26', 1);
INSERT INTO Book (book_id, title, publication_date, author_id) VALUES (202, 'Harry Potter and the Chamber of Secrets', '1998-07-02', 1);
Step 3: Querying Data
To fetch the titles of all books written by J.K. Rowling:
SELECT b.title
FROM Book b
JOIN Author a ON b.author_id = a.author_id
WHERE a.name = 'J.K. Rowling';
This will list all the books written by J.K. Rowling.
Many to many relationships
You've seen the use of foreign keys to represent the relationships between tables. Up until this point, the relationships have been between two tables: one with a primary key, and the other that uses a foreign key to indicate which item in the other table it is associated with. For example, an orders table keeps track of the customer_id of each order.
What about many-to-many relationships?
Think about it: Model these situations
How would you model these scenarios? Think about what tables you'd need, and what foreign keys would go on those tables.
- Actors can appear in many films. Films can have many actors.
- Posts can have many tags. Tags can be applied to many posts.
- Users can follow (and be followed by) many other users.
Where would you put the foreign keys on these tables?
If you only have two tables, there's no good answer.
Take the posts and tags example.
- If the foreign key goes on the posts table (
posts.tag_id), then each post can only have one tag. - If the foreign key goes on the tags table (
tags.post_id), then each tag can only apply to one post.
There are some bad answers possible here, like adding more than one column (posts.tag1_id, posts.tag2_id), or storing more than one id in a column (posts.tag_ids with a comma-separated list of ids). However, these violate the principles of normalization.
Instead, we'll need to introduce a third table in between posts and tags to represent the association between them.
Associative entities
Many to many relationships in SQL databases are surprising because they require an additional table in order to establish the relationship between two entities. This table contains foreign keys to both of the related entities, and is used to represent the many to many relationship.
This third table is called an association table (there are lots of other names for it, like "junction table" and "join table").
Let's see how it would work for the examples above.
- To connect
actorsandfilms, you could have anappearancestable. Eachappearancewould have anactor_idandfilm_id, to capture the fact that the actor appeared in that film. - To connect
postsandtags, you might have apost_tagstable, withpost_idandtag_idcolumns. Each row in thepost_tagstable would connect one tag to one post. - To connect users to the users that they follow, you might introduce a
followingtable, with afollower_idandfollows_id, which both point back to theuserstable!
Terminology: belongs-to, has-many, and has-many-through
When discussing relationships between entities, it's common to use the terms "belongs to" and "has many" for this kind of relationship. An order belongs to a customer. A customer has many orders. An order also belongs to a product, and a product has many orders.
For many to many relationships, it can be helpful to describe the with the phrase "has-many-through". A post has many tags through the post_tags table. A film has many actors through appearances.
JOIN for many-to-many relationships
To write the JOIN query for a many-to-many relationship, you need to join the main entity tables with the association table. Here's an example, using the tables students, courses, and enrollments:
To fetch all the courses enrolled by a student with id = 1, you would write the following JOIN:
SELECT courses.*
FROM courses
JOIN enrollments ON courses.id = enrollments.course_id
JOIN students ON enrollments.student_id = students.id
WHERE students.id = 10;
In this statement, we first join the "courses" table with the "enrollments" table on the course_id column. Then we join the "enrollments" table with the "students" table on the student_id column. Finally, we filter the results to only show the courses enrolled by the student with id = 10.
When we're writing JOIN queries, it's important to include the name of the table in the WHERE clause. Since more than one table has a column called id, SQL needs the name of the table to determine which id is meant.
Practice: querying many-to-many
Practice reading and writing queries for multiple tables using a restaurant dataset on Replit.
Open Restaurant Reviews on Replit
Fork the repl to begin.
- Start by reading schema.sql to get a sense for the tables
- Read and run main.sql to see a little bit about what the data is like, and to see some example queries.
- Try writing some queries! Follow the instructions at the bottom of main.sql for some queries to try.
Entity-Relationship Diagrams
An entity-relationship diagram (ERD) is a graphical representation of entities and their relationships to each other, used in the design of a relational database. It provides a visual representation of the entities, attributes, and relationships in a system, and helps to illustrate how data is organized and related.
An ERD typically consists of entities, which are objects or concepts that are being modeled, and relationships, which describe the connections between entities. Each entity is represented as a rectangle, and each relationship is represented as a line connecting two entities.
ERDs are a useful tool for modeling and visualizing the structure of relational databases, and can help to ensure that data is organized, consistent, and free of redundancies and anomalies.
ERDs also help with communication between database designers, developers, and stakeholders, providing a common understanding of the data structure and relationships.
Video: Introduction to ERDs
This video from LucidChart explains how to create ERDs.
Example: Customers, Products, Orders
Here's two different ERDs showing the relationships between customers, products, and orders.


The ERD with more details is a complete specification of the schema.
When there are more tables or the schema is not yet fully designed, it's often useful to create a more basic ERD without all the details.
Note: there are many different visual syntaxes you can find for representing entities and attributes. A common notation is to show attributes as ovals. It is visually noisy, so we stick to showing tables with lines and arrows in these materials.
Practice: Draw an ERD
ERDs are a powerful design tool. Practice drawing an ERD based on a schema.
You can use any drawing tool you like. The ERDs above were created using Excalidraw and Visual Paradigm; Figma and LucidChart are other popular tools.
Create an ERD based on this schema. The diagram should include entities for student, course, assignment, and assignment_score, as well as relationships between these entities to represent the foreign key constraints. You can choose whether to represent the attributes of each entity.
CREATE TABLE student (
    student_id INTEGER PRIMARY KEY,
    name TEXT,
    email TEXT
);

CREATE TABLE instructors (
  instructor_id INTEGER PRIMARY KEY,
  name TEXT,
);

CREATE TABLE course (
    course_id INTEGER PRIMARY KEY,
    course_name TEXT,
    instructor_id INTEGER
    FOREIGN KEY (instructor_id) REFERENCES instructors (instructor_id)
);

CREATE TABLE assignment (
    assignment_id INTEGER PRIMARY KEY,
    course_id INTEGER,
    assignment_name TEXT,
    due_date DATE,
    FOREIGN KEY (course_id) REFERENCES course (course_id)
);

CREATE TABLE assignment_score (
    student_id INTEGER,
    assignment_id INTEGER,
    score INTEGER,
    FOREIGN KEY (student_id) REFERENCES student (student_id),
    FOREIGN KEY (assignment_id) REFERENCES assignment (assignment_id)
);
Practice: Translate an ERD into a schema
In addition to creating an ERD, you also need to be able to take an ERD and create a schema.
From the image of the ERD below, write the CREATE TABLE statements needed to make the database tables that match the diagram. Note that `N`` stands for "nullable" – you use it when there can be NULL values in a column. Otherwise, the NULL values won't be accepted.

Practice: Draw an ERD for a many to many relationship
Consider a situation where you have two entities, students and courses. A student can enroll in multiple courses, and a course can have multiple students.
Draw the ERD representing this schema. Include a table called "enrollments" with foreign keys to both the "students" and "courses" tables.
JOINS
The SQL JOIN statement is used to combine rows from two or more tables based on a related column between them.
Here's an example of a JOIN statement:
SELECT customers.name, orders.product
FROM customers
JOIN orders
ON customers.id = orders.customer_id;
The JOIN statement combines the rows from the customers and orders tables based on the customer_id column. The result of this query contains the name from the customers table and product from the orders table, with each row representing a customer and their corresponding order.
If a customer has multiple orders, each order will appear as a separate row in the results.
Practice: Writing JOINs
Practice JOINs on SQLBolt
SQL Lesson 6: Multi-table queries with JOINs
Other kinds of JOIN
The most common kind of JOIN is the INNER JOIN. If you don't specify another kind of join, it will treated as an INNER JOIN.
There are several types of JOIN statements in SQL, each of which returns different subsets of the data from the joined tables.
INNER JOINLEFT JOINRIGHT JOINFULL OUTER JOIN
The names correspond to the portions of a Venn diagram of the tables:
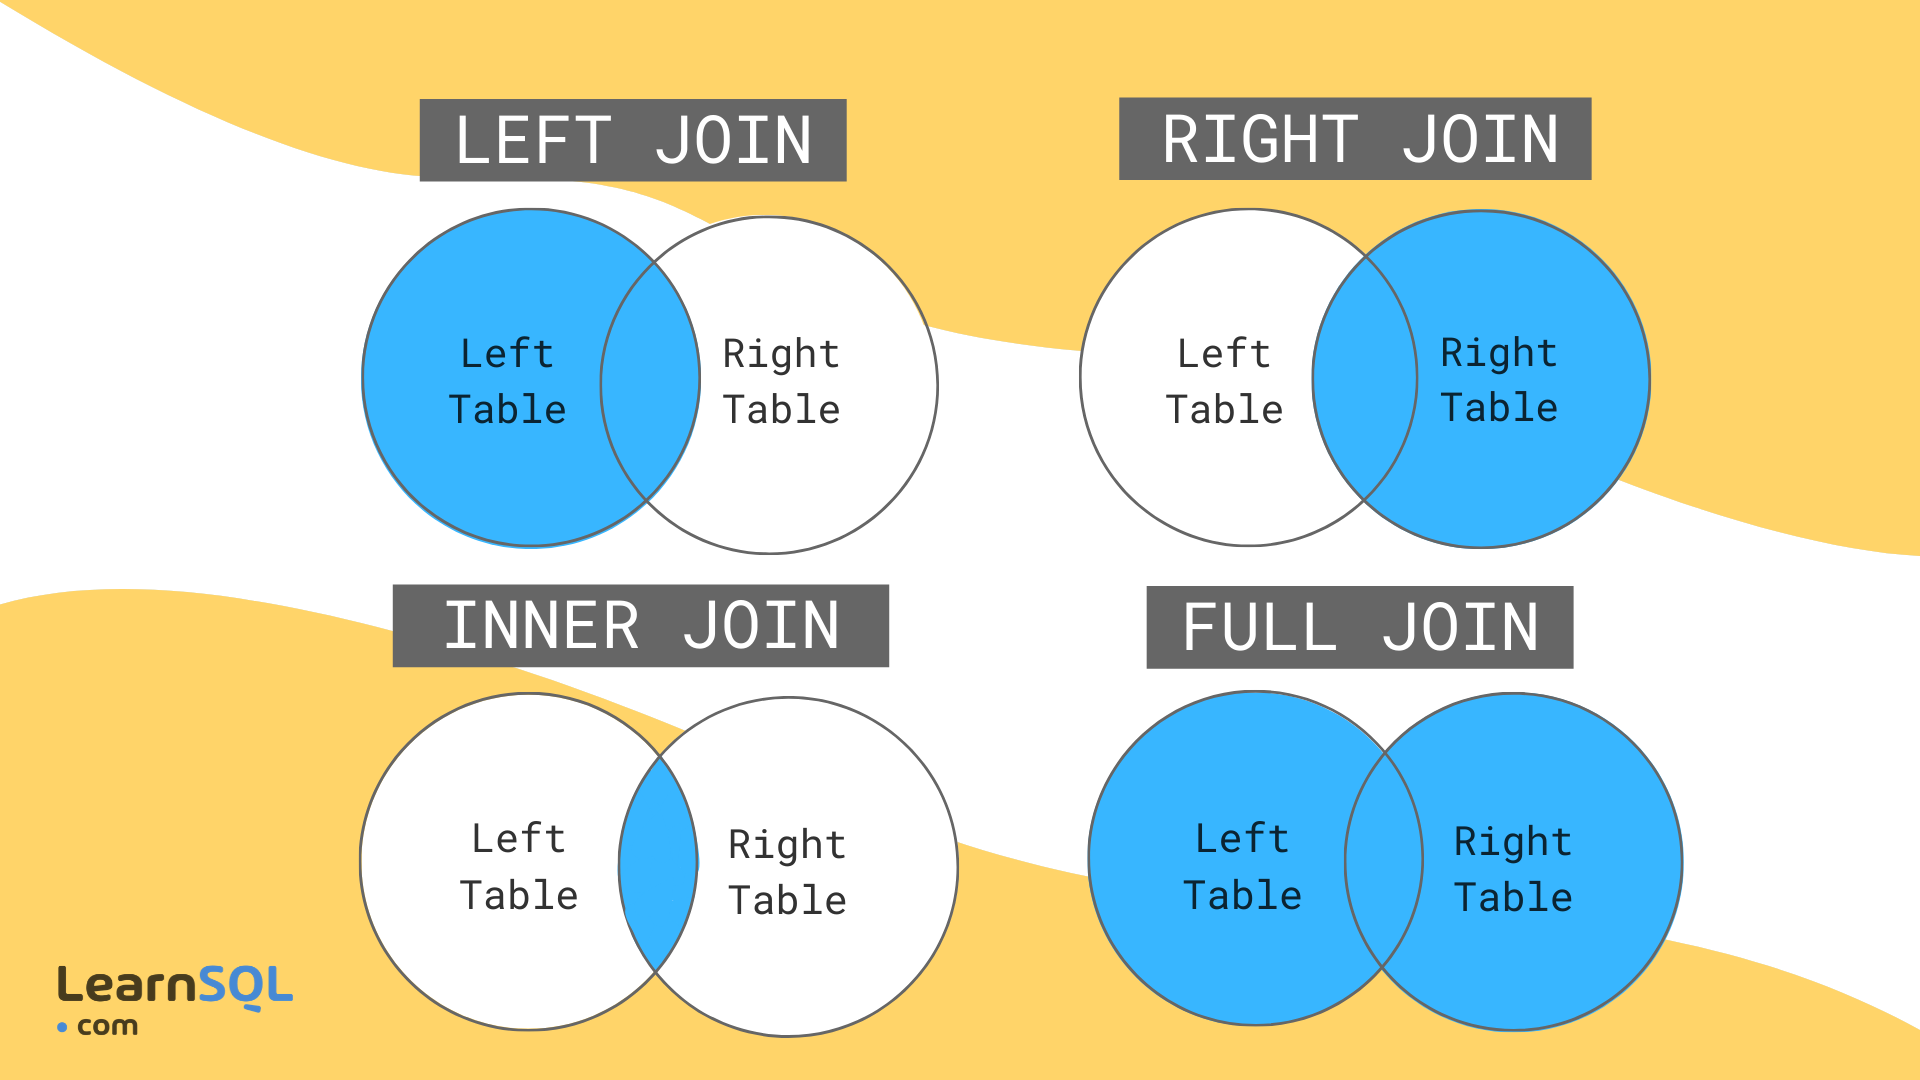
An INNER JOIN returns only the rows that have matching values in both tables.
The other three joins are all 'outer' joins in some sense, since they include 'outer' values (not just inner ones).
A LEFT JOIN returns all the rows from the left table and the matching rows from the right table. If there is no matching row in the right table, the result will contain NULL values for the columns from the right table.
A RIGHT JOIN is similar to a LEFT JOIN, but it returns all the rows from the right table and the matching rows from the left table.
A FULL JOIN returns all the rows from both tables, including the rows that have no matching values in either table.
You'll almost exclusively use the INNER JOIN (or just JOIN), but occasionally a LEFT or RIGHT JOIN will be helpful. FULL JOIN is pretty rare, so you'll probably only see it in tutorials.
Practice: Outer joins
Practice OUTER JOINs on SQLBolt:
Practice: Data Modeling
💡 This is your chance to put what you’ve learned into action.
Try solving these practice challenges to check that you understand the concepts.
Submission
To log your practice for credit:
- Practice exercises will be graded for completion not correctness. You have to document that you did the work, but we won't be checking if you got it right.
- You are encouraged to engage with all the exercises listed on the practice page.
- You are expected to submit only the details requested on the Gradescope submission.
JOIN practice
If you have not already, practice JOINs on SQLBolt.
You can get more JOIN practice with the exercises on SQLZoo:
SQLBolt also has lessons on other kinds of queries, like aggregations. If you have time, it's good to get more SQL practice.
Many to many relationships: Restaurants
Practice working with many-to-many relationships by reading, running, and writing queries in the restaurant, tags, and reviews domain.
- Fork the Restaurant Reviews replit
- Read the files there, and run the queries
- Practice writing queries, following the instructions in the comments
Draw a data model
Using a drawing tool like Figma, Lucidchart, Excalidraw, or Visual Paradigm, draw an ERD to match the following description and features:
Ubolter is a phone-based taxi application. Customers can request rides, and drivers can accept them. A ride has a destination and a pickup location, a start time and end time. Each ride has an associated payment, which has a base cost that depends on the time and distance, as well as surcharges for service fees and taxes. The customer may also add a tip. After each ride, customers and drivers can leave a rating and review.
- Riders
- Drivers
- Rides
- Payments
- Ratings
After you've drawn the ERD, write the CREATE TABLE statements that would create the tables in your design.
Assignment: Guestbook
This is an individual project. You are expected to submit your own solution, not to work with a partner or team.
In this assignment you will build a Guestbook using Flask

https://github.com/kiboschool/wad-flask-guestbook
Submission
After you complete the assignment and push your solution to Github, submit your work in Gradescope and Anchor to receive credit.
Rubric
| Points | Criteria | Description |
|---|---|---|
| 5 pts | Application runs | - Application starts with flask run- Loads the '/' route without errors |
| 5 pts | Database | - Application connects to an SQLite database without errors - Table created as specified |
| 10 pts | POST Route | - App handles this route appropriately - retrieves form data - validates form data - inserts data into database if valid - gives error message as appropriate |
| 10 pts | GET Route | - GET \ retrieves all entries - Entries shown in a dedicated page in a structured format |
| 5 pts | Form | - HTML form with email, name and message elements - App loads form on the appropriate route |
| 5 pts | Client Validation | - All form elements filled - Form inputs are validated appropriately |
| 10 pts | Bonus | - Filtering and Searching Functionality |
| 40 | Total | 50 possible points with the bonus, scored out of 40 |
Tables Normalization
While designing databases, sometimes we need some guidance or best practices to ensure an optimal database design, table normalization is one of them.
Table normalization is a systematic approach used in designing relational database tables to minimize data redundancy and ensure data integrity. It involves organizing the columns (attributes) and tables (relations) of a database to ensure that their dependencies are maintained properly.
Video: Learn the process of table normalization
This video walks through all of the different kinds of data consistency errors and the normal forms that can make those inconsistencies impossible.
Anomalies and Inconsistencies
When designing a schema, you want to make sure the data is correct, consistent, and easy to work with.
Here's a poorly-designed orders table that also stores information about the product and customer.
CREATE TABLE orders (
  order_id INTEGER PRIMARY KEY AUTOINCREMENT,
  customer_id INTEGER,
  customer_name TEXT,
  address TEXT,
  product_id TEXT,
  product_name TEXT,
  quantity INTEGER,
  price DECIMAL(10, 2)
);
| order_id | customer_id | customer_name | product_id | product_name | quantity | price |
|---|---|---|---|---|---|---|
| 0 | 2 | Mary | 1 | leg warmers | 3 | 23 |
| 1 | 2 | Mary | 4 | shoes | 10 | 21 |
| 2 | 2 | Mary | 6 | towel | 3 | 40 |
| 3 | 4 | Chukwuemeka | 1 | leg warmers | 9 | 32 |
| 4 | 1 | Simon | 1 | leg warmers | 5 | 33 |
| 5 | 1 | Simon | 5 | chocolate | 10 | 45 |
| 6 | 1 | Simon | 4 | shoes | 8 | 46 |
This schema can lead to all kinds of problems!
-
Update anomalies: If you update the name for a customer, you could update it for all of that customer, or just some. After running
UPDATE orders SET customer_name = "Gideon" WHERE order_id = 2;, what is the name of the customer withid = 2? It could be either Mary or Gideon. The database is inconsistent! -
Insert anomalies: With this schema, if a customer has not placed any orders, there's no good way to add them to the database.
-
Delete anomalies: A delete anomaly occurs when deleting data from one part of a database leads to unintended consequences. For example, if Chukwuemeka cancels order number 3 for leg warmers, then that whole customer is deleted too!
-
Data redundancy: Data redundancy is when the same data is stored in multiple places, leading to data storage inefficiencies and an increased risk of inconsistencies. Since the same customer information is repeated in multiple rows for different orders, it takes up more space in the database (and can lead to the issues noted above).
Why do we need table normalization?
Table Normalization prevents the anomalies above. In short, it requires that you create different tables for the different "things" in your system.
To normalize the orders, customers, and products from the example and prevent inconsistencies, you would need to separate the data into separate tables and establish relationships between them.
CREATE TABLE customers (
  id INTEGER PRIMARY KEY AUTOINCREMENT,
  name TEXT,
  address TEXT
);

CREATE TABLE products (
  id INTEGER PRIMARY KEY AUTOINCREMENT,
  name TEXT,
  price DECIMAL(10, 2)
);

CREATE TABLE orders (
  id INTEGER PRIMARY KEY AUTOINCREMENT,
  customer_id INT NOT NULL,
  product_id INT NOT NULL,
  quantity INT,
  FOREIGN KEY (customer_id) REFERENCES customers(id),
  FOREIGN KEY (product_id) REFERENCES products(id)
);
In this example, the customers table stores customer information, the products table stores product information, and the orders table stores order information.
With this design, changing customer information will only affect the customers table, and deleting an order will only delete the order information, not the related customer information.
Notice also the use of constraints to ensure the data stays consistent. You've seen the PRIMARY KEY and NOT NULL constraints already, which ensure that those columns are present and, for primary keys, unique. The orders table also has foreign key constraints that reference the primary keys of the customers and products tables, establishing relationships between the data.
Rules of Normalization
These aren't all of the normalization rules, but if you keep these in mind, you'll end up with better database designs.
-
Store data in separate tables. Each kind of item should be stored in its own table, rather than all data being stored in a single table.
-
Avoid repeating data. Data should not be repeated in multiple places, and instead should be stored in one location and referenced from other tables as needed.
-
Columns should only contain single values. Don't put a list in a single column!
-
Minimize data dependencies. If updating one field or row would mean that you need to update another row in order to stay consistent, there might be a better way to design the schema so that it's impossible to "forget to update" part of the data.
Database Constraints
You got a preview of database constraints when discussing form data validation last week.
Now, let's take a slightly deeper look at what kinds of constraints you can add to a database.
Types of Data
One fundamental way that databases enforce valid data is through the types of the columns.
Each database has different types that it supports. SQLite supports just 5 types: NULL, INTEGER, REAL, TEXT, and BLOB. (Many more 'spellings' of types are allowed in CREATE TABLE statements, but SQLite turns them into one of these types.) Postgres supports many datatypes and even more through extensions like PostGIS.
If you try to INSERT or UPDATE a column with a value that does not match the data type of the column, the database will reject your query.
sqlite> INSERT INTO students (id) VALUES ("albert");
Error: stepping, datatype mismatch (20)
Well... at least it should. SQLite is a bit flexible with the types of the columns, so you don't get as much protection as other databases. You can enable STRICT for a table if desired.
What are database constraints?
Your database will raise an error instead of inserting a string into an integer column. That protects your data - you won't accidentally enter a string for a numeric rating, or any similar error.
Database constraints are rules or conditions that must be met by the data in a database. They are used to enforce the integrity and consistency of data within the database. Constraints are specified when creating or modifying a database table and are enforced by the database management system.
That way, more invalid situations will raise errors - like if you forget to include the 'name' for a student, if that column is marked as NOT NULL.
More errors means more protection from invalid data.
Types of constraints
There are several types of database constraints:
NOT NULL: Specifies that a column cannot contain a null value.UNIQUE: Specifies that a column or a set of columns must have unique values.PRIMARY KEY: Specifies a unique identifier for each row in a table and cannot contain null values. There can only be one primary key for any table.FOREIGN KEY: Specifies a relationship between two tables by referencing the primary key of one table in another table. It will fail if the value in the FOREIGN KEY column does not exist in the other table.CHECK: Specifies a custom condition that must be met by the data in a column.CHECKconstraints allow you to bring your own constraint to a column.
There are two other specifiers you'll see for columns, which aren't quite constraints in the same way:
DEFAULT: Specifies a default value for a column. If no value is provided, the default value is used.AUTOINCREMENT: Automatically fills in the value with the next incremental value.
These don't raise errors for invalid data the way other constraints do, but they can help ensure data integrity.
NOT NULL
As the name suggests, the NOT NULL constraint prevents NULL values from being added in that column. This is useful in situations where you need to have that data for the application to make sense. For instance - many applications will not work if a user does not have an email. Setting NOT NULL on the email field will prevent the database from storing users without emails.
If the constraint is specified:
assignment_id INTEGER NOT NULL,
Then the error might be:
sqlite> INSERT INTO assignment_scores (student_id, assignment_id, score) VALUES (1, NULL, 100);
Error: stepping, NOT NULL constraint failed: assignment_scores.assignment_id (19)
UNIQUE
The UNIQUE constraint is used when you want to ensure that a particular column or set of columns contains unique values.
For example, you might use the UNIQUE constraint on the email column of a customers table to ensure that each customer has a unique email address. This constraint is also often used to enforce unique identifiers, such as product codes or order numbers.
If the constraint is specified:
email TEXT UNIQUE,
Then the error might be:
sqlite> INSERT INTO users (email) VALUES ("oye@example.com");
sqlite> INSERT INTO users (email) VALUES ("oye@example.com");
Error: stepping, UNIQUE constraint failed: users.email (19)
How would you specify a unique constraint on multiple columns in the same table? Write the constraint statement that would ensure that the pair (post_id, tag_id) is unique for a post_tags table.
PRIMARY KEY
A primary key is both UNIQUE and NOT NULL, and there can only be one for any table.
The primary key is special because it can be used in a FOREIGN KEY constraint on another table.
FOREIGN KEY
The FOREIGN KEY constraint ensures that the related data exists when inserting a row that references another table.
Note: SQLite will allow you to specify FOREIGN KEY constraints, but it will not check them unless you enable them by executing
PRAGMA foreign_keys = ON;
with the foreign key constraint specified this way on the assignment_scores table:
FOREIGN KEY (student_id) REFERENCES students (id)
This is the error when inserting a student that does not exist:
sqlite> INSERT INTO assignment_scores (student_id, assignment_id, score) VALUES (5000000, 1, 100);
Error: stepping, FOREIGN KEY constraint failed (19)
CHECK
The check constraint allows you to define your own expression to check that the data is valid. It's very powerful; it can execute SQL expressions. Here are some examples.
Check that the price is more than 0:
price INTEGER CHECK (price > 0),
Check that the phone number is longer than 10 characters:
phone TEXT NOT NULL CHECK (length(phone) >= 10),
CHECK constraints can also apply to a whole table, like checking that the start date is before the end date:
CREATE TABLE terms (
  start_date INTEGER NOT NULL,
  end_date INTEGER NOT NULL,
  CHECK (start_date < end_date)
);
Attempting to insert invalid data into any of these tables would result in an error.
sqlite> INSERT INTO term VALUES (date('now'), date('now', '-1 day'));
Error: stepping, CHECK constraint failed: start_date < end_date (19)
Practice: SQL Expressions
CHECK constraints rely on SQL expressions. Like the rest of SQL, expressions take practice.
Complete SQL Lesson 9: Queries with expressions on SQLBolt.
ON CONFLICT
When encountering a conflict with a constraint, you can have the database take an action other than fail.
For instance, when inserting data that might conflict with an existing row, you can update that data if it exists.
Here's an example.
A process will be looking at emails and scores, and inserting them into the database. If an email appears more than once, the total score should be reflected in the database.
CREATE TABLE email_scores (
  email TEXT NOT NULL UNIQUE,
  score INTEGER NOT NULL,
);
for (email, score) in data:
  conn.execute('INSERT INTO email_scores (email, score) VALUES (?, ?) ON CONFLICT DO UPDATE SET score = score + ?;', (email, score, score))
conn.commit()
Note: don't worry about memorizing the ON CONFLICT syntax. It's enough to remember that you are allowed to take an action other than error when a constraint is violated.
N+1 queries
You've seen how to use JOIN to select rows from multiple related columns in one query.
A common mistake is to forget to use JOIN in those situations, and instead fetch all the related data in a loop.
This is called the N+1 query problem, because there is 1 query for the initial list, plus N additional queries for each of the items in the list.
Because this results in so many queries going back and forth between the application and the database, this problem can cause big slowdowns in applications.
An example N+1 query
Suppose you have a database with a table named "students" and another table named "courses", with a many-to-many relationship represented by an association table "enrollments".
To fetch the name of each student and the courses they're enrolled in, you might write the following code in your application:
students = get_all_students()
for student in students:
    courses = get_courses_by_student(student.id)
    student.courses = courses
In this example, get_all_students returns a list of all students, and get_courses_by_student returns a list of courses for a given student id.
Say the school had 200 students. How many SQL queries would be issued when running this code snippet?
This approach can quickly become inefficient when the number of students is large, as it requires N+1 queries to the database.
For each student, an additional query is made to retrieve the courses they're enrolled in.
To solve this issue, you can write a JOIN, which, as you've seen, allows you to fetch all the required data in a single query, instead of multiple queries. This can significantly improve the performance of your application, especially when dealing with large datasets.
Try it: Fix the enrollments N+1 query
Write the SQL statement that you'd use to fetch all of the students with their courses. Use the data model above, with tables for students, courses, and enrollments.
Why does the N+1 query problem happen?
Since you've seen how to write this query using JOIN, you might wonder why any developer would ever write an N+1 query.
Let's think deeper about the python code above:
students = get_all_students()
for student in students:
    courses = get_courses_by_student(student.id)
    student.courses = courses
The functions get_all_students and get_courses_by_student execute SQL queries (a lot of queries!) But, that might not necessarily be obvious to the developer who wrote this code.
They might think that get_all_students returns a list of students in memory, or that get_courses_by_student is accessing courses in a fast cache.
Often, N+1 queries show up because the underlying functions hide the actual SQL queries and database calls away from the developer. It is not obvious when the database is getting called in a loop!
This is especially the case when teams use an ORM to access their data. Wrapping all of the functionality for the database models behind an object obscures which methods will run a query, and which ones just do some computation.
Bonus: Database performance
This is not a course on database performance. We're focused on the basics of web applications. The databases we're working with are small, the queries are pretty simple, and we don't have enough users to make our applications slow down much.
One day, though, you will be working on large applications with slow databases, and you'll need some tricks up your sleeve for figuring out why things are slow and what to do to fix them. Database performance is a deep topic, so we'll just touch on some of the briefest.
Even if you don't read this in depth now, you'll have a reference to return to, or at least some keywords to search.
Database performance overview
When you send a SQL query to the database, it has to interpret and run that query. Depending on the query, the data in the database, and what other queries are running at the same time, it will run faster or slower.
Unlike thinking through the performance of your Python code, where you can consider how many times you might execute a loop, SQL statement performance is harder to reason about.
The keys to managing database performance are:
- Normalization: Normalizing the database schema can minimize data redundancy and improve data consistency, resulting in improved performance. It's one reason we focus so much on Normalization.
- Batch processing (avoiding the N+1 query problem): Processing data in batches instead of processing each record one by one can greatly improve performance, especially when dealing with large datasets.
- Indexing: Creating indexes on columns that are frequently used in WHERE clauses, JOIN conditions, and ORDER BY statements can greatly improve query performance.
- Monitoring and tuning: Regularly monitoring the database performance, the CPU and memory consumption of your database, looking out for slow queries, and tuning the database parameters (such as the buffer size and the number of connections can help to identify and resolve performance bottlenecks.
- Measuring and optimizing queries: If you find slow queries, you can find out why they are slow using tools like explain plans, performance profiling, and query optimization techniques to identify and resolve performance issues.
Normalization and Batch Processing
You learned about normalization and N+1 queries already. Two of the biggest database issues are data that is not normalized and the N+1 query problem. If you normalize your schema and avoid N+1 queries, you are well on your way to solid database performance.
Indexes
Indexes are data structures maintained by the database so that they don't have to loop through every row in order to find data to match your query.
Without an index, when you run a SQL query like SELECT * FROM users WHERE id = 105, the database has to do something like this under the hood:
results = []
for user in users:
  if user.id == 105:
    results.append(user)
return results
If you have a lot of users, that could take a long time!
An index makes that lookup process more like this:
return users[105]
No looping through all the users.
Having the right index can make a world of difference to the speed of a query. So, why not index everything?
Indexes also have a cost! When you update a row, the database also has to update any indexes that contain that row. That makes each INSERT or UPDATE a bit slower.
Since accessing tables by their PRIMARY KEY is so common, SQLite automatically indexes based on the primary key (and has a specialized, faster index for INTEGER PRIMARY KEYs). SQLite also creates an index for any UNIQUE column, because it needs to check those columns values every time it inserts or updates a row to confirm there is no duplicate.
If you are frequently querying by a particular column or group of columns, you can create an index manually using the CREATE INDEX command.
Note: the behavior of indexes is one of the big differences between different databases. SQLite won't be the same as Postgres, which will be different from MySQL. They all have indexes, but the specifics of tuning the indexes on each database is different.
If you want to learn more about indexing in different databases, check out Use the Index, Luke.
Database Monitoring and Tuning
When we're running small SQLite databases on localhost, there is not a lot to monitor. When you use a hosted database service for a production application, however, you'll usually get graphs and charts that tell you things like:
- how long does each query take?
- what are the average times for different queries?
- what are the slowest queries?
- how much CPU is the database using over time?
- how much memory is the database using over time?
- how many different database connections are there, over time?
- how much time is spent processing the query, vs. sending the results to the application?
Each of these could lead to different moves to make your database or application work better. We won't cover the tuning moves in depth here, but knowing what the problem is can help you to identify potential solutions.
Your application might also log some or all of your SQL queries, which can provide even more data to inspect as you are debugging sources of slowness (or opportunities for speed).
EXPLAIN queries
A particularly helpful tool as you are looking for ways to understand your database and the speed or slowness of queries is the EXPLAIN query.
EXPLAIN asks the database to tell you how it plans to execute your query.
Different databases offer different kinds of EXPLAIN queries. SQLite offers a high-level overview of the plan of a query with EXPLAIN QUERY PLAN. It tells you the steps that SQLite will do to fulfill your query:
sqlite> EXPLAIN QUERY PLAN SELECT * FROM students;
QUERY PLAN
`--SCAN students
sqlite> EXPLAIN QUERY PLAN SELECT * FROM students ORDER BY name;
QUERY PLAN
|--SCAN students
`--USE TEMP B-TREE FOR ORDER BY
sqlite> EXPLAIN QUERY PLAN
   ...> SELECT * FROM students
   ...> JOIN assignment_scores on assignment_scores.student_id = students.id
   ...> JOIN assignments ON assignments.id = assignment_scores.assignment_id
   ...> ORDER BY students.id;
QUERY PLAN
|--SCAN assignment_scores
|--SEARCH students USING INTEGER PRIMARY KEY (rowid=?)
|--SEARCH assignments USING INTEGER PRIMARY KEY (rowid=?)
`--USE TEMP B-TREE FOR ORDER BY
SCANmeans it has to look through the whole table. It's expensive!SEARCH ... USINGmeans it can use an index. It's typically cheaper than a SCANUSE ...says how SQLite is doing sorting or grouping for an ORDER, GROUP BY, or DISTINCT statement
You can read more about the output in the SQLite docs.
More web frameworks
The world of web development is diverse. While there are numerous languages and tools that can be employed to build web applications, frameworks often emerge as the preferred choice for developers. Frameworks provide a structured way to build applications by offering reusable pieces of code for common tasks, thereby making the development process more efficient and organized.
We just studied one, Flask, the popular micro web framework written in Python. It's known for its simplicity and ease of use, making it a go-to choice for many when building small to medium-sized web applications. Through the first modules of this course, we delved deep into Flask, exploring its architecture, templating system, form handling, routing, and database connectivity.
However, Flask is just the tip of the iceberg. There are numerous other web frameworks, each with its own unique features, strengths, and philosophies. Studying multiple frameworks can provide a comprehensive perspective on web development. It allows us to understand:
- How different languages shape the design of a framework.
- The various solutions to common web development problems.
- The trade-offs involved in choosing one framework over another.
Why Study More Frameworks?
- Diverse Solutions: Different frameworks often have diverse approaches to solving the same problem. By studying various frameworks, you get exposed to a range of solutions and design patterns.
- Adaptability: In the real world, a developer might have to work with multiple frameworks based on project requirements. Being familiar with more than one makes you adaptable and versatile.
- In-depth Understanding: When you see how different frameworks handle the same tasks, you gain a deeper understanding of the underlying principles of web development.
Beyond Flask: Exploring Express.js
As we transition from Flask, we'll be delving into Express.js - a web application framework for JavaScript (node.js backend). Express.js is known for its fast performance, flexibility, and minimalistic structure.
Express.js is particularly popular in the realm of JavaScript-based web applications, especially when building APIs for single-page applications or mobile backends.
In the upcoming modules, we'll explore the architecture of Express.js, its templating engines, form handling mechanisms, routing, and database connections and more.
Let's start
Intro to express
Express.js, often referred to simply as "Express," is a minimalistic web framework for Node.js. It provides a robust set of features for web applications.
Key Features of Express.js
- Minimalistic and Flexible: Express is unopinionated, meaning it doesn't force any particular way of organizing your application. This gives developers the freedom to choose libraries, structure their code, and define their workflow as they see fit.
- Middleware Support: Middleware are functions that have access to the request object, the response object, and the next function in the application’s request-response cycle. They form the backbone of an Express application, allowing developers to augment requests, handle errors, and more.
- Routing System: Express provides a sophisticated routing system, allowing developers to define routes based on HTTP methods, paths, and parameters.
- Performance: Being built on Node.js, Express benefits from its non-blocking, event-driven architecture, resulting in high performance and scalability.
- Vast Ecosystem: Express, being a part of the Node ecosystem, has access to the vast npm registry, which is filled with countless modules and packages to assist in your development process.
Hello World with Express.js
Setting up a basic Express application is straightforward. Here's a simple "Hello World" example to get you started:
- Setting Up: Begin by initializing a new Node.js project and installing Express:
mkdir express-demo
cd express-demo
npm init -y
npm install express
- Creating the Application:
In your project directory, create a file named
app.js. Add the following code:
const express = require('express');
const app = express();

app.get('/', (req, res) => {
    res.send('Hello World!');
});

const PORT = 3000;
app.listen(PORT, () => {
    console.log(`Server is running on http://localhost:${PORT}`);
});
- Running the Application: In your terminal, run the application:
node app.js
Now, if you navigate to http://localhost:3000 in your web browser, you'll be greeted with the message "Hello World!"
Express vs Flask
We studied Flask, we will study Express, but how do they stack up against each other? Let's dive deep into a comparative analysis of Flask vs. Express.js, examining their underlying languages and common feature implementations.
| Aspect | Flask (Python) | Express.js (JavaScript) |
|---|---|---|
| Syntax | Clean and human-readable syntax. Favored for its ease of learning. | Ubiquitous as the language of the web. Might not be as intuitive as Python's syntax. |
| Performance | Generally slower due to being interpreted. | Faster execution times, especially for I/O-bound tasks due to its non-blocking architecture. |
| Ecosystem | Benefits from Python's vast ecosystem. Strong in areas like data analysis, machine learning, etc. | Rich in web development libraries and tools, thanks to the npm registry. |
| Installing dependencies | Done with requiriments.txt and pip install -r requirements.txt | Done with package.json and npm i or yarn install |
| Command to run the app | python app.py | node app.js |
| Templating | Built-in support for Jinja2 templating engine. | No built-in templating engine, but can integrate with several (e.g., EJS, Pug, Handlebars). |
| Database Integration | Typically uses ORM (Object Relational Mapping) like SQLAlchemy. | Typically uses ORM (Object Relational Mapping) like Prisma. |
| Error Handling | Provides a way to define error handlers using decorators. | Uses middleware for error handling and offers a default error handler. |
Implementing Common Features
-
Setting Up a Basic Server
-
Flask:
from flask import Flask app = Flask(__name__) @app.route('/') def hello(): return "Hello World!" if __name__ == '__main__': app.run() -
Express.js:
const express = require('express');
const app = express();

app.get('/', (req, res) => {
    res.send('Hello World!');
});

app.listen(3000, () => {
    console.log('Server is running on http://localhost:3000');
});
-
-
Routing
-
Flask:
@app.route('/user/<username>') def show_user(username): return f"Hello, {username}!" -
Express.js:
app.get('/user/:username', (req, res) => {
    res.send(`Hello, ${req.params.username}!`);
});
-
-
Middleware
-
Flask:
@app.before_request def log_request(): print(f"Request received: {request.path}") -
Express.js:
app.use((req, res, next) => {
    console.log(`Request received: ${req.path}`);
    next();
});
-
Conclusion
Both Flask and Express.js offer powerful features that cater to different types of developers and project needs. While Flask might appeal to those who prefer Python's syntax or are working on projects that uses Python's strong ecosystem, Express.js is a go-to for those focused on full-stack JavaScript development.
It's essential to understand that neither framework is categorically "better" than the other. The choice between Flask and Express.js should be based on project requirements, team expertise, and personal preferences. By learning both, you arm yourself with the flexibility to choose the right tool for the job and the ability to work across different tech stacks.
Deploying express apps
As we covered before, we will be using render.com to deploy apps.
Follow the steps on this link.
While creating your file apps, pay special attention to the files package.json and app.js. These two files are the one responsible for specifying all the dependencies of your app (like express) and handling all the code of your app, respectively.
Express templates
As we covered with Flask, Web applications often require dynamic content rendering, where the same template can be used to display different data based on user actions (visit a page, click something, etc). This is where templating engines come into play.
For this lesson we will cover templates with EJS (Embedded JavaScript), but there are other template enginees like Pug or Handlebars.
Setting Up Templating
-
Installation:
In your app folder, install the templating engine via npm:
npm install ejs -
Configure Express to Use EJS:
In your main Express app file:
const express = require('express'); const app = express(); // Set EJS as the templating engine app.set('view engine', 'ejs'); // Your routes and logic -
Creating Templates:
By default, Express expects templates to be in a directory named
views. Create an EJS template namedindex.ejsin theviewsdirectory:<!DOCTYPE html> <html lang="en"> <head> <meta charset="UTF-8"> <meta name="viewport" content="width=device-width, initial-scale=1.0"> <title>Welcome</title> </head> <body> <h1>Welcome, <%= name %>!</h1> </body> </html>Here,
<%= name %>is a placeholder that will be replaced by the actual value ofnamewhen the template is rendered. -
Rendering the Template:
In your Express routes:
app.get('/', (req, res) => {
    const userName = "John";
    res.render('index', { name: userName });
});
The
res.render()function is used to render the EJS template. The first parameter is the name of the template file (without the.ejsextension), and the second parameter is an object containing the data to be passed to the template.
Express forms
As we covered before, Web forms provide a mechanism for users to submit data to the server, whether it's for registration, search queries, feedback, or other purposes. Express.js, with its minimalistic and flexible nature, offers intuitive ways to handle form data. In this article, we'll delve into managing forms in Express.js, focusing on receiving and sending information using req.query, req.params, and res.send.
Setting Up Express with Body Parsing
To handle POST data (like form submissions), Express needs to use middleware to parse the incoming request body:
const express = require('express');

// middleware is a function to be executed between request and response
app.use(express.json());

// definition of routes
Receiving Form Data
Forms can send data via GET (typically for search queries) or POST (for submitting data). For GET request, we do not need express.json() middleware.
-
GET Data (Query Strings): This can be accessed using
req.query.For example, for a URL like
/search?query=express, you can access the 'query' parameter as:app.get('/search', (req, res) => { let searchQuery = req.query.query; res.send(`You searched for ${searchQuery}`); }); -
POST Data: This can be accessed using
req.body(thanks to theexpress.json()middleware).If your form looks something like this:
<form action="/submit" method="post">
    <input type="text" name="username">
    <input type="submit" value="Submit">
</form>
In Express, you'd handle it as:
app.post('/submit', (req, res) => { let submittedUsername = req.body.username; res.send(`You submitted the username: ${submittedUsername}`); }); -
Route Parameters: Accessible using
req.params, these are useful for dynamic routes.For example, in a route like
/user/:username, you can access the 'username' parameter as:app.get('/user/:username', (req, res) => { let username = req.params.username; res.send(`You are viewing the profile of ${username}`); });
Sending Data Back to the Client
The res object in Express provides several methods to send responses back to the client. One of the most commonly used methods is res.send().
-
Sending a Simple Response:
app.get('/hello', (req, res) => { res.send('Hello, world!'); }); -
Sending Form Data Back:
For demonstration, if a user submits their name via a form, you can send it back:
app.post('/name', (req, res) => { let name = req.body.name; res.send(`Hello, ${name}!`); }); -
Sending JSON Data:
Express makes it easy to send JSON responses using
res.json():app.get('/data', (req, res) => { let data = { name: "John", age: 30 }; res.json(data); });
Express and SQL
As we covered before, it's often necessary to store and retrieve data, and databases are often an ideal solution (though not always). SQLite is a lightweight, self-contained database, and it is a popular choice for all kinds of applications.
We'll guide you through integrating SQLite with an Express application.
Setting Up SQLite with Express.js
To integrate SQLite with Express, we'll make use of the sqlite3 module available on npm.
- Installation:
npm install sqlite3
- Setting up the Database Connection:
const express = require('express');
const sqlite3 = require('sqlite3').verbose();

const app = express();
const PORT = 3000;

// Middleware for parsing POST request bodies
app.use(express.json());

// Connect to SQLite database
const db = new sqlite3.Database('./database.db', (err) => {
    if (err) {
        console.error("Error connecting to database:", err);
    } else {
        console.log('Connected to SQLite database.');
    }
});

// Create the "users" table if it doesn't exist
const createTableQuery = `
CREATE TABLE IF NOT EXISTS users (
    id INTEGER PRIMARY KEY AUTOINCREMENT,
    username TEXT NOT NULL,
    email TEXT UNIQUE NOT NULL
)`;

// execute query
db.run(createTableQuery, (err) => {
    if (err) {
        console.error("Error creating table:", err);
    }
});

// Route to register a new user
app.post('/register', (req, res) => {
    const { username, email } = req.body;
    const insertQuery = "INSERT INTO users (username, email) VALUES (?, ?)";

    db.run(insertQuery, [username, email], function(err) {
        if (err) {
            return res.status(400).json({ error: err.message });
        }
        // `this` refers to the statement object, and `lastID` contains the ID of the last inserted row.
        res.json({ id: this.lastID, message: "User registered successfully!" });
    });
});

// Route to fetch a user by their ID
app.get('/user/:id', (req, res) => {
    const userId = req.params.id;
    const fetchQuery = "SELECT * FROM users WHERE id = ?";

    db.get(fetchQuery, [userId], (err, row) => {
        if (err) {
            return res.status(400).json({ error: err.message });
        }
        res.json(row);
    });
});

// Start the Express server
app.listen(PORT, () => {
    console.log(`Server is running on http://localhost:${PORT}`);
});

// Handle exiting the application
process.on('exit', () => {
    db.close((err) => {
        if (err) {
            console.error(err.message);
        }
        console.log('Closed the SQLite database connection.');
    });
});
As you can see, the app is doing:
-
Initialization:
- Necessary modules (
express, andsqlite3) are imported. - An Express application instance (
app) is created.
- Necessary modules (
-
Middleware Configuration:
- The
express.json()middleware is added to the Express application. This enables the app to parse incoming POST request bodies, which is essential when handling form data submissions.
- The
-
Database Connection and Setup:
- A connection to an SQLite database (
database.db) is established. - If the database doesn't exist, SQLite will create a new file named
database.db. - A table named
usersis created if it doesn't already exist. This table is designed to store user information, with columns forid,username, andemail.
- A connection to an SQLite database (
-
Routes:
- Registration Route (
/register):- It's a POST route designed to register a new user.
- The submitted
usernameandemailare extracted from the request body. - The data is then inserted into the
userstable in the SQLite database. - A JSON response is sent back, containing the ID of the newly registered user and a success message.
- User Retrieval Route (
/user/:id):- It's a GET route to retrieve a user's details based on their ID.
- The user ID is extracted from the route parameter (
:id). - A database query fetches the corresponding user's details and returns them as a JSON response.
- Registration Route (
-
Server Start:
- The Express server is set to listen on port
3000. - A console log confirms when the server starts and provides the URL to access the app.
- The Express server is set to listen on port
-
Shutdown:
- An event listener is added to handle the
exitevent of the application process. - When the application is about to exit, the SQLite database connection is closed gracefully.
- A message confirming the closure of the database connection is logged to the console.
- An event listener is added to handle the
Other web Frameworks
The world of web development is vast, and the tools available to developers are continually evolving. While Flask and Express.js are popular and widely-used frameworks in Python and JavaScript, respectively, there are numerous other options that meet different needs and preferences.
Python Web Frameworks
JavaScript Web Frameworks
Conclusion
The choice of a web framework often depends on the specific needs of a project, the preferences of the developer or team, and the long-term goals of the application. Whether you're looking for a framework that offers a lot of built-in tools or one that provides a minimal, un-opinionated approach, there's likely a framework out there that's a perfect fit. The above options are just a starting point. Dive into each framework's documentation, explore its community and plugins, and experiment with building small projects to find the one that resonates with you.
Assignment: Guestbook in express
This is an individual project. You are expected to submit your own solution, not to work with a partner or team.
In this assignment you will build the same from last week but in Express.

https://github.com/kiboschool/wad-express-guestbook
Submission
After you complete the assignment and push your solution to Github, submit your work in Gradescope and Anchor to receive credit.
ORMs
Writing raw SQL queries can be tedious and complicated. This is where ORM (Object-Relational Mapping) comes into play, simplifying database interactions for developers.
Advantages of ORMs over Raw SQL
-
Simplicity: Instead of dealing with rows, columns, and SQL queries, developers work with classes and objects, which aligns with the object-oriented paradigm.
-
Security: ORMs often come with built-in security features, such as protection against SQL injection attacks.
-
Database Independence: ORM provides a level of abstraction, making it easier to switch between different database systems without rewriting much of your code.
-
Automation: Tasks like connection management and schema updates can be handled more efficiently.
In the following lessons, we will explore in deepness how do they work.
Let's get started!
What is an ORM?
ORM stands for Object-Relational Mapping. It's a tool that allows developers to interact with databases using the programming language of their choice, rather than raw SQL queries. Think of it as a bridge between the world of object-oriented programming and the world of relational databases.
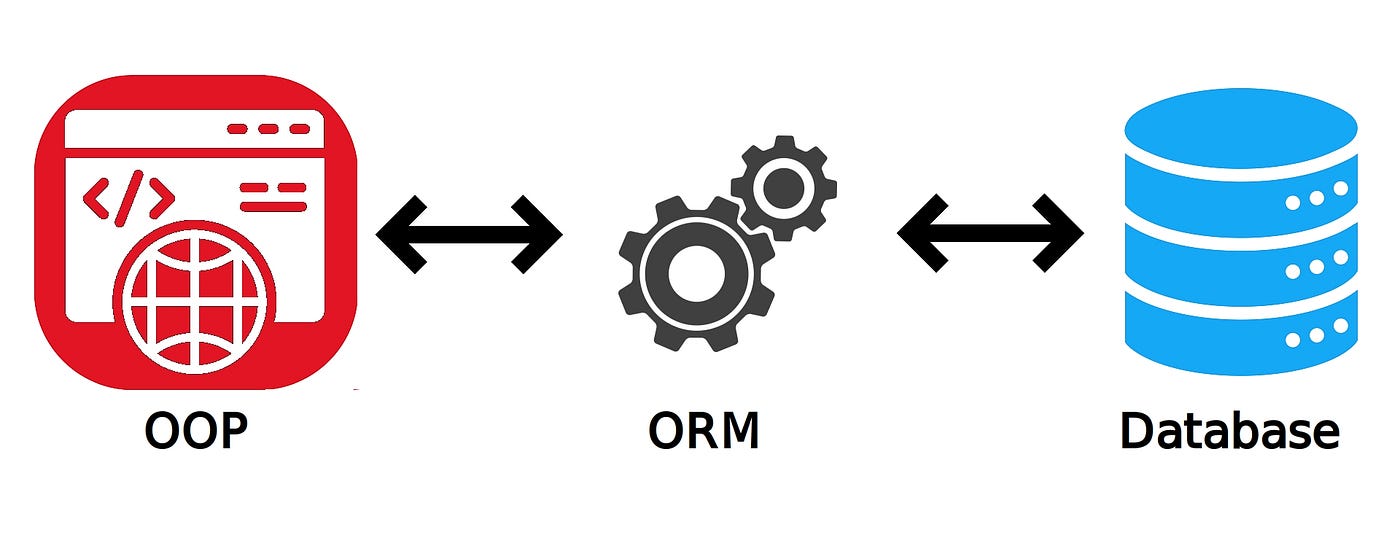
Imagine we have a book store application with the following tables:
- Authors: Storing author details.
- Books: Storing book details, linked to authors.
- Orders: Storing customer orders, linked to books.
We want to fetch all books written by a particular author that have been ordered more than 50 times.
Raw SQL:
Using a raw SQL query, this might look something like:
SELECT Books.title, COUNT(Orders.id) AS order_count
FROM Books
JOIN Authors ON Books.author_id = Authors.id
JOIN Orders ON Books.id = Orders.book_id
WHERE Authors.name = 'J.K. Rowling'
GROUP BY Books.title
HAVING COUNT(Orders.id) > 50;
This SQL query joins the three tables, filters by the author's name, groups by book titles, and counts orders to filter out books ordered more than 50 times.
Using an ORM (like prisma):
Using Prisma, this might be approached differently.
const books = await prisma.book.findMany({
  where: {
    author: {
      name: 'J.K. Rowling'
    },
    orders: {
      _count: {
        gt: 50
      }
    }
  },
  select: {
    title: true,
    _count: {
      select: { orders: true }
    }
  }
});
Differences:
-
Syntax: The raw SQL query requires knowledge of SQL syntax, joins, grouping, and filtering. Prisma's query, on the other hand, uses a more JavaScript-centric approach, which may feel more intuitive to JS developers.
-
Abstraction: With Prisma, the focus is on the data's shape and the relationships between entities, abstracting away the SQL layer. This makes it more maintainable and readable, especially for those who aren't SQL experts.
-
Flexibility: Both methods provide flexibility. Raw SQL might offer more fine-tuned control for complex queries, while Prisma offers a more structured and type-safe approach.
-
Type Safety: With Prisma, the queries are type-checked, which means you can catch potential issues at compile time rather than runtime.
Prisma as ORM
So let's set up a simple app with Prisma and JavaScript.
By the way, Prisma can also be used in python with Flask. However, this week we will use Express and JavaScript.
Setting Up Prisma with Express.js
1. Installation:
Create the folder app and navigate into it:
mkdir prisma-test
cd prisma-test
Start by initializing a new Node.js project if you haven't already:
npm init -y
Install all required dependences:
npm install prisma @prisma/client express
Now, set up Prisma for your project:
npx prisma init --datasource-provider sqlite --url file:./dev.db
This command generates a prisma directory with 3 files:
-
schema.prisma. You define all your tables information (also known as models). -
dev.db. Contains the database itself. Never touch this file. -
As well, in the root folder you will have a
.envfile (for environment variables like the DB url).
2. Defining Models:
Inside schema.prisma, you can define your data models. It's like tables in the SQL universe.
Here's a basic example with a User table (model):
model User {
  id    Int     @id @default(autoincrement())
  name  String
  email String  @unique
}
The above definition creates a User with an id, name, and email fields, with email being unique.
Copy this code in your schema.prisma file.
3. Integration with Express.js:
In your root folder create a file index.js.
touch index.js
Now, in your main server file (e.g., index.js), set up a basic Express.js application connected to Prisma.
const express = require('express');
const { PrismaClient } = require('@prisma/client');

const prisma = new PrismaClient();
const app = express();

app.use(express.json());

// Sample route to fetch all users
app.get('/users', async (req, res) => {
    const users = await prisma.user.findMany();
    res.json(users);
});

const PORT = 8000;
app.listen(PORT, () => {
    console.log(`Server is running on http://localhost:${PORT}`);
});
This sets up a basic Express server with a single route to fetch all users from the database.
4. Seeding the Database:
To seed the database (add some test users into DB) with Prisma, we'll add a seeding script.
Create a new file called seed.js in the prisma folder of your project (prisma/seed.js). In this file, you'll add the logic to insert sample users into the database:
const { PrismaClient } = require('@prisma/client');

const prisma = new PrismaClient();

async function main() {
    await prisma.user.create({
        data: {
            name: 'John Doe',
            email: 'john.doe@example.com',
        },
    });

    await prisma.user.create({
        data: {
            name: 'Jane Smith',
            email: 'jane.smith@example.com',
        },
    });

    // You can add more users or other data as needed
}

main()
    .catch(e => {
        console.error(e);
        process.exit(1);
    })
    .finally(async () => {
        await prisma.$disconnect();
    });
Next, add the prisma.seed to your package.json file (you should add this just before the last curly bracket in your package.json file):
,
  "prisma": {
    "seed": "node prisma/seed.js"
  }
5. Migrating the Database:
So far you only created the "mould of your information". But the database is empty, you need to create the tables and run the seed file to populate this tables. This process is called migration:
In your terminal run:
npx prisma migrate dev --name init
Finally, to seed the database, run the CLI command:
npx prisma db seed
6. Run your app
Finally run:
node index.js
This command will run the Express server in port 8000 (http://localhost:8000) and navigate to the http://localhost:8000/users endpoint, you'll see the seeded users in the response.
CRUD Operations with Prisma
In the previous article, we've set up an Express application integrated with Prisma. We've also created a basic User model and seeded our database with some sample users. Now, let's extend our application to perform more CRUD (Create, Read, Update, Delete) operations and explore various relationships between data models.
Extending the Data Model
Before diving into CRUD operations, let's introduce more complexity to our data model by adding one-to-one, one-to-many, and many-to-many relationships.
1. One-to-One Relationship: Profile
Each User can have one Profile. This represents a one-to-one relationship.
Update your schema.prisma:
model User {
  id      Int     @id @default(autoincrement())
  name    String
  email   String  @unique
  profile Profile?
}

model Profile {
  id     Int    @id @default(autoincrement())
  bio    String
  userId Int    @unique
  user   User   @relation(fields: [userId], references: [id])
}
2. One-to-Many Relationship: Posts
A User can have multiple Posts, but each Post belongs to one User. This represents a one-to-many relationship.
Extend your schema.prisma:
model User {
  // ... existing fields ...
  posts  Post[]
}

model Post {
  id       Int    @id @default(autoincrement())
  title    String
  content  String?
  authorId Int
  author   User   @relation(fields: [authorId], references: [id])
}
3. Many-to-Many Relationship: Categories
A Post can belong to multiple Categories, and each Category can have multiple Posts. This represents a many-to-many relationship.
Further extend your schema.prisma:
model Post {
  // ... existing fields ...
  categories CategoryOnPost[]
}

model Category {
  id    Int            @id @default(autoincrement())
  name  String         @unique
  posts CategoryOnPost[]
}

model CategoryOnPost {
  postId     Int
  categoryId Int
  post       Post     @relation(fields: [postId], references: [id])
  category   Category @relation(fields: [categoryId], references: [id])

  @@id([postId, categoryId])
}
After you've updated your schema.prisma don't forget to run the migration command to update your actual database with the new schema:
npx prisma migrate dev
Note that this command will prompt you to enter a name for the new migration, simply type in a name representing the changes in your schema, e.g., "newmodels".
With our relationships defined, let's explore CRUD operations in plain JavaScript.
CRUD Operations
1. Create:
To create a new user:
const newUser = await prisma.user.create({
  data: {
    name: "Alice",
    email: "alice@example.com",
  },
});
2. Read:
Fetch all users:
const users = await prisma.user.findMany();
3. Update:
Update a user's name:
const updatedUser = await prisma.user.update({
  where: { email: "alice@example.com" },
  data: { name: "Alicia" },
});
4. Delete:
Delete a user:
const deletedUser = await prisma.user.delete({
  where: { email: "alice@example.com" },
});
Complex CRUD operations
1. All posts of a user
const posts = await prisma.user.findUnique({
  where: { id: Number(id) },
  select: {
    posts: true,
  },
});
2. Get all the categories of a post:
// Fetch categories for all posts
prisma.post.findMany({
  select: {
    title: true,
    categories: {
      select: {
        category: {
          select: {
            name: true,
          },
        },
      },
    },
  },
});
3. Fetching Users with Their Latest Post:
const usersWithLatestPost = await prisma.user.findMany({
  select: {
    name: true,
    email: true,
    posts: {
      take: 1,
      orderBy: {
        createdAt: 'desc'
      }
    }
  }
});
4. Count of Posts for Each User:
const usersPostCount = await prisma.user.findMany({
  select: {
    name: true,
    email: true,
    _count: {
      select: { posts: true }
    }
  }
});
5. Users Who Have Written More Than 5 Posts:
To filter users based on the number of posts they've written:
const activeUsers = await prisma.user.findMany({
  where: {
    posts: {
      _count: {
        gt: 5
      }
    }
  },
  select: {
    name: true,
    email: true
  }
});
5. Fetch Posts with Specific Categories:
Let's say you want to fetch all posts that are categorized under "Technology":
const techPosts = await prisma.post.findMany({
  where: {
    categories: {
      some: {
        category: {
          name: 'Technology'
        }
      }
    }
  },
  select: {
    title: true,
    content: true
  }
});
6. Posts Without Any Categories:
Fetching posts that haven't been categorized:
const uncategorizedPosts = await prisma.post.findMany({
  where: {
    categories: {
      NONE: {}
    }
  },
  select: {
    title: true,
    content: true
  }
});
7. Sorting Users by the Number of Posts:
const usersByPostCount = await prisma.user.findMany({
  select: {
    name: true,
    email: true,
    _count: {
      select: { posts: true }
    }
  },
  orderBy: {
    _count: {
      posts: 'desc'
    }
  }
});
These are just a few examples of what you can achieve with Prisma. The ability to chain conditions, filter based on relationships, and perform aggregations makes Prisma a powerful tool for complex queries.
Setting Up API Routes in Express.js
Now that we've explored how to write the queries in plain JavaScript, let's do it with Express.
Extend your index.js to handle these basic operations:
// Create a new user
app.post("/user", async (req, res) => {
  const { name, email } = req.body;
  const user = await prisma.user.create({
    data: { name, email },
  });
  res.json(user);
});

// Fetch all users
app.get("/users", async (req, res) => {
  const users = await prisma.user.findMany();
  res.json(users);
});

// Update a user
app.put("/user/:id", async (req, res) => {
  const { id } = req.params;
  const { name } = req.body;
  const user = await prisma.user.update({
    where: { id: Number(id) },
    data: { name },
  });
  res.json(user);
});

// Delete a user
app.delete("/user/:id", async (req, res) => {
  const { id } = req.params;
  const user = await prisma.user.delete({
    where: { id: Number(id) },
  });
  res.json(user);
});
And of course you can explore:
Try adding more endpoints with more complex queries as detailed before!
Project: Book Review System
This is an individual project. You are expected to submit your own solution, not to work with a partner or team.
In this assignment you will build a Book Review API

https://github.com/kiboschool/wad-prisma-book-review-platform
Submission
After you complete the assignment and push your solution to Github, submit your work in Gradescope and Anchor to receive credit.
Bonus: More ORMs
In our journey through the world of ORMs, we've discovered how Prisma works, exploring its features and capabilities. But the landscape of ORMs is vast. Different ORMs fulfill different needs, languages, and frameworks. As we conclude our series, let's explore some other ORMs in the JavaScript and Python ecosystems.
JavaScript:
- Sequelize: Sequelize
- TypeORM: TypeORM
- Objection.js: Objection.js
Python:
- SQLAlchemy: SQLAlchemy
- Django ORM: Django
- Tortoise-ORM: Tortoise-ORM
- Peewee: Peewee
APIs
Web applications don't live in isolation. They often work together with other applications.
For instance, if you have an online store, it might use Google or Facebook to let users log in, then use Flutterwave or Paystack for checkout.
To connect your application to those applications, you make use of an interface. An Application Programming Interface, or API, is how an application communicates with other programs.
Every API is different, but there are skills you can learn that make it easier each time you have to deal with a new API. Practicing with different APIs and designing your own API will help you get a handle on how to connect your application to other services.
You'll practice reading and writing documentation, navigating API authentication, and patterns like webhooks and rate limiting.
API Basics
An Application Programming Interface (API), is a set of rules that defines how two software programs should interact with each other. It allows one program to request data or services from another program and receive a response.
APIs on the web
When web developers say 'API', they typically mean a way of requesting data and performing actions over HTTP. Often, the JSON format is used as a standard way for programs to communicate.
Web APIs often follow a convention called REST - Representational State Transfer.
In a REST API, requests are made to a specific endpoint. The endpoint URL represents a specific resource or collection of resources, and the HTTP method (such as GET, POST, PUT, or DELETE) determines the type of action being performed on that resource.
Note: there are other popular data formats for APIs, like GraphQL, gRPC, or XML. We're going to stick to JSON for this class, but many of the ideas are similar, no matter what format an API uses.
Communicating with an API
In your career in software, you'll write code interacting with tons of different APIs. Let's review the basics.
Developers interact with an API by making requests to the API's endpoints and receiving responses.
Making requests in Python
In Python, the requests library is commonly used to make HTTP requests to an API.
Here is an example of a simple GET request to retrieve data from an API endpoint:
import requests

response = requests.get("https://api.example.com/users")

if response.status_code == 200:
    data = response.json()
    print(data)
else:
    print("There was a problem fetching the data")
The requests library simplifies making HTTP requests and working with the responses.
Making requests in JavaScript
JavaScript has a built-in method called fetch to make and handle HTTP requests.
Here is the same example as above, in JS:
fetch("https://api.example.com/users")
  .then(response => {
    return response.json();
  })
  .then(data => {
    console.log(data);
  })
  .catch(error => {
    console.error("There was a problem fetching the data")
  });
Handling response data
API requests and responses often use JSON as the data format. In both Python and JS, you can parse the response body from a JSON string into native objects:
response.json()
In the JS version, there's a little dance to actually access the data (the .json method actually returns a Promise, which is slightly trickier to work with).
APIs for other kinds of services
There are APIs for all kinds of things.
- get the weather
- send an email
- process a payment or bank transfer
- add an event to someone's calendar
- start a server
- send physical mail
- drive a car
Many APIs will use HTTP, but not all.
You will follow the same kind of process to use any of them:
- read the documentation
- figure out how to do the basics (such as make an authenticated request)
- figure out how to do what you want
- brainstorm and design around edge cases
Working with APIs, like lots of web development, takes practice!
Summary
- APIs are ways for programs to communicate with each other
- In web development, that often means REST APIs, sending JSON over HTTP
- You can make requests
In the next few lessons, you'll see how to build your own API, learn more about REST and API design. You'll also see more about how to use external services from your application, practice reading documenation, and authenticate to an API.
Practice: Making requests
The Cat API offers endpoints for fetching cats.
- Practice using the Python requests library to fetch images. Make a request to https://api.thecatapi.com/v1/images/search?limit=10 and print out the results.
- Practice using JS fetch to fetch the same images (you can run JS using node on the command line, or in the browser console). Make a request to the same endpoint, and log out the results.
Creating APIs
An API is not so different from the other web applications you've been working with.
- Instead of returning HTML templates, they return JSON
- They pay even more attention to the names and HTTP verbs of the routes
- They publish documentation describing how the API works
All the rest of what you've learned still applies. APIs still use HTTP, routes, templates, and databases.
Rendering JSON from Flask
Flask will automatically convert strings, ints, lists, and dicts into JSON.
@app.get("/users/<id>")
def show_user(id):
  user = db.get_user(id)
  return { "name": user.name, "id": user.id }
If you have another datatype (not a dict, list, string, or int), then you may have some work to do to turn it into JSON. You can either make a dict with the values that you want, or you can write code that will serialize your data into JSON.
There are some libraries that will do this for you. For the small apps in this class, you can usually write the dictionary or list version of your response more easily than configure a library to do the work.
Rendering JSON from express
In Express, you can render a JSON response using res.json.
app.get("/user/:id", (req, res) => {
  const user = db.get_user(req.params.id)
  res.json(user);
});
Boom! It's an API
Well... routing requests and rendering JSON is the easy part.
The hard part is designing an API that other developers want to use. That means:
- making an API that does something that is valuable to them
- designing the API so they can understand it
- writing documentation (and sharing the API) so that they can learn how to use it
Practice: Rendering JSON
Create a small Flask app with no database. Return a string, int, list, and dict from different routes. Run the app and check your routes in the browser to confirm that they show up as JSON.
Rebuild the same app using Express for practice. Check that your routes render JSON in the browser.
Other considerations
There are some API-specific features that don't show up as often in HTML web applications, or are treated differently.
- Errors: in an HTML site, you want to steer users away from errors as much as possible. In an API, errors are almost inevitable, so it's more important to give clear error messages that can help the developer know what they got wrong in their request.
- Rate limiting: If users use your site too much, it might go down. To prevent that, you might rate-limit users so that they can only view 1000 pages per minute, or some other limit. APIs may be expected to support much higher rate limits, since Python can make requests much faster than a user can click!
- Caching: Browsers will sometimes cache images or other static resources, so they don't have to fetch them again when reloading a page. When designing an API, you will likely have a different caching strategy than when you design an HTML page.
- Availability: APIs and web pages have different expectations for performance and availability. It's bad if a user can't access a webpage. If no one can use PayPal's API, then that's many thousands of webpages that end up broken!
- Authentication: Many websites have concepts of Users who can log in, and only access certain resources. APIs frequently have more complicated notions of users. For instance, you can sign in with a provider, who can then modify resources on your behalf.
We haven't discussed auth yet, but it is a frequent concern in APIs. This week you'll see how to authenticate to an API, and next week you'll learn a bit about building authentication in your apps.
REST
REST, or Representational State Transfer, is a pattern for API design based on resources. It matches common names and behaviors to HTTP verbs and paths.
REST APIs are widely used in web development and have become a popular way of creating web-based services that can be consumed by a variety of clients, including web browsers, mobile apps, and other server-side systems.
Resources
Resources are the fundamental building blocks of REST architecture. Resources are abstract representations of objects or data entities, and they are accessed and manipulated using standard HTTP methods, such as GET, POST, PUT, and DELETE.
For example, in a RESTful API that provides access to a chat, a resource might represent a message. This resource can be accessed and manipulated in standard ways: retrieving the message using a GET request, creating a new message using a POST request, updating an existing message using a PUT request, and deleting a message using a DELETE request.
Each resource in a RESTful API is identified by a unique URL, and the API defines a set of standard operations that can be performed on each resource. This provides a consistent and predictable interface for interacting with the API, making it easier for developers to understand and use the API.
Standard names and actions for HTTP methods
Here are the standard actions associated with each HTTP method:
GET: Retrieve a representation of a resource. This method is used to retrieve the current state of a resource, and it should be safe (i.e., it should not modify the state of the resource).POST: Create a new resource. This method is used to create a new resource, and it should return a representation of the new resource.PUT: Update a resource. This method is used to update an existing resource, and it should return a representation of the updated resource.PATCH: Partially update a resource. This method is used to partially update an existing resource, and it should return a representation of the updated resource.DELETE: Delete a resource. This method is used to delete an existing resource.
These standard actions are the foundation of RESTful APIs, and they provide a predictable and consistent interface for accessing and manipulating resources.
Note: PUT and PATCH play similar roles. It's common to mix the two up, so don't be surprised if you see a full update using PATCH or a partial update using PUT. Also... there's a lot of updates that just use POST to a dedicated update route, in part because HTML forms cannot send PUT or PATCH HTTP requests.
Standard URL patterns
Here are some common URL patterns and resource names used in RESTful APIs:
- Collection of resources: A collection of resources is often represented as a list, and it is accessed using a URL pattern such as
/resources. For example,/messagesmight represent a collection of chat messages. - Single resource: A single resource is accessed using a URL pattern that includes an identifier, such as
/resources/:id. For example,/messages/1might represent a single message with an ID of 1. - Sub-resources: Sub-resources are resources that are related to a parent resource, and they are accessed using a URL pattern that includes both the parent resource and the sub-resource. For example,
/messages/1/repliesmight represent the replies for a message with an ID of 1. - Search: Search for resources can be performed using a URL pattern that includes a query string, such as /resources?query=search_term. For example,
/messages?author=Johnmight search for all chat messages written by John.
Create, Read, Update, and Delete
The typical actions on a resource are these 4: Create, Read, Update, and Delete (CRUD). Those are typically the actions you'd expect to be able to perform on a resource in a REST API.
You may be noticing a parallel between the HTTP Verbs, REST, and SQL. At each level of the application, we have parallel versions of similar CRUD actions.
- HTTP GET mirrors SQL SELECT
- HTTP POST mirrors SQL INSERT
- HTTP DELETE mirrors SQL DELETE (nice!)
- HTTP PATCH mirrors SQL UPDATE
When you start using a new API, a new database, or a new web framework, it's often a good idea to start with CRUD. If you can Create, Read, Update, and Delete the relevant resources, you are on the right track with your new tool!
Example: Flask
Here's a small but complete example of how you might implement REST API routes for a "message" resource using Flask:
from flask import Flask, request, jsonify

app = Flask(__name__)

messages = [
    {
        "id": 1,
        "message": "Hello World!"
    },
    {
        "id": 2,
        "message": "Goodbye World!"
    }
]

# Get all messages
@app.route("/messages", methods=["GET"])
def get_all_messages():
    return jsonify(messages), 200

# Get a single message by id
@app.route("/messages/<int:message_id>", methods=["GET"])
def get_message(message_id):
    message = [message for message in messages if message["id"] == message_id]
    if len(message) == 0:
        return jsonify({"error": "Message not found"}), 404
    return jsonify(message[0]), 200

# Create a new message
@app.route("/messages", methods=["POST"])
def create_message():
    message = {
        "id": messages[-1]["id"] + 1,
        "message": request.json["message"]
    }
    messages.append(message)
    return jsonify(message), 201

# Update an existing message
@app.route("/messages/<int:message_id>", methods=["PUT"])
def update_message(message_id):
    message = [message for message in messages if message["id"] == message_id]
    if len(message) == 0:
        return jsonify({"error": "Message not found"}), 404
    message[0]["message"] = request.json["message"]
    return jsonify(message[0]), 200

# Delete a message
@app.route("/messages/<int:message_id>", methods=["DELETE"])
def delete_message(message_id):
    message = [message for message in messages if message["id"] == message_id]
    if len(message) == 0:
        return jsonify({"error": "Message not found"}), 404
    messages.remove(message[0])
    return jsonify({"message": "Message deleted"}), 200

if __name__ == "__main__":
    app.run(debug=True)
This example implements the standard CRUD (Create, Read, Update, Delete) operations for a "message" resource. The messages list represents the current state of the resource, and the API routes perform the appropriate action for each HTTP method (e.g., GET retrieves the current state of the resource, POST creates a new resource, PUT updates an existing resource, and DELETE deletes a resource).
Example: Express
Here's an equivalent example using Express:
const express = require('express');
const app = express();
const bodyParser = require('body-parser');

app.use(bodyParser.json());

const messages = [
  {
    id: 1,
    message: 'Hello World!'
  },
  {
    id: 2,
    message: 'Goodbye World!'
  }
];

// Get all messages
app.get('/messages', (req, res) => {
  res.status(200).json(messages);
});

// Get a single message by id
app.get('/messages/:messageId', (req, res) => {
  const message = messages.find(message => message.id === parseInt(req.params.messageId));
  if (!message) {
    return res.status(404).json({ error: 'Message not found' });
  }
  res.status(200).json(message);
});

// Create a new message
app.post('/messages', (req, res) => {
  const message = {
    id: messages[messages.length - 1].id + 1,
    message: req.body.message
  };
  messages.push(message);
  res.status(201).json(message);
});

// Update an existing message
app.put('/messages/:messageId', (req, res) => {
  const message = messages.find(message => message.id === parseInt(req.params.messageId));
  if (!message) {
    return res.status(404).json({ error: 'Message not found' });
  }
  message.message = req.body.message;
  res.status(200).json(message);
});

// Delete a message
app.delete('/messages/:messageId', (req, res) => {
  const messageIndex = messages.findIndex(message => message.id === parseInt(req.params.messageId));
  if (messageIndex === -1) {
    return res.status(404).json({ error: 'Message not found' });
  }
  messages.splice(messageIndex, 1);
  res.status(200).json({ message: 'Message deleted' });
});

const port = process.env.PORT || 3000;
app.listen(port, () => {
  console.log(`Listening on port ${port}`);
});
This example uses the express library and the body-parser middleware to handle HTTP requests and responses. The REST API routes are defined using the app.get(), app.post(), app.put(), and app.delete() methods, and the response is constructed using the res.status() and res.json() methods.
As with the Flask example, this implementation uses an in-memory array to represent the "message" resource, and implements the standard CRUD operations for the resource.
External services
You've written programs that make API requests. You've written web applications (and at least seen ones that act as APIs).
You can combine the two! You can make API requests from your web applications.
Many web applications rely on external services for features such as payment processing, mapping, and social media integration. These services are often provided through APIs that allow web applications to interact with them programmatically.
Client-side requests
Since JavaScript runs in the browser, you can make requests to APIs from within your client-side code.
This is very common in frontend web development, especially for richly-featured web applications. Instead of requesting new HTML pages, JavaScript-based apps request data from the server, and then update what is displayed on the page.
In this course, we aren't focused on client-side JavaScript, so we won't cover this in any more detail for now.
Server-side requests
There are some requests that it's better to make from the server. If there is a secret that the application knows, and the rest of the world should not know (like an authentication token), then making those requests from the client side would be dangerous! Remember, any code that executes on the client side means that other people will have access to the code and its data as it runs -- including any requests it makes.
For instance, if your application uses Sendgrid to send emails, it authenticates itself using a secret key. From the server, the application can send an HTTP request to Sendgrid to trigger sending an email. If you tried to send that HTTP request from the client, then random users might be able to get your Sendgrid key and send emails on your behalf!
How to make third-party requests from your server
You can make requests from your server the same way you would from another program.
Here's a mini-example in Flask, using NewsAPI.org:
@app.route('/news')
def news():
    API_KEY = 'your-api-key-here'
    URL = f'http://newsapi.org/v2/top-headlines?country=ng&apiKey={API_KEY}'
    response = requests.get(URL)
    if response.status_code == 200:
        news_data = response.json()
        return jsonify(news_data)
    else:
        return 'Error retrieving news headlines'
In this example, the /news endpoint uses the requests library to make a GET request to the NewsAPI.org service. The response is checked for a 200 status code, and if successful, the JSON data is returned to the client as a JSON response. If there is an error, a simple error message is returned.
Here's the same example, but using Express:
app.get('/news', (req, res) => {
  const API_KEY = 'your-api-key-here';
  const URL = `http://newsapi.org/v2/top-headlines?country=ng&apiKey=${API_KEY}`;

  fetch(URL)
    .then(response => {
      if (response.ok) {
        return response.json();
      } else {
        res.send('Error retrieving news headlines');
      }
    })
    .then(data => {
      res.json(data);
    })
    .catch(error => {
      res.send('Error retrieving news headlines');
    });
});
Using a package to do the work
Instead of making API requests manually, some services offer a "Client Library", a package that makes the API requests for you. NewsAPI.org offers client libraries for Python and Node.
Here are the examples again, but using the client libraries:
from newsapi import NewsApiClient
newsapi = NewsApiClient(api_key='API_KEY')

@app.route('/news')
def news():
  top_headlines = newsapi.get_top_headlines(country="ng")
  return top_headlines
The client library handles building the query and parsing the response.
const NewsAPI = require('newsapi');
const newsapi = new NewsAPI('API_KEY');

app.get('/news', (req, res) => {
  newsapi.v2.topHeadlines({country: 'ng'})
    .then(data => { res.json(data); });
})
Not every API offers client libraries, and client libraries don't always stay up to date with all the options offered by the HTTP API... but they save a lot of work if they are available!
Documentation
API documentation explains how to interact with an API. It provides information about the functionality that an API offers, including what data it can return and how to request it. API documentation typically includes information such as:
- Endpoints: A list of all the available URLs that can be accessed through the API, along with a description of what they do.
- HTTP methods: A description of the HTTP methods (such as GET, POST, PUT, DELETE, etc.) that the API supports and what each method does.
- Request and response formats: Information about what kind of data can be sent to the API as part of a request and what kind of data the API will return in response. This can include information about the data format (e.g., JSON or XML), as well as details about the structure of the data.
- Error handling: Information about how the API handles errors and what kind of error responses can be expected.
- Authentication and authorization: Details about how to authenticate with the API and what level of access is required to access certain parts of the API.
API documentation is an important resource for developers who want to integrate their applications with an API. It helps them understand what the API can do, how to make requests to the API, and how to handle responses from the API.
Practice: Reading Documentation
It's easy to skim documentation. You really find out if you understand it when you actually try to use the API.
Pick one of the following APIs, then read the documentation and implement at least two actions using the API.
- Giphy API: An API for searching for and retrieving animated GIFs. The API documentation includes information about endpoints, request and response formats, and examples of how to use the API.
- News API: An API for retrieving news articles from around the world. The API documentation includes information about endpoints, request and response formats, and examples of how to use the API.
- OpenWeatherMap: A weather API that provides weather data for cities around the world. The API documentation includes example requests and responses, as well as information about the data format and available endpoints.
API Authentication
API authentication is the process of verifying the identity of the user or the client making API requests. The goal of API authentication is to ensure that the API is only used by authorized users and to prevent unauthorized access to sensitive data. If a particular user is misusing the API, identifying the user and intervening is easy if every request has to be authenticated.
There are several common methods of API authentication, including:
- API Key: An API key is a string of characters that is passed in with each API request as a parameter. The API key is used by the API to identify the client making the request and to determine if the client is authorized to access the requested data.
- OAuth: OAuth is an open standard for authorization that provides a secure way for API clients to access resources on behalf of a user. OAuth allows API clients to obtain an access token, which can be used to make API requests on behalf of the user.
- Basic Authentication: Basic authentication is a simple authentication method that involves sending a username and password with each API request. The API server then verifies the credentials and grants access to the requested data if the credentials are valid.
- Token-based Authentication: Token-based authentication involves the client sending a token with each API request. The API server verifies the token and grants access to the requested data if the token is valid. Tokens can be generated and stored on the server or sent to the client as part of an authentication process.
For most APIs where you are requesting data, you'll use an API key. If you want to act on behalf of a user, or implement sign-on with another service, you'll need to learn about Oauth.
What it means for you
When you use external APIs, you'll often need to sign up for a developer key. Some services give you a key instantly, others have a wait.
When you make requests to the API, you'll need to include your key in the request. The documentation for the API should explain how to authenticate your requests (it's often the first thing in the docs).
Testing APIs
API testing involves verifying that APIs function correctly, that means, that they return the correct information when visiting a particular endpoint.
There are several ways of testing these APIs, but we are going to see the 3 most popular.
For starters, we are only going to test GET methods, in a very popular API called PokeApi. This API returns information about pokemons.
1. Testing API with a Browser (Chrome, Firefox, etc)
One of the simplest ways to test a GET API is by using a web browser.
Open a new tab and go to the given address:
https://pokeapi.co/api/v2/pokemon/ditto
You should receive a JSON response displaying the data.
This means your browser is doing a GET request to the PokeApi and receiving a response.
For a better visual experience, when using Google Chrome, it's recommended to add an extension called JSON formater. This will ensure the JSON response is displayed in a readable format.
2. Testing API with curl command
curl is a versatile command-line tool available on most platforms that lets you send HTTP requests.
Open your terminal and type the following command:
curl https://pokeapi.co/api/v2/pokemon/ditto
This command will retrieve information about the Pokémon "Ditto" from the PokeAPI. Remember, this particular API does not support POST requests, so you'll be limited to GET requests.
3. Testing API with Postman
While browsers and curl offer quick ways to test APIs, the recommended method for a more comprehensive testing experience is a dedicated software called Postman.
This video shows some basic steps on how to use Postman.
Practice: APIs
💡 This is your chance to put what you’ve learned into action.
Try solving these practice challenges to check that you understand the concepts.
Submission
To log your practice for credit:
- Practice exercises will be graded for completion not correctness. You have to document that you did the work, but we won't be checking if you got it right.
- You are encouraged to engage with all the exercises listed on the practice page.
- You are expected to submit only the details requested on the Gradescope submission.
Fetching from an API in Node
Pick one of the following APIs, read the documentation and get data from the API using NodeJS and fetch:
- Giphy API: An API for searching for and retrieving animated GIFs. The API documentation includes information about endpoints, request and response formats, and examples of how to use the API.
- News API: An API for retrieving news articles from around the world. The API documentation includes information about endpoints, request and response formats, and examples of how to use the API.
- OpenWeatherMap: A weather API that provides weather data for cities around the world. The API documentation includes example requests and responses, as well as information about the data format and available endpoints.
Writing Documentation: Sample Node App (optional)
This Sample app on Replit is missing documentation.
Based on what's in index.js, write documentation for the methods. Include the path and HTTP verb, any expected parameters, what values to expect in return, as well as a general description of the path.
- Remember to consider the purpose and audience of the documentation you write.
- You are encouraged to share your documentation with other students for feedback.
Serving an API: Flask (optional)
Open up your previous Flask number guessing game project. Instead of using HTML templates, write an updated version as an API that communicates using JSON. It won't be easy to play using the browser. Instead, you can write a program that uses the requests package to play the guessing game by JSON API instead.
Assignment: Product Info
In this assignment, you'll be updating a Flipkart clone so that it serves data as an API in addition to rendering HTML pages. Then, you'll update the search feature.
The Flipkart clone is an e-commerce website built using Flask, SQLite3, and SQLAlchemy. SQLAlchemy is a Python based ORM, most commonly used with Flask applications (just like we used Prisma for our Express Apps).
Although a deep understanding of the SQLAlchemy ORM is not required for the assignment, the assignment expects you to explore use of this ORM in a web application. This will help to deepen your understanding of ORMs in general, as you navigate another ORM similar to Prisma.
It would help you if you go through this link to have an overview of the SQLALchemy ORM for a good understanding of how it works. This would also help you better understand how the Flipkart clone for the assignment works.
Auth
Many applications require you to sign into your account in order to use the services. Users of the application should see their own data, not someone else's. Similarly, users might have different roles within an application. An admin might be able to see different pages and take different actions than a normal user.
In the news, you frequently hear about hacks and leaks of passwords and user data. Despite how vulnerable companies websites seem to be, it is possible to design secure applications.
This week, you'll learn about the key patterns for authenticating users (verifying they are who they say), and authorizing them to access particular pages and actions within your application. You'll see and learn to recognize some of the common mistakes that developers make in building auth flows, and learn about some schemes to create 'defense in depth' to make sure users can use the features as intended, and no more.
As part of managing authentication, you'll learn about using external services to sign in, and learn more about sending emails from your application.
Authentication and Authorization
There are two key words that both start with "Auth".
Authentication is about verifying who someone is.
Authorization is about granting access, based on who they are.
Read more about the basics of Authentication vs. Authorization from Auth0.
Authentication flows
Before diving into each of the pieces of authentication and authorization in more detail, it's good to have an overview of the basics of the flow.
You've likely signed into applications hundreds or thousands of times, so the steps might be familiar:
- Sign up: Create a new account with the credentials you'll use later on
- Sign in: Enter the credentials, and move to a 'logged in' state
- Logged-in Navigation: Navigate to various pages, with your identity and authorization
- Sign out: move from a 'logged in' state to a 'logged out' state
There are also several other pieces of the authentication and authorization that we will mention, but not cover in depth here:
- Email verification
- Multi-factor authentication
- Forgot password and password reset
- Update email or password
- Revalidation
- Invite or approve users
Illustration: Authentication flows
This image illustrates the requests and responses involved in basic password authentication.

It can get even more complicated than this!
Sign up
Creating an account uses the familiar two-part flow involved in creating any REST resource.
- First, render a form with the necessary inputs
- Then, handle the submission of the form, creating the account
There are lots of considerations when it comes to validating sign up form data, verifying email addresses, and storing passwords that we'll cover in more depth.
Sign in
Sign in relies on the user to remember their credentials and enter them. It's a lot like the sign up form, though frequently asks for less information.
- Render a form with the required inputs
- Check the inputs to see if the credentials match
- If they do, issue a persistent cookie or token to authenticate subsequent requests
Once again, there are lots of nuances to checking the credentials to prevent different kinds of attacks. We'll cover those in greater depth.
Authenticated Navigation
Once the user is logged in, their device stores a cookie or token that authenticates them.
- Requests for other pages include the cookie or token. For cookies, this inclusion is handled automatically by the browser.
- The server checks the cookie or token included with the request and uses that to determine who the user is
- Based on the user, the server grants access to different resources and different abilities.
We'll cover more later about cookies and Authorization (granting different access to different users)
Sign out
Sign out is the simplest part.
A signout route removes the stored identifier (whether that's a cookie or a token), so the user is no longer identified.
Further reading: Sign in forms
Sign in forms are everywhere. Some are nice to use, and some are unfriendly. These pages from web.dev explain how to design sign-in forms that are user-friendly.
Authentication
Authentication is how a user proves they are who they say they are.
Apps can use different combinations of factors to authenticate who a user is. That could mean:
- Credentials: tokens, usernames, email accounts, or passwords
- Device identifiers: cookies, long-lived application sessions, phone numbers, or multi-factor auth
- Third-party services and SSO: using protocols like Oauth for 'Sign in with Github' (or other providers)
As you can see, there are many options, but we will focus on the easiest one - Credentials, particularly with tokens. A token is very large string, like a password, but it's the server that creates it for you. It looks like this:
This is a JWT token. JWT stands for JSON Web Tokens. You can read more about it here. As you can see, JWT tokens have 3 different parts: the header, payload and signature.
You will usually provide your email and password to the server and once the server verifies that the email and password are correct, it will give you back a token (if email or password are incorrect it will return an error).
Once you have this token, you are Authenticated and you will not need to send your email and password every time you want to do a request. You will only need to send the token. This token will prove that you are who you say you are.
This is how we implement this basic flow in Javascript:
1. Setting Up the Environment
Initialize a new Node.js project and install the necessary packages:
npm init -y
npm install express jsonwebtoken
- Express: Web framework for Node.js
- jsonwebtoken: For creating JSON Web Tokens (JWT) for sessions.
2. Registration Process
Step 1: Set up a basic Express server:
const express = require('express');
const app = express();

app.use(express.json()); // For parsing JSON body

app.listen(3000, () => {
  console.log('Server started on http://localhost:3000');
});
Step 2: Implement the registration endpoint:
// In-memory user storage. In a real-world application, replace with a database.
const users = {
  "john@email.com": "password123",
  "jane@email.com": "password456"
};

app.post('/register', (req, res) => {
  const { email, password } = req.body;

  // Store user data (in a real-world application, use a database)
  users[email] = password;

  res.status(201).send('User registered');
});
As you can see:
-
In-Memory User Storage: The code begins by initializing a
usersconstant. This object simulates a storage mechanism by using email-password pairs. In real-world applications, this data would typically be stored in a secure database. -
Endpoint Definition: The code defines an endpoint (
/register) to handle POST requests. This endpoint is responsible for user registration. -
Extract User Credentials: Within the
/registerendpoint, the code extracts theemailandpasswordfrom the incoming request's body using destructuring. -
Store User Data: The provided email and password are stored in the
usersobject. This step mimics storing the user's data in a database. When a new user registers, their email becomes a key in theusersobject, and their password becomes the corresponding value. -
Send a Response: After successfully storing the user's data, the server sends a
201 Createdstatus code along with a message "User registered" to indicate that the registration process was successful.
Storing passwords in plain text, as done above, is not secure. It's highly recommended to hash passwords before storing them.
Step 3: Implement the registration endpoint:
// Endpoint to handle user login
app.post('/login', (req, res) => {
  // Extract email and password from the incoming request body
  const { email, password } = req.body;

  // Fetch the stored password for the given email
  const storedPassword = users[email];

  // Check if the user exists and the provided password matches the stored password
  if (!storedPassword || storedPassword !== password) {
    return res.status(400).send('Invalid email or password');
  }

  // If credentials are valid, generate a JWT token
  const token = jwt.sign({ user: { email } }, 'SECRET_KEY', { expiresIn: '1h' });

  // Send the generated token as the response
  res.json({ token });
});
As you can see:
-
Endpoint Definition: The code starts by defining a
/loginendpoint to handle POST requests. This endpoint is responsible for authenticating users. -
Extract User Credentials: Within the
/loginendpoint, the code extracts theemailandpasswordfrom the incoming request's body using destructuring. -
Retrieve Stored Password: The code then fetches the password associated with the provided email from the
usersobject, mimicking a database query. -
Credential Verification: The system checks if the provided email exists within the
usersobject and if the associated password matches the provided password.- If either condition is not met, the server responds with a
400 Bad Requeststatus and a message "Invalid email or password," indicating a failed login attempt.
- If either condition is not met, the server responds with a
-
Token Generation: If the credentials are valid, the server generates a JSON Web Token (JWT). This token contains a payload with a
userobject that has theemailproperty. The token is signed using a secret key ('SECRET_KEY') and is set to expire in one hour (expiresIn: '1h'). -
Send Token as Response: The server sends the generated JWT as the response in JSON format. This token will typically be used by the client to authenticate subsequent requests, verifying that the user is logged in and has the appropriate permissions.
Normally, when the client of this API recives the token, they will store it in local cookies or local storage to use it later.
Something interesting about the JWT, is that inside of the string is your email, but you need to decrypt it first (we will do that in the next lesson). Actually anyone can decrypt your JWT, but only the server can create one. Go to this video to learn more.
Authorization
The first part of 'auth' (Authentication) is all about proving that a user is who they say they are. In the example, we used a JWT token for this.
The next part, Authorization, is about giving users the right access, based on who they are.
User-specific data
When a user visits the home page, they expect to see their own data - not someone else's.
One key, but subtle, component of Authorization is fetching data based on the current user. Often, web frameworks (like express) will provide a helper to get the current user from the session, which can then be used to look up data for that user.
return {
  posts: currentUser().posts()
}
Usually, Authorization refers to checking that a user has access to particular data. If you fetch data related to the user, the assumption is that they have access to that data.
Basics of Authorization
At it's core, authorization is about if statements. If the user has permission, then continue. If they don't, raise an exception and show a Forbidden response instead of continuing.
Authorization in many apps uses if statements like this, spread throughout the application.
This post from Oso runs through some of the reasons why authorization tends to get complicated.
Let's continue the flow we implemented in the last session and add protected endpoints (endpoints that only authenticated users can use); like getting posts (/posts).
This is the code:
const express = require('express');
const jwt = require('jsonwebtoken');

const app = express();

app.use(express.json());

// Dummy data representing user posts
const userPosts = {
  "john@email.com": ["Post 1", "Post 2"],
  "jane@email.com": ["Post A", "Post B"]
};

// Endpoint to fetch user posts
app.get('/posts', (req, res) => {
  // Extract the token from the request header
  const token = req.headers['authorization'];

  // If no token is provided, deny access
  if (!token) {
    return res.status(403).send('Access denied. No token provided.');
  }

  try {
    // Verify and decode the token
    const decoded = jwt.verify(token, 'YOUR_SECRET_KEY');
    req.user = decoded; // Store decoded payload for subsequent use
  } catch (error) {
    // If token verification fails, deny access
    res.status(400).send('Invalid token.');
  }
  // Extract user email from the decoded token payload
  const userEmail = req.user.email;

  // Fetch posts for the authenticated user
  const posts = userPosts[userEmail];

  // If there are no posts for the user, send an empty array
  if (!posts) {
    return res.json([]);
  }

  // Send the fetched posts as the response
  res.json(posts);
});
As you can see, this endpoint provides a simplified demonstration of how JWT can be used to protect an endpoint and ensure that only authenticated users can access specific resources.
-
Dummy Data Creation: A constant
userPostsis initialized with dummy data to simulate user posts. Each key in this object is an email, and the corresponding value is an array of posts associated with that email. -
Define Endpoint: An endpoint
/postsis defined to handle GET requests. This endpoint fetches posts for authenticated users. -
Token Extraction: Inside the endpoint, the code attempts to extract a JWT token from the
authorizationheader of the incoming request. -
Token Verification: If a token is provided, the code tries to verify and decode it using the
jwt.verifymethod. If the token is valid, the decoded payload is attached to the request object for subsequent use. -
Error Handling:
- If no token is provided in the request, the server sends a
403 Forbiddenresponse with a message "Access denied. No token provided." - If the token verification fails (maybe because it's expired or tampered with), the server sends a
400 Bad Requestresponse with a message "Invalid token."
- If no token is provided in the request, the server sends a
-
Fetch User Posts: After verifying the token, the code extracts the user's email from the decoded payload. It then uses this email to fetch the associated posts from the
userPostsdummy data. -
Send Response:
- If there are no posts associated with the user's email, the server sends an empty array as the response.
- Otherwise, the server sends the fetched posts in JSON format as the response.
Practice: Auth
💡 This is your chance to put what you’ve learned into action.
Try solving these practice challenges to check that you understand the concepts.
Submission
To log your practice for credit:
- Practice exercises will be graded for completion not correctness. You have to document that you did the work, but we won't be checking if you got it right.
- You are encouraged to engage with all the exercises listed on the practice page.
- You are expected to submit only the details requested on the Gradescope submission.
Tutorial: Passwords in PassportJS
Complete the PassportJS tutorial to implement a password authentication strategy:
Passport is a JS library to avoid doing auth flows from scratch (like we did on exercises before)
Final Project: Multi-model CRUD App
For your final project, you'll work with a team to design and build a complete web application.
Team Formation
This is a Team Project. You'll work in groups of 2-3 students to design and build your application.
- You are expected to work with the same group as you did for your mid-term project. If you need to change your group for any reason, then reach out to the instructor.
- Join the same team in Github Classroom. Work on your project together. Ideally, find a time when you can all join a video call and work together on the project. Everyone in the group should have a roughly equal contribution to the project.
- Submit your project as a group in Gradescope.
Join the project on Github Classroom
Note: Do not join a team you have not communicated with ahead of time. If someone joins your team without communicating with you, please reach out to the instructor.
Requirements
- Your application must use Flask or Express.
- Your application must use a relational database.
- Your application must have multiple related database models.
- Your application must have features to Create, Read, Update, and Delete at least some of those models from a web interface.
- Your application must be designed such that it works properly on different devices (desktop and mobile).
- Your application must be deployed to the web.
You must also include a README.md file that
- explains what your app does
- explains the tables in your schema
- explains how to set the app up and run it locally
Optional components
The following are optional, but not required:
- you may use an ORM library
- you may use a CSS framework
- you may use an API
- you may have users and authentication
- you may use a library to manage authentication and authorization.
Presentations
During the final week(s) of class, your team will share your project to the rest of the class.
Record a 5 minute video to share what the application does, explain the code for the features implemented, and share challenges you faced in creating the application.
Submission
For credit, you must:
- Join the same team in Github as your teammates
- Submit your code together in Gradescope
- Submit your project in Anchor
- Submit the link to the video and deployed app here.
Guidelines on the Video Submission
- Length of video should be between 5 to 7 minutes.
- The video should begin with a brief overview/description of your webapp.
- Video should show all the pages of the webapplication (running on a browser).
- Video should contain a code walkthrough, going through all your files.
- Video should show your database and the tables therein, with sample data
- Video should show a full description of using your web app.
- Upload the video to any accessible platform of your choice and submit the link here.
Rubric
| Points | Criteria | Description |
|---|---|---|
| 10 pts | Application runs | Flask or Express app that can start and run without errors |
| 15 pts | Multiple related models | Schema has two or more tables, appropriately related by foreign keys |
| 20 pts | CRUD actions | Can create, read, update, and delete items using the web app interface |
| 10 pts | Works on Mobile | App is styled so that all functionality is available on different screen sizes |
| 10 pts | Application Quality | App is designed clearly and effectively |
| 10 pts | Code Quality | Code is clear, uses good variable names, code style, and clean separation of helper functions |
| 15 pts | Deployment | App is deployed |
| 10 pts | Presentation | Video submission |
| 10 pts | (Bonus) Additional Features | App includes additional features, such as a third-party API or Authentication |
| 100 | Total | 110 possible points with the bonus, scored out of 100 |
Cookies and Sessions
HTTP is a 'stateless' protocol. The requests don't know anything about state on either side of the protocol. Requests and Responses aren't for storing data, they are for transmitting data.
But... state is so useful! It's really helpful for the browser to remember things for you, and for the server to remember things for you. When you click between pages, it's nice for the server to remember who you are and what you've done -- like the items that you've got in your ecommerce shopping cart, or (since it's the topic this week) which user you are signed in as.
That information about a user is typically stored in a session. There are several different ways of building sessions.
This video will help differenciate Cookie vs Token auth flows.
Cookies
Cookies are one of the tools for building sessions. They let the server store a little bit of data in the browser, which the browser will send back on subsequent requests.
Cookies are stored per domain. That means your application will only ever see cookies that it set, and other applications will never see the cookies your application sets.
Cookies are added using the Set-Cookie HTTP header in the response from the server. On subsequent requests, the browser will include the data in the Cookie header.
Here's an example of a cookie flow.
Request:
POST /cart

item_id=fancy_scarf_498
Response:
HTTP/1.1 200 OK
Set-Cookie: cart=fancy_scarf_498

{ "message": "added Fancy Scarf to your cart" }
Request:
GET /view_cart
Cookie: cart=fancy_scarf_498
The first HTTP response set the cookie. Then the browser included Cookie on subsequent requests.
Further Reading: Cookies
Sessions
Sessions contain information about the user's browsing session. There are a few ways to design sessions:
- include the session information in the cookie itself
- store the session information in your database, then store a session id in the cookie
For authentication, it's typical to store information about the user in the session. For several reasons (especially cookie size limitations and server-side session expiration), it's often a good idea to store the session information in a database instead of in the cookie itself.
Typically, that means:
- creating a table called
sessions - saving data in the sessions table when the user signs in
- looking up data from the sessions table based on the data in the cookie
Since this is so common, most frameworks have a way to handle it for you. You configure how the sessions should be stored, and then can access them and add or lookup data in your request handlers.
Since sessions don't have to be saved forever and are written and read more often than other data, many applications use a separate, secondary database for sessions. Key-value stores like Redis are a common choice for session databases.
Session security
The session authenticates the user. That means that if an attacker can get the session, then they can impersonate the user! Cookies are better than other methods for implementing sessions (it's theoretically possible to use a URL parameter or something, but that could lead to several kinds of vulnerabilities).
Session cookies should be encrypted so that only the server can decrypt and understand their contents.
There are also several attributes you can set on Cookies that improve their security:
- The
Secureattribute limits cookies to HTTPS. That prevents insecure networks from leaking the cookie. - The
HttpOnlyattribute prevents JavaScript on the page from accessing the cookie. That's good, because it means that a JavaScript bug will not give the attacker access to the cookie. - The
SameSiteattribute means the cookie will only be included in requests from the same origin. That prevents specific kinds of cross-origin attacks. - The
Domainattribute restricts the domain the cookie is used on, so it will only be sent to your domain. - The
ExpireandMax-Ageattributes will make the cookie expire after some time.
Further reading: Session Management
Read more about best practices on OWASP Cheatsheets: Session Management
Example: Sessions in Flask
By default, if you've set a secret key, Flask will store session data in an encrypted cookie. As discussed, that loses some of the advantages of server-side sessions.
Flask sessions are easy to use:
# add something to the session
session['cart'] = ['fancy_scarf_489']
# read data from the session
cart_items = session['cart']
You can configure the Flask session to store data in a database. This is a bit tricky -- the libraries that handle it for you are small and out of date, and there is a Google name collision with the concept of a session in SQLAlchemy.
Read more in the Flask Docs on sessions, or this blog, Server-side sessions in Flask with Redis.
Example: Sessions in Express
Express requires installing the express-session package, which provides a configurable session implementation. It adds a session key to the request object, so you can read and modify session data like this:
req.session.cart = ['fancy_scarf_489'];
let cartItems = req.session.cart;
The session id is stored in an encrypted cookie, and session data is stored on the server in a session store. The default session store is an in-memory store within the node app. That doesn't work great in a big production app, but there are tons of available options for the session store.
There are lots of packages available for connecting to different backing stores, like connect-redis to connect to Redis for a session store, connect-sqlite3 to connect to SQLite3, or @quixo3/prisma-session-store to use Prisma.
View the list of compatible session stores on the express-session Github page.
Legal history: The cookie popup
You have seen the popup on every website "This site uses cookies, approve / deny". It's the worst!
It's a consequence of the European privacy law, the General Data Protection Regulation (GDPR). Much of the law is good, but the cookie popups are a bane.
Cookies are used for lots of helpful features, but also for tracking users across sites. The EU regulators wanted citizens to be notified and have the ability to opt out of tracking on privacy grounds -- quite reasonable!
However, the implementation of the cookie consent box across every website has made every website worse, without accruing real privacy benefits to end users. It's very easy for sites to include the cookie banner, so they all to. Users have been trained to basically ignore the notice and find the button to dismiss the popup as quickly as possible to get to the content, rendering the protection ineffective.
If you build a website for a company, you will probably use cookies, and someone on the team will be asked to build the cookie consent box. You should do it, because the penalties for non-compliance are bad. Hold in your heart a rebellious spirit that ever yearns to remove the cookie consent box forever.
Bonus: Cryptography
This course isn't about Cryptography, and building secure apps doesn't require learning all the math at work under the hood.
However, as you've seen, Cryptography is key to understanding how secure software works. If you are curious to learn more, here are some links to resources you might start with.
Conference Talks: Cryptographic Wrong Answers
This 2013 talk is a quick 45-minute intro to lots of core ideas in Cryptography:
This 2019 talk is a bit dense, but it walks through lots of cool attacks and provides a cool history of recent cryptography and security on the web:
Oktane 19: Cryptographic Wrong Answers
Blog post: Cryptographic Right Answers
This post from Latacora spells out what cryptographic tools you should use for what problems. Even if you don't understand every word, bookmark it to reference when you're wondering what tool to use.
Latacora: Crypyographic Right Answers
Intro Textbook: Crypto101
If you want to dig into the math and have the appetite for a long pdf:
Practice Breaking Insecure Systems: Cryptopals Challenges
If you want to really understand cryptographic protocols (and how easy it is for attackers to break ones that have flaws), it's helpful to get your hands dirty and write some code.
Further Reading: Cryptography
These are course-length treatments of Cryptography, if you've done the above
Real Web Apps
Real software is alive.
Much of the code you've written so far will not end up running for very long. The applications and services that people use tend to run for a long time, often years or decades.
That has a lot of implications. Instead of optimizing for ease of setting up, systems are optimized for maintenance. Most of the job of software engineers isn't building something from scratch, it's maintaining, fixing, and updating existing code.
This week, you'll learn a bit about the real-world considerations that impact software development. You'll also spend time exploring real-world application code from open-source projects, and catalog patterns you notice, as well as similarities and differences from the web applications you've worked on this term.
There is a lot more to learn about web applications. This week, you'll touch on a few disparate topics that make developers lives easier as they build and manage web applications.
You won't end this week an expert in each of these topics, but you will learn enough to recognize the terms and build a list of further ideas and concepts to explore after the course.
Dealing with Reality
In a class, the code you write lives in a protected space, isolated from reality. That's helpful as you are learning, because it simplifies the demands.
When you write real applications (programs that many people use), there are a number of differences. Some of the biggest ones are:
- real software is often much larger, with many more lines of code, developed by large teams
- real software changes over time: it's alive!
- real software runs on real users' devices and internet
- real software has real users real data
Larger projects, developed by teams
The projects you've built in class take a few days or at most a few weeks, built alone or with a few teammates.
Large applications often have codebases with thousands of contributors over years or decades. The programs are much more complicated, with hundreds, thousands, or millions of files. On such a project, no one knows the details of how every line of code works. Instead, each engineer knows roughly how the relevant systems work, and knows a subset of the application where they have responsibility in great detail.
Working in large teams means using tools to collaborate. There are tons of different tools including the normal collaboration tools like Discord, Zoom, Whatsapp, Calendar, and Email. There are also specific software collaboration tools, including version control like Git and Github, design tools like Figma, planning tools like Asana or Trello, as well as common configuration for code editors and tools for pair programming.
Living Code
In class, you write your code, and then it is finished. There may be multiple parts of the project to tackle, but the requirements are fixed.
Real applications evolve over time, as features are added and removed in response to users' needs. There are tons of implications for this, especially in the tools for managing projects.
As you saw when you deployed your applications, hosting services have tools to redeploy and update the application when you make changes to the main branch on github. They can also create different preview versions of the application, so that teams can test changes internally before releasing them to the world. These are often called the testing or staging environment (as opposed to the local environment on your laptop, or the production environment, which is the live application).
In projects that used the Prisma database, you've seen something called a migration, which represents a change to the database schema. Because databases have to change over time, and the changes themselves are complicated and tied to the application's code, it is common for most database schema development to use migrations.
Real Devices
In class, your code has to run on your computer. Real applications have to run on the server, and the pages have to work on lots of different users' devices.
Servers may have a different operating system or configuration from your laptop. Working on a team, you may have lots of different devices that need to be able to run the application. There are tools like Docker and Vagrant that simulate a standard environment, so that you can be certain that if your application runs on your computer, it can run on the server or on your teammate's computer.
On the client side, there are no tools like Docker that can standardize exactly the way the client-side code will run. Instead, you have to build web applications so that they work well on different browsers, on different devices.
Designing pages to work well across different screen sizes is called Responsive Design. You can use HTML and CSS to shape the content so that it looks 'right' on a monitor, a laptop, or on a phone.
Writing code that works well on different web browsers can also be a challenge. Especially as the web platform changes, some features don't get released to all platforms at the same time. You can browse features and see support across different browsers at Caniuse.
Real internet
Users won't always have a stable internet connection, and they have to pay for data. As a developer it's critical to be aware of what requests your application needs to make and how much data is sent. When possible, design applications offline first so that they can function well, even if there is no data connection.
Localization and Internationalization
Apps have users from lots of different countries and cultures, who speak lots of different languages. Localization and Internationalization (often abbreviated i18n) are the processes of making applications flexible and adaptive to different languages, cultures, regulations, and markets.
Real applications often make use of libraries to translate key parts of the page (like the text on the buttons or the navigation menu) into different languages, to suit their users.
Further Reading: Contending with Reality
Reality is complex. Applications have to negotiate and manage that complexity. If you are curious, read these links to expand your perspective on the world that applications have to contend with.
Falsehoods Programmers Believe About Names explores different assumptions about names that might be designed into an application or database system. Because names are complicated, they are difficult to 'get right', and sometimes it's not even clear what it would mean to get it right! For more lists of falsehoods, you can check out awesome-falsehoods.
What happens when you load a URL is a common interview question and one of the diagrams you've drawn in this course and in the Web Foundations course. The blog post dives much deeper into the topic, and explores things on the hardware and network level. The diagram we've drawn in class leaves out a lot of details! There is a follow-up github repository with a comprehensive answer: https://github.com/alex/what-happens-when.
Exploring Real Web Apps
'Real' web applications are different from the applications you've worked with in this course. They follow the same principles, but they tend to be much larger, much longer-lived, and have much larger teams working on them. They also have users! All of those factors change the way the code tends to look.
These large open-source projects illustrate the similarities and differences between the web apps you've worked with in this course and applications that have been around for a long time with lots of users.
Explore the applications below.
Real Flask Apps
- FlaskBB is a forum-hosting application built using Flask.
- Apache Airflow is a workflow tool, for creating and monitoring automated tasks. The web interface is built in flask: airflow/www.
Real companies use Flask internally: Companies that use Flask and more.
Real Express Apps
- JSBin is a code snippet hosting platform. It lets users create and share snippets of code.
- Strapi is a browser tool for creating APIs.
Real companies use Express too! See this list of companies using Express.
Other frameworks
There are lots of web frameworks. If you are curious to explore real web applications in other languages or frameworks, you can take a look at:
- Organization for Transformative Works, which is a large, long-running application using Ruby on Rails.
- MediaWiki, which is a popular wiki hosting software built using PHP.
If you find another large, long-lived open source application to add to this list, share it!
What is next: Frontend
We've taken a deep dive into learning web applications, however it was mainly focused on what we can not see - the backend.
However, there's a new world waiting for you: Frontend Development.
A New World of Interactivity
Imagine visiting a website, what do you immediately see and interact with... The captivating animations or colors, that is the job of frontend development. It's all about creating an interactive, user-friendly interface that users love.
Journey into JavaScript
While you might have encountered JavaScript before, in our upcoming frontend development course, we'll revisit this powerful language, diving deeper into its potential. JavaScript is the magic behind those interactive elements, dynamic content updates, and even some games you might play on the web.
The Era of React
Ever heard of Facebook, Instagram, or Airbnb? These are just a few examples of big-name companies using React, a popular JavaScript library, for their user interfaces. In our frontend course, we'll dive deep into React, introducing you to components, hooks, and the state management techniques that have modernized web app development.
The Expansive JS Ecosystem
JavaScript isn't limited to the browser. From mobile apps to browser extensions, JavaScript has stretched its wings everywhere. We'll explore these avenues and introduce you to exciting libraries and tools.
In Conclusion
While our journey in this web application development course has been enlightening, the next step into frontend development promises to be exciting.
So, gear up for a new adventure and let's dive into the world of frontend development! 🚀🌟
Practice: Case Study
This is an individual project. You are expected to submit your own solution, not to work with a partner or team.
For your final assignment, you will investigate two real-world web applications, and answer questions about how they work. You'll get to see for yourself the similarities and differences between the applications you've worked with so far in this course and the codebases for living applications with thousands of users.
Instructions
- Follow the links to read more about the applications
- Clone the application, install dependencies, and follow the Getting started instructions to run the code on your laptop
- Answer the questions about each application
Submission
Complete the questions on the Gradescope Assignment to get credit for this assignment.
Redash
Redash is an open-source browser-based data tool. From the description:
Redash is designed to enable anyone, regardless of the level of technical sophistication, to harness the power of data big and small.
Redash is a large, active Flask application with years of development.
Ghost
Ghost is an open-source blogging and newsletter platform, built on Express.
Turn your audience into a business. Publishing, memberships, subscriptions and newsletters.
It's one of the go-to options for building a newsletter or blog. You can also learn a lot about how a large, widely-used Express app works by reading the source.